background image

         Smartphone User Manual

3.

 Using your  camera

38

2.

 Press 

Capture

, the camera hardware button or 

Action

.

3.

 When 

fi

 nished press 

Stop

.

Sending, deleting, saving as photo 

contact and  renaming immediately after 

capture

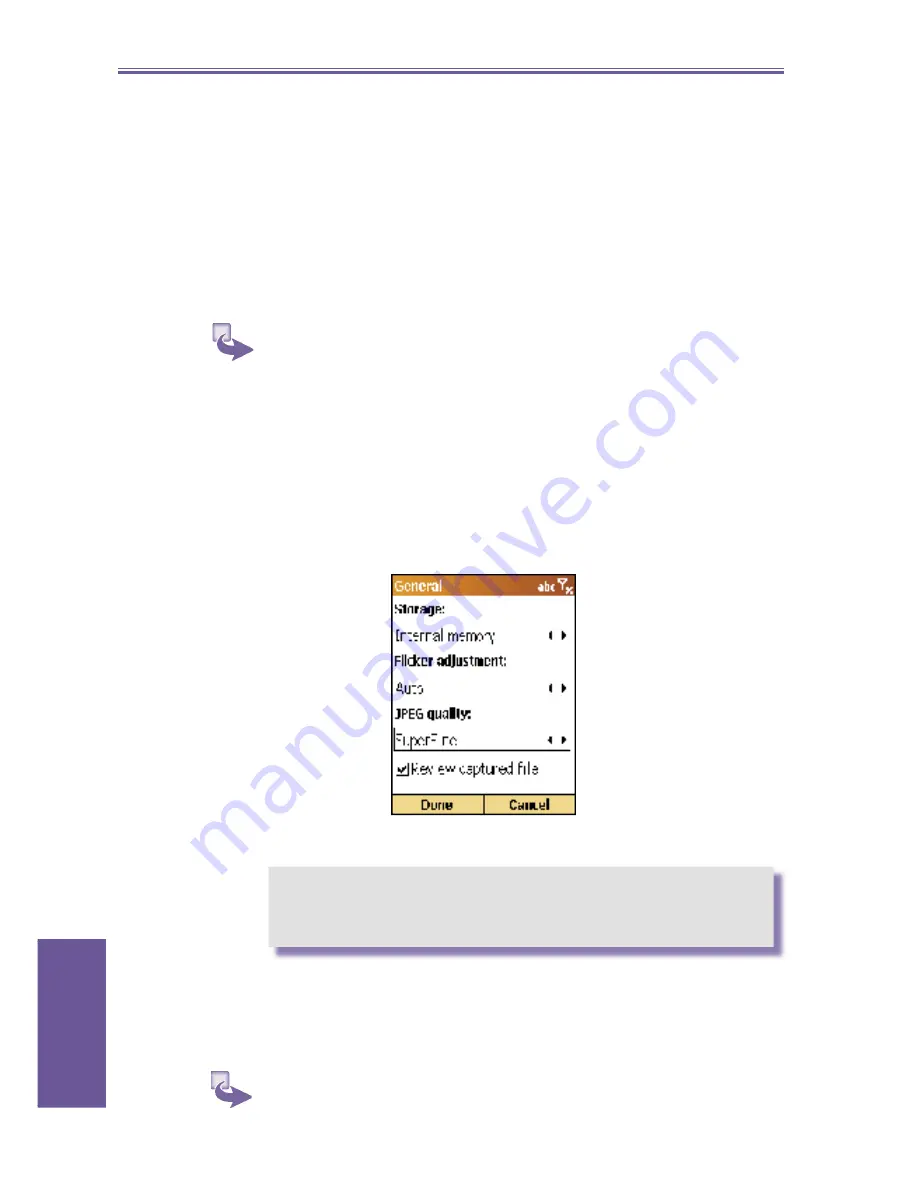
1.

 Press 

Menu

, then 

Options

General

, and check 

Review 

captured 

fi

 le

.

2.

 Take a picture.

3.

 In the con

fi

 rmation screen, press 

Back

 to con

fi

 rm  and 

return to the camera. To 

delete

send

, s

ave as Photo 

Contact

 or rename press 

Menu,

 then follow the options 

there.

Reviewing after capturing doesn't include the option to 
view properties, zoom or rotate. You must go to Album 
Thumbnails to do that.

Going to the last captured 

fi

 le and 

editing

1.

 In 

Camera

 press the 

#

 key.

Содержание Windows Mobile SmartPhone

Страница 1: ...Smartphone User Manual C 2003 All rights reserved The names of actual companies and products mentioned herein may be the trademarks of their respective owners...

Страница 2: ...information see Step 2 Charge the battery in Quick Start Guide TO TURN ON YOUR SMARTPHONE PRESS AND HOLD THE POWER BUTTON FOR 3 SECONDS DO NOT REMOVE THE BATTERY PACK WHEN THE DEVICE IS CHARGING WHEN...

Страница 3: ...ng a call 24 2 2 Receiving a call 26 2 3 In call options 27 2 4 Retrieving a voice mail message 28 2 5 Reviewing your calls 29 2 6 Shortcuts speed dials 30 2 7 Advanced dialing options 32 2 8 Switchin...

Страница 4: ...90 Chapter 6 Contacts Calendar and Tasks 6 1 Using Contacts 96 6 2 Using Calendar 101 6 3 Using Tasks 105 6 4 Photo Contacts 109 Chapter 7 Synchronizing information 7 1 Understanding ActiveSync 116 7...

Страница 5: ...Chapter 1 Getting Started 1 1 Knowing your smartphone 1 2 Status indicators 1 3 Battery 1 4 Accessories 1 5 Navigating 1 6 Entering text and numbers 1 7 Securing your phone...

Страница 6: ...y Function description 1 LED indicator Solid green Battery is fully charged Solid red Battery is empty Solid amber Battery is charging Flashing green blinking every second Notification Flashing green...

Страница 7: ...en to music or talk hands free insert the earphone jack here 9 Pound key Pressing and holding the pound key displays a list of symbols 10 Asterisk Pressing and holding the asterisk key switches betwee...

Страница 8: ...ss the Power button to turn on the phone When the phone is on Press the power button to access the Quick List Press and hold the power button to turn off the phone 3 Camera button Press to launch the...

Страница 9: ...Indicator Meaning New email New voice mail New instant message Voice call active Data call active Call forwarding Call on hold Missed call Line 2 Battery level Low battery No battery Signal strength...

Страница 10: ...ates will vary Your smartphone contains a lithium ion battery pack There is a risk of fire and burns if the battery pack is handled improperly Do not disassemble crush puncture short external contacts...

Страница 11: ...tphone comes with a USB cradle This allows you to recharge your smartphone as well as synchronize information between your smartphone and a PC using ActiveSync To synchronize the USB Cradle must be pl...

Страница 12: ...The USB cable allows you to syn chronize with your desktop without the cradle The DC converter in the head also allows you in combination with an AC adapter to recharge your device DC connector The D...

Страница 13: ...n stick to the direction as described in the table below Action Navigation Press up Moves the selection focus upward on the screen Press down Moves the selection focus downward on the screen Press rig...

Страница 14: ...t profile When you scroll to one of these items and press the navigation stick the associated program opens On the bottom left side of the Home screen is the Programs menu Pressing the soft key for th...

Страница 15: ...it in and then release letting the card spring out Using the soft keys There are two soft keys on your phone located directly below the display screen Each soft key performs the command displayed imme...

Страница 16: ...nt and press the Action button Using numbers You can also use numbers to quickly navigate to programs and settings on your phone Just press the number on the keypad that corresponds to the number show...

Страница 17: ...in the title bar The following table shows the complete list of input mode status indicators Entering text in Multipress mode When you are in Multipress mode you can enter a letter by pressing the num...

Страница 18: ...press 2 and then press 8 To enter punctuation in Multipress mode press 1 repeatedly until you see the punctuation mark that you want To change the Multipress time out 1 On the Home screen select Start...

Страница 19: ...efault to Numeric mode Miscellaneous input tasks 1 To enter a space In Multipress or T9 mode press the key 2 To start a new line Press the Action button 3 To change between uppercase and lowercase in...

Страница 20: ...ton The left soft key will display Unlock indicating that your phone is locked 2 To unlock your keypad On the Home screen press the Unlock soft key and press the key Locking your phone Locking your ph...

Страница 21: ...hone Lock and then press the Done soft key Locking the SIM card Locking your SIM Subscriber Identity Module card prevents you from using the phone but you can still turn it on and a Press the Power bu...

Страница 22: ...n the Home screen press the Start soft key select Settings select More select Security select Enable SIM Lock and then press the Action key Enter your PIN1 password and then press the Done soft key 2...

Страница 23: ...phone 2 1 Making a call 2 2 Receiving a call 2 3 In call options 2 4 Retrieving a voice mail message 2 5 Reviewing your calls 2 6 Shortcuts speed dials 2 7 Advanced dialing options 2 8 Switching to yo...

Страница 24: ...card to find a matching number When you see the name of the person you want to call listed select it and press the Talk button Making a call from Contacts 1 To make a call by contact name Press the St...

Страница 25: ...tacts and then press the Action button b Select the contact to call and press hte Action button c Select the number you want to call and press the Talk button For more information about contact list a...

Страница 26: ...and or your phone To place an emergency call Dial the emergency number appropriate for your location and press the Talk button 2 2 Receiving a call When you receive a call the name and number of the c...

Страница 27: ...the Accept soft key or the Talk button to accept the incoming call Rejecting a Call Waiting call If you are already talking on the phone when you receive a call and you don t want to answer it press t...

Страница 28: ...ystem is then dialed Menu option Function End Disconnects the call Hold Places the active call on hold Unhold Activates the call on hol Swap Switches between two call Save Contacts Creates a contact f...

Страница 29: ...story and then press the Action button You can filter Missed Calls Incoming Calls and Outgoing Calls Press the Menu soft key select Filter press the Action button and select the filter you want 2 To v...

Страница 30: ...Timers is useful for keeping track of your calling patterns for example to determine what type of calling plan you want It can also help you estimate your monthly billing You can reset Call Timers to...

Страница 31: ...address or Web page address that is stored in Contacts Creating a speed dial for a phone number 1 On the Home screen press the Start soft key select Contacts and then press the Action button 2 Select...

Страница 32: ...then press the Action button 2 Select the shortcut to delete press the Menu soft key select Delete and then press the Action button 2 7 Advanced dialing options The following information covers advanc...

Страница 33: ...key Inserting a manual pause in a dialing sequence There may be phone numbers that require a pause longer than three seconds in the dialing sequence For these cases you can pause as long as you want a...

Страница 34: ...Wait press the Talk button to continue the dialing sequence 2 8 Switching to your Bluetooth headset You can switch between your Bluetooth headset and your device during a call 1 Press and hold the Ho...

Страница 35: ...Chapter 3 Using your camera 3 1 Camera and Video Recorder 3 2 Album...

Страница 36: ...nd image for your Home screen For still image capture you can specify a capture size the destination storage media for saved files rename them after capturing them and an output quality the output for...

Страница 37: ...format Audio formats Capturing a picture 1 Go to Camera 2 Press Capture the camera hardware button or Action 3 The file is saved immediately in the JPEG file format to the storage media filename conve...

Страница 38: ...tions General and check Review captured file 2 Take a picture 3 In the confirmation screen press Back to confirm and return to the camera To delete send save as Photo Contact or rename press Menu then...

Страница 39: ...hen Zoom Select 1x 2x or 3x then press Action 2 Go to Camera or Video Recorder then press the navigation stick up or down Submode Capture Size Setting Zoom Video 176 x 144 1x 3x 352 x 288 1x Image 160...

Страница 40: ...w the screen 3 Press the navigation stick to the left or right to adjust the level then press the OK soft key Switching to Grayscale Sepia Cool effects 1 Go to Camera or Video Recorder press the Menu...

Страница 41: ...ning off and on audio or changing the Image filename prefix 1 Go to Camera or Video Recorder press the Menu soft key then Options 2 In Options select Image make an adjustment then Done Adjusting for d...

Страница 42: ...iewing area can be panned into view Flip up down flip left right rotate left rotate right view in actual one to one pixel size or fit to window For your convenience many of the functions can be activa...

Страница 43: ...Action to view or play it back 2 Press Menu then View and Zoom In Zoom Out or Rotate if it is a video file first press Stop make your changes then Play Viewing properties 1 In Thumbnail view press Me...

Страница 44: ...played b Change the direction of rotation c Change the order of play d Opt to keep backlight on during the slide show e Opt for full screen when playing the slide show Viewing all your options In Thum...

Страница 45: ...Decide between Descending and Ascending 3 Thumbnails has the following options a Select a size for thumbnails b Select to show index number or information c Go to Association to select the type of fi...

Страница 46: ...Smartphone User Manual 3 Using your camera 46...

Страница 47: ...Chapter 4 Personalizing your phone 4 1 Changing settings 4 2 Bluetooth 4 3 Data Connections...

Страница 48: ...our calls more efficiently and more Viewing Settings 1 On the Home screen press the Start soft key select Settings and then press the Action button 2 To view the remaining settings select More and pre...

Страница 49: ...Options Enables you to change phone numbers such as your voice mail and SMS service center answer incoming calls by pressing any key and other advanced call options Call Waiting Enables you to turn Ca...

Страница 50: ...navigation stick left or right to select your sound and then press the Done soft key You can also select the sound to use by selecting the item you want to customize and then pressing the Action butt...

Страница 51: ...en press the Action button b Select the profile press the Action button to set the profile and then press the Done soft key You can also select a different profile using the Quick List Press the Power...

Страница 52: ...gs On the Home screen press the Start soft key select Settings select Home Screen and then press the Action button Customizing the Home screen with your own image a Go to where your image file is stor...

Страница 53: ...een About The About screen displays information about your phone s operating system including version numbers and copyright information To view About settings On the Home screen press the Start soft k...

Страница 54: ...e incoming beams The Smartphone receives all incoming beams from other devices until you clear this option Certificates On your Smartphone you can add and delete public key certificates These certific...

Страница 55: ...delete a certificate scroll to it in the list select Menu and then select Delete 6 To view details about a certificate select it in the list Date and Time Date and Time settings enable you to change...

Страница 56: ...s files appoint ments tasks and contact cards between devices that have Bluetooth capabilities For example if you and a co worker each have a device with Bluetooth you can beam items between your devi...

Страница 57: ...iscoverable a On the Home screen select Start and then Settings b Select Bluetooth c Scroll to Discoverable d Select Done By default the Bluetooth radio is turned off If you turn it on and then turn o...

Страница 58: ...Your device searches for other Bluetooth devices and displays them in the list e Scroll to the device you want and select Add f In PIN enter a PIN of between 1 and 16 characters and select Done g Ente...

Страница 59: ...on with the other device 3 To rename a bond a Select Start Settings and then select Bluetooth b Select Menu and then Bonded Devices c Scroll to the bond to rename d Select Menu and then Rename e In Na...

Страница 60: ...select Settings select Data Con nections and then press the Action button Dial up connection You need to set up a Dial up connection to connect directly to the Internet or to your corporate network 1...

Страница 61: ...tion button c Select Dial up Connections and press the Action button d Press the Menu soft key select Add and then press the Action button e Under Description enter a name for the connection a name f...

Страница 62: ...d to access the Internet using an existing connection to your corporate or a WAP network GPRS connection If there is GPRS coverage in your area you can set up a GPRS connection to access your corporat...

Страница 63: ...5 Messaging features 5 1 Setting up accounts 5 2 Sending e mail MMS and SMS messages 5 3 Receiving e mail MMS and SMS messages 5 4 Viewing your message folders 5 5 Managing your Inbox 5 6 Instant mes...

Страница 64: ...7 Synchronizing information 2 By connecting to a POP3 or IMAP4 e mail server to send and receive Internet e mail messages You may set up an Internet e mail account as follows a On the Home screen sele...

Страница 65: ...count that you set up l In Network scroll to the type of network that your e mail server runs on and select Next m Enter information about your e mail servers and select Next If you are not sure what...

Страница 66: ...t account you used displays b Scroll right or left to switch to the account you want 3 To change e mail account options a On the Home screen select Start and then Inbox b If necessary scroll right or...

Страница 67: ...ync email 3 In To enter recipient e mail addresses or SMS numbers Insert a semicolon between multiple addresses or SMS numbers You can only enter SMS numbers in an SMS message and e mail addresses in...

Страница 68: ...then unified as one SMS message after all of the small SMS messages have been received You can quickly enter e mail addresses or SMS numbers from your contact cards In To press the Action key and sel...

Страница 69: ...and receive mail SMS messages are sent immediately Inserting predefined text into SMS and e mail messages To save time entering text you can insert predefined text into messages You can edit the pred...

Страница 70: ...ge area of an e mail message select Menu 2 Select Insert Recording 3 Select Record and start speaking into the Smartphone microphone 4 When finished speaking select Stop Select Done You can send only...

Страница 71: ...gnature a On the Home screen select Start and then Inbox b Select Menu and then Options c Select Signatures d If necessary scroll right or left to switch to the account for which to stop inserting a s...

Страница 72: ...end and receive mail SMS messages are sent immediately Requesting a delivery receipt You can request a delivery receipt for an SMS message When you do this you receive an SMS message to confirm that y...

Страница 73: ...croll right or left to switch to the Internet e mail account for which you want to send and receive messages 3 Select Menu and then Send Receive The Smartphone connects to your Internet e mail server...

Страница 74: ...ction button 2 Press the New soft key choose MMS from the new menu 3 Enter a SMS number in the To field or select a name from Contacts by pressing Menu then Add Recipient 4 Press menu then select an o...

Страница 75: ...s soft key select Inbox New MMS and then press the Action button b Press Menu Insert and then select Picture from the pop up menu c Select an image from the list and then the Select soft key 2 To capt...

Страница 76: ...rt a sound clip a On the Home screen press the Programs soft key select Inbox New MMS and then press the Action button b Press Menu Insert and then select Sound from the pop up menu c Press the Menu s...

Страница 77: ...ecide how long the message stays on the recipient s server before it is deleted you can ask for confirmation of delivery confirmation of when the message is read give the message a type such as Advert...

Отзывы: