HQ Power NEBULA 150 Скачать руководство пользователя страница 4

VDP150CC2

 4  VELLEMAN 

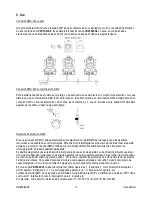
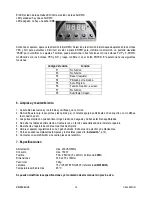
The LED next to the LED display indicates the status of the DMX signal. 
LED flashing: DMX signal present. 
LED off: no input DMX signal. 


After powering on the device the display shows the DMX start address. Set the desired start address by means of the 
YES/NO buttons to increase or decrease the address. Press the ENTER button to confirm. The display will show 

“PASS” to confirm your settings. Other functions can also be selected by means of F-DOWN and F-UP buttons, 
changed by means of the NO, YES buttons and confirmed by means of the ENTER button. The device has these 
functions:  
 

Function Code 

Corresponding Function 

F1 No 

function 

F2 No 

function 

F3 Reset 
F4 Music 

Control 

F5 Auto 

Program 

F6 

Master – Slave Function 

F7 No 

Function 

F8 Display 

up/down 


6. Cleaning and Maintenance 

 
1.  All screws should be tightened and free of corrosion. 
2.  The housing, the lenses, the mounting supports and the installation location should not be deformed, modified or 

tampered with e.g. do not drill extra holes in mounting supports, do not change the location of the connections, … 

3.  Mechanically moving parts must not show any signs of wear and tear. 
4.  The electric power supply cables must not show any damage. Have a qualified technician maintain the device. 
5.  Disconnect the device from the mains prior to maintenance activities. 

6.  Wipe the device regularly with a moist, lint-free cloth. Do not use alcohol or solvents. 
7.  There are no user-serviceable parts, apart from the lamp and the fuse (see “

4. Installation

” on p.2). 

8.  Contact your dealer for spare parts if necessary. 


7. Technical Specifications 

 
Power Supply 

max. 230VAC/50Hz 

Power Consumption 

max. 150W 

Fuse 

F 3A, 250VAC (5 x 20mm) (order code 

FF3N

Dimensions 

330 x 270 x 160mm 

Total Weight 

3.2kg 

Lamp 

15V / 150W EFR GZ6.35 (order code 

LAMP150/15

Max. Ambient Temperature 

45°C 


The information in this manual is subject to change without prior notice. 

Содержание NEBULA 150

Страница 1: ...onnect the device from the mains to clean it or when it is not in use Handle the power cord by the plug only There may be some smoke or a particular smell when the device is activated for the first ti...

Страница 2: ...er cap in the housing c Mounting the Device Have the device installed by a qualified person respecting EN 60598 2 17 and all other applicable norms The construction to which the device is attached sho...

Страница 3: ...t address so that the correct device responds to the signals This digital start address is the channel number from which the device listens to the digital commands from the DMX controller The start ad...

Страница 4: ...osion 2 The housing the lenses the mounting supports and the installation location should not be deformed modified or tampered with e g do not drill extra holes in mounting supports do not change the...

Страница 5: ...rek nooit aan de kabel voordat u het toestel reinigt en als u het niet gebruikt Wanneer u het toestel voor het eerst gebruikt kan dit gepaard gaan met een lichte rookontwikkeling en een bepaalde geur...

Страница 6: ...er de oude zekering en breng de nieuwe in 3 Plaats de zekeringhouder terug in de behuizing en zet hem vast c Toestel monteren Laat een geschoolde technicus dit toestel installeren conform EN 60598 2 1...

Страница 7: ...digitaal startadres nodig zodat het juiste toestel op bepaalde signalen reageert Dit digitale startadres is het kanaalnummer van waarop het toestel luistert naar de signalen van de DMX controller De...

Страница 8: ...n 2 De behuizing de lenzen de montagebeugels en de montageplaats bv het plafond of het gebinte mogen niet vervormd zijn of aangepast worden geen extra gaten in montagebeugels aansluitingen niet verpla...

Страница 9: ...d alimentation si n cessaire D branchez l appareil s il n est pas utilis ou pour le nettoyer Tirez la fiche pour d brancher l appareil non pas le c ble La premi re mise en service peut s accompagner...

Страница 10: ...appareil Un technicien qualifi doit installer l appareil en respectant EN 60598 2 17 et toute autre norme applicable La construction portante de l appareil doit tre capable de supporter 10 x le poids...

Страница 11: ...appareils r agissent sur les signaux de contr le corrects Cette adresse de d part num rique indique le num ro de canal sur lequel l appareil coute le contr leur DMX Entrez cette adresse de d part ave...

Страница 12: ...ent pas 2 Le bo tier les lentilles les supports de montage et la construction portante ne peuvent pas tre d form s adapt s ou bricol s p ex pas de trous additionnels dans un support ne pas d placer le...

Страница 13: ...nsi n indicada en las especificaciones No aplaste el cable de alimentaci n y prot jalo contra da os por alg n tipo de superficie afilada Si es necesario pida a su distribuidor reemplazar el cable de a...

Страница 14: ...del conector de alimentaci n 2 Quite el fusible fundido y reempl celo 3 Vuelva a colocar el portafusibles en su lugar y atorn llelo c Montaje del aparato Respete la directiva EN 60598 2 17 y toda nor...

Страница 15: ...del cual el aparato empieza a escuchar la se al DMX emitida por el controlador DMX Introduzca esta direcci n inicial con los interruptores DIP en la parte posterior del aparato Es posible elegir entr...

Страница 16: ...e bien las tuercas y los tornillos y verifique que no corren 2 No modifique la caja los soportes y las pticas p ej no taladre agujeros adicionales en un soporte o no modifique las conexiones etc 3 Las...

Страница 17: ...t geerdet sein Der elektrische Anschluss darf nur von einer Fachkraft durchgef hrt werden Vergewissern Sie sich dass die anzuschlie ende Netzspannung nicht h her ist als die Netzspannung beschrieben i...

Страница 18: ...t einer h heren Leistungsangabe ein Lampen mit einer h heren Leistung entwickeln h here Temperaturen f r die das Ger t nicht ausgelegt ist Ersetzen Sie eine verformte oder besch digte Lampe durch eine...

Страница 19: ...s darf nur von einer Fachkraft durchgef hrt werden Schlie en Sie das Ger t ber den Stecker an das Netz an Lichteffekte sollten im Allgemeinen nicht ber Dimmerpacks geschaltet werden Die Installation m...

Страница 20: ...adresse mit den DIP Schaltern Die Kodierung ist bin r DIP Schalter 1 hat Wert 1 DIP Schalter 2 hat Wert 2 Schalter 3 hat 4 Schalter 4 hat 8 usw Zum Beispiel Wenn die Startadresse 95 sein soll ist die...

Страница 21: ...l oder irgendwelche L sungsmittel 7 Au er Lampen und Sicherung gibt es keine zu wartenden Teile siehe 4 Installation S 18 19 8 Bestellen Sie eventuelle Ersatzunterteile bei Ihrem Fachh ndler 7 Technis...

Отзывы: