HQ Power NEBULA 150 Скачать руководство пользователя страница 3

VDP150CC2

 3  VELLEMAN 

5. Use 


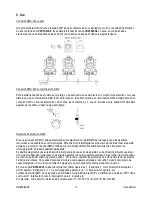
DMX-512 control connection 

 
Connect the provided XLR cable to the female 3-pin XLR output of your controller and the other side to the male 3-

pin XLR input of the 

VDP150CC2

. You can chain multiple 

VDP150CC2

's together through serial linking. The cable 

needed is a two core, screened cable with XLR input and output connectors. Please refer to the diagram below. 


DMX-512 connection with DMX termination 

 
For installations where the DMX cable has to run a long distance or is in an electrically noisy environment, such as in 
a discotheque, it is recommended to use a DMX terminator. This helps in preventing corruption of the digital control 
signal by electrical noise. The DMX terminator is simply an XLR plug with a 120 

 resistor connected between pins 2 

and 3, which is then plugged into the output XLR socket of the last fixture in the chain. Please see illustrations below. 


Projector DMX start address selection 

 
All DMX-controlled devices need a digital start address so that the correct device responds to the signals. This digital 
start address is the channel number from which the device “listens” to the digital commands from the DMX controller. 
The start address/channel number is set by means of the DIP switches located at the back of the device. 
You can set the same start address for a whole group of devices or enter an individual one for every device. 
When using one single address, all the units will “listen” to the control signal on one particular channel. In other 

words: changing the settings of one channel will affect all devices simultaneously. If you set different addresses, 
each device will “listen” to a separate channel number. Changing the settings of one channel will only affect the 
device in question. 
In the case of the 

VDP150CC2

, a 1 channel device, you will have to set the start address of the first unit to 1, the 

second unit to 2 (1 + 1), the third unit to 3 (2 + 1), and so on. The DMX start address is defined by the DIP switches. 
The encoding is binary: DIP switch 1 has value 1, switch 2 has value 2, switch 3 is 4, switch 4 is 8, etc. 
For example, if the start address were 95, the settings would be 111110100 (1+2+4+8+16+0+64+0+0=95). 

Содержание NEBULA 150

Страница 1: ...onnect the device from the mains to clean it or when it is not in use Handle the power cord by the plug only There may be some smoke or a particular smell when the device is activated for the first ti...

Страница 2: ...er cap in the housing c Mounting the Device Have the device installed by a qualified person respecting EN 60598 2 17 and all other applicable norms The construction to which the device is attached sho...

Страница 3: ...t address so that the correct device responds to the signals This digital start address is the channel number from which the device listens to the digital commands from the DMX controller The start ad...

Страница 4: ...osion 2 The housing the lenses the mounting supports and the installation location should not be deformed modified or tampered with e g do not drill extra holes in mounting supports do not change the...

Страница 5: ...rek nooit aan de kabel voordat u het toestel reinigt en als u het niet gebruikt Wanneer u het toestel voor het eerst gebruikt kan dit gepaard gaan met een lichte rookontwikkeling en een bepaalde geur...

Страница 6: ...er de oude zekering en breng de nieuwe in 3 Plaats de zekeringhouder terug in de behuizing en zet hem vast c Toestel monteren Laat een geschoolde technicus dit toestel installeren conform EN 60598 2 1...

Страница 7: ...digitaal startadres nodig zodat het juiste toestel op bepaalde signalen reageert Dit digitale startadres is het kanaalnummer van waarop het toestel luistert naar de signalen van de DMX controller De...

Страница 8: ...n 2 De behuizing de lenzen de montagebeugels en de montageplaats bv het plafond of het gebinte mogen niet vervormd zijn of aangepast worden geen extra gaten in montagebeugels aansluitingen niet verpla...

Страница 9: ...d alimentation si n cessaire D branchez l appareil s il n est pas utilis ou pour le nettoyer Tirez la fiche pour d brancher l appareil non pas le c ble La premi re mise en service peut s accompagner...

Страница 10: ...appareil Un technicien qualifi doit installer l appareil en respectant EN 60598 2 17 et toute autre norme applicable La construction portante de l appareil doit tre capable de supporter 10 x le poids...

Страница 11: ...appareils r agissent sur les signaux de contr le corrects Cette adresse de d part num rique indique le num ro de canal sur lequel l appareil coute le contr leur DMX Entrez cette adresse de d part ave...

Страница 12: ...ent pas 2 Le bo tier les lentilles les supports de montage et la construction portante ne peuvent pas tre d form s adapt s ou bricol s p ex pas de trous additionnels dans un support ne pas d placer le...

Страница 13: ...nsi n indicada en las especificaciones No aplaste el cable de alimentaci n y prot jalo contra da os por alg n tipo de superficie afilada Si es necesario pida a su distribuidor reemplazar el cable de a...

Страница 14: ...del conector de alimentaci n 2 Quite el fusible fundido y reempl celo 3 Vuelva a colocar el portafusibles en su lugar y atorn llelo c Montaje del aparato Respete la directiva EN 60598 2 17 y toda nor...

Страница 15: ...del cual el aparato empieza a escuchar la se al DMX emitida por el controlador DMX Introduzca esta direcci n inicial con los interruptores DIP en la parte posterior del aparato Es posible elegir entr...

Страница 16: ...e bien las tuercas y los tornillos y verifique que no corren 2 No modifique la caja los soportes y las pticas p ej no taladre agujeros adicionales en un soporte o no modifique las conexiones etc 3 Las...

Страница 17: ...t geerdet sein Der elektrische Anschluss darf nur von einer Fachkraft durchgef hrt werden Vergewissern Sie sich dass die anzuschlie ende Netzspannung nicht h her ist als die Netzspannung beschrieben i...

Страница 18: ...t einer h heren Leistungsangabe ein Lampen mit einer h heren Leistung entwickeln h here Temperaturen f r die das Ger t nicht ausgelegt ist Ersetzen Sie eine verformte oder besch digte Lampe durch eine...

Страница 19: ...s darf nur von einer Fachkraft durchgef hrt werden Schlie en Sie das Ger t ber den Stecker an das Netz an Lichteffekte sollten im Allgemeinen nicht ber Dimmerpacks geschaltet werden Die Installation m...

Страница 20: ...adresse mit den DIP Schaltern Die Kodierung ist bin r DIP Schalter 1 hat Wert 1 DIP Schalter 2 hat Wert 2 Schalter 3 hat 4 Schalter 4 hat 8 usw Zum Beispiel Wenn die Startadresse 95 sein soll ist die...

Страница 21: ...l oder irgendwelche L sungsmittel 7 Au er Lampen und Sicherung gibt es keine zu wartenden Teile siehe 4 Installation S 18 19 8 Bestellen Sie eventuelle Ersatzunterteile bei Ihrem Fachh ndler 7 Technis...

Отзывы: