HQLP10014
V. 03 – 24/11/2017
2
©Velleman nv
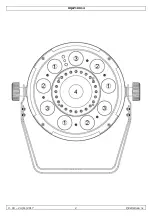
Страница 1: ...HQLP10014 SHOWPAR SPECIAL FX RGBW USER MANUAL 6 HANDLEIDING 11 MODE D EMPLOI 16 MANUAL DEL USUARIO 21 BEDIENUNGSANLEITUNG 26...
Страница 2: ...HQLP10014 V 03 24 11 2017 2 Velleman nv...
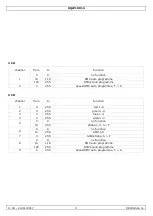
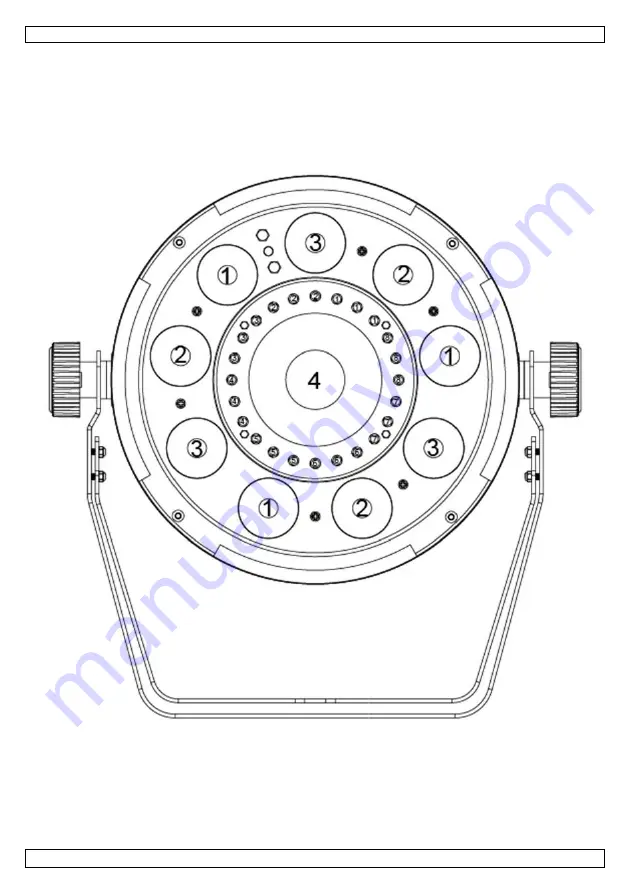
Страница 3: ...2 0 255 speed DMX auto programme F S 9 CH channel from to function 1 0 255 red 1 4 2 0 255 green 1 4 3 0 255 blue 1 4 4 0 255 white 1 4 5 0 9 no function 10 255 strobe 1 4 S F 6 0 9 no function 10 25...
Страница 4: ...red 4 7 0 255 green 4 8 0 255 blue 4 9 0 255 white 4 10 0 9 no function 10 255 strobe 4 S F 11 0 9 no function 10 255 SMD 1 12 0 9 no function 10 255 SMD 2 13 0 9 no function 10 255 SMD 3 14 0 9 no fu...
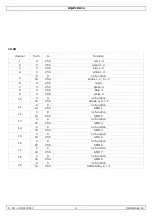
Страница 5: ...5 red 4 15 0 255 green 4 16 0 255 blue 4 17 0 255 white 4 18 0 9 no function 10 255 strobe 4 S F 19 0 9 no function 10 255 SMD 1 20 0 9 no function 10 255 SMD 2 21 0 9 no function 10 255 SMD 3 22 0 9...
Страница 6: ...maged it shall be replaced by a special cord or cord exclusively available from the manufacturer or his service agent All cords and cables should be routed so that they will not be walked on or pinche...
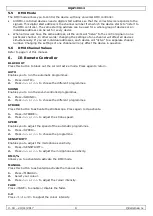
Страница 7: ...ld responsible for any damage extraordinary incidental or indirect of any nature financial physical arising from the possession use or failure of this product 4 Installation 4 1 General Guidelines Hav...
Страница 8: ...29CH d001 d484 29 channels 19CH d001 d494 19 channels 9CH d001 d504 9 channels 2CH d001 d512 2 channels static colours C C01 21 static colours auto mode Auto Au1 7 auto programme sound mode Soun So1...
Страница 9: ...annel Values Refer to page 3 of this manual 6 IR Remote Controller BLACK OUT Press this button to black out the current active mode Press again to return AUTO Enables you to run the automatic programm...
Страница 10: ...rt from the fuse and the lamp Refer to an authorized dealer for service and or spare parts Replacing the fuse 1 Unplug the device s power cord from the outlet 2 Let the device cool down 3 Remove the r...
Страница 11: ...eer het toestel niet in gebruik is of voordat u het toestel reinigt Houd de voedingskabel altijd vast bij de stekker en niet bij de kabel Indien de voedingskabel beschadigd is dan moet deze door de fa...
Страница 12: ...waarvoor het gemaakt is De garantie vervalt automatisch bij ongeoorloofd gebruik De garantie geldt niet voor schade door het negeren van bepaalde richtlijnen in deze handleiding en uw dealer zal de ve...
Страница 13: ...Menu door de opties scrollen naar boven in het menu scrollen naar onder in het menu scrollen Enter een optie bevestigen 5 2 Menu modus programma omschrijving DMX modus 29CH d001 d484 29 kanalen 19CH d...
Страница 14: ...ding 6 IR afstandsbediening BLACK OUT Druk om de huidige actieve modus uit te schakelen Druk nogmaals om terug te keren AUTO Druk om de automatische programma s uit te voeren 1 Druk op AUTO 2 Druk op...
Страница 15: ...Contacteer uw verdeler voor eventuele reserveonderdelen De zekering vervangen 1 Ontkoppel het toestel van het lichtnet 2 Laat het toestel afkoelen 3 Verwijder het deksel achterkant met een geschikte s...
Страница 16: ...le d alimentation est endommag demander au fabricant ou son agent de service de le remplacer Disposer les c bles de telle mani re que personne ne puisse marcher ou tr bucher dessus particuli rement au...
Страница 17: ...impr vus ou indirects quelles que soient la nature financi re corporelle etc caus s par la possession l utilisation ou le dysfonctionnement de ce produit 4 Installation 4 1 Directives g n rales L appa...
Страница 18: ...9CH d001 d504 9 canaux 2CH d001 d512 2 canaux couleurs statiques C C01 21 couleurs statiques mode automatique Auto Au1 7 programme automatique mode contr l par la musique Soun So1 7 mode contr l par...
Страница 19: ...age 3 de ce mode d emploi 6 T l commande IR BLACK OUT Appuyer pour d sactiver le mode actif Appuyer nouveau pour retourner AUTO Appuyer pour ex cuter les programmes automatiques 1 Appuyer sur AUTO 2 A...
Страница 20: ...r le fusible 1 D brancher le c ble d alimentation 2 Laisser refroidir l appareil 3 Retirer le couvercle arri re avec un tournevis appropri 4 Ouvrir le porte fusible 5 Remplacer le fusible d fectueux p...
Страница 21: ...do pida a un distribuidor o centro de servicio t cnico autorizado reemplazarlo Instale los cables de tal manera que nadie pueda pisarlos ni puedan quedar atrapados por objetos situados encima o contra...
Страница 22: ...inarios ocasionales o indirectos sea cual sea la ndole financiera f sica etc causados por la posesi n el uso o el fallo de este producto 4 Instalaci n 4 1 Normas generales Deje que un t cnico cualific...
Страница 23: ...H d001 d504 9 canales 2CH d001 d512 2 canales static colours C C01 21 colores est ticos auto mode Auto Au1 7 programa autom tico sound mode Soun So1 7 programa controlado por la m sica speed SPEE SP1...
Страница 24: ...3 de este manual del usuario 6 Mando a distancia IR BLACK OUT Pulse este bot n para desactivar el modo actual Vuelva a pulsar para volver AUTO Pulse este bot n para iniciar los programas autom ticos 1...
Страница 25: ...ontacte con su distribuidor si necesita piezas de recambio Reemplazar el fusible 1 Desconecte el aparato de la red el ctrica 2 Deje que el aparato se enfr e 3 Quite la tapa de la parte trasera con un...
Страница 26: ...Sie das Ger t bei Nichtbenutzung und vor jeder Reinigung vom Netz Fassen Sie dazu den Netzstecker an der Grifffl che an und ziehen Sie nie an der Netzleitung Ist das Netzkabel besch digt so muss es d...
Страница 27: ...e das Ger t nur f r Anwendungen beschrieben in dieser Bedienungsanleitung Bei falscher Anwendung dieses Ger tes erlischt der Garantieanspruch Bei Sch den die durch Nichtbeachtung der Bedienungsanleitu...
Страница 28: ...odus mit einem DMX 512 Controller 5 1 Bedienfeld Bedienen Sie das Bedienfeld mit den vier Tasten im Display Men durch die Optionen im Men scrollen nach oben im Men scrollen nach unten im Men scrollen...
Страница 29: ...zur ckzukehren AUTO Dr cken Sie diese Taste um die automatischen Programme zu starten 1 Dr cken Sie AUTO 2 Dr cken Sie auf oder um zwischen den verschiedenen Programmen zu schalten SOUND Dr cken Sie...
Страница 30: ...lle Ersatzteile bei Ihrem Fachh ndler Die Sicherung ersetzen 1 Trennen Sie das Ger t vom Netz 2 Lassen Sie das Ger t abk hlen 3 Entfernen Sie den Deckel R ckseite mit einem geeigneten Schraubendreher...
Страница 31: ...volledig terug te betalen In dat geval krijgt u een vervangend product of terugbetaling ter waarde van 100 van de aankoopsom bij ontdekking van een gebrek tot n jaar na aankoop en levering of een ver...
Страница 32: ...de transporte de y a Velleman si el aparato ya no est cubierto por la garant a Cualquier art culo que tenga que ser reparado tendr que ser devuelto a su distribuidor Velleman Devuelva el aparato con l...