


HQLP10014
V. 03 – 24/11/2017
14
©Velleman nv
5.5
DMX-modus
In DMX-modus kunt u het toestel aansturen via een universele DMX-controller.
Alle DMX-gestuurde toestellen hebben een digitaal startadres nodig zodat het juiste toestel reageert
op de signalen. Dit digitale startadres is het kanaalnummer van waarop het toestel luistert naar het
signaal van de DMX controller. U kunt één enkel startadres gebruiken voor een groep toestellen of u
kunt per toestel een nieuw startadres ingeven.
Wanneer u een enkel startadres instelt, zullen alle toestellen ‘luisteren’ naar hetzelfde kanaal. Met
andere woorden: Wanneer u de instellingen voor 1 kanaal verandert, zullen alle toestellen er tegelijk
op reageren. Wanneer u verschillende adressen instelt, dan luistert elk toestel naar een ander
kanaal. Wanneer u de instellingen van een kanaal verandert, zal enkel het toestel op dat kanaal
reageren.
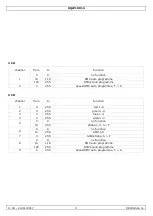
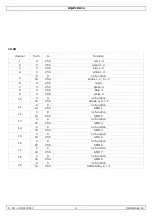
5.6
DMX-waarden per kanaal
Zie pagina 3 van deze handleiding.
6.
IR-afstandsbediening
BLACK OUT
Druk om de huidige actieve modus uit te schakelen. Druk nogmaals om terug te keren.
AUTO
Druk om de automatische programma's uit te voeren.
1.
Druk op <AUTO>.
2.
Druk op <+> of <-> om tussen de verschillende programma's te schakelen.
SOUND
Druk om de muziekgestuurde programma's uit te voeren.
1.
Druk op <SOUND>.
2.
Druk op <+> of <-> om tussen de verschillende programma's te schakelen.
STROBE
Druk om de stroboscoop in te schakelen. Druk nogmaals om uit te schakelen.
1.
Druk op <STROBE>.
2.
Druk op <+> of <-> om de stroboscoopsnelheid in te stellen.
SPEED
Druk om de snelheid van de automatische programma's in te stellen.
1.
Druk op <SNELHEID>.
2.
Druk op <+> of <-> om het programma te kiezen.
SENSITIVITY
Druk om de microfoongevoeligheid in te stellen.
1.
Druk op <SENSITIVITY>.
2.
Druk op <+> of <-> om de microfoongevoeligheid in te stellen.
DMX/%
Druk op de DMX-modus te activeren/deactiveren.
MANUAL
Druk om de manuele modus te activeren/deactiveren.
1.
Druk op <MANUAL>.
2.
Selecteer de gewenste kleur.
3.
Druk op <+> of <-> om de kleurintensiteit in te stellen.
FADE
Druk op <FADE> om de fader in- of uit te schakelen.
1-9
Druk op <1> tot <9> om te kleurintensiteit in te stellen.
Содержание HQLP10014
Страница 2: ...HQLP10014 V 03 24 11 2017 2 Velleman nv...


