background image

English

37

3   Troubleshooting Your PC

HP DiagTools Hardware Diagnostics Utility

Starting the 
Diagnostics Utility

To start DiagTools:

1

Insert the DiagTools diskette into the floppy drive. 

2

Quit all applications, shut down the operating system and restart 
your PC. On restarting, this utility will run automatically, displaying 
the Welcome screen.

3

Press F2 to continue and follow the instructions on-screen to carry 
out the diagnostic tests.

This utility will automatically detect the complete hardware 
configuration of your system before any tests can be performed.

Basic System Tests

To verify the correct operation of your system's hardware, you will need 
to carry out the Basic System Tests.

Advanced System 
Tests

To perform more in-depth testing of your system’s individual 
components, you can use the Advanced System Tests. 

NOTE

The advanced system tests are suitable for intermediate and advanced 
users only.

Support Ticket

To produce a complete record of your system’s configuration and test 
results, you will need to create a Support Ticket. This can then be sent, 
via email or fax, to your local or HP-dedicated Support Agent.

For more information on how to use this utility, refer to the 

Vectra 

Hardware Diagnostics User's Guide

, available on the HP World Wide 

Web Site, at


http://www.hp.com./go/vectrasupport/

.

Содержание Vectra VL6 8

Страница 1: ...HP Vectra VL series 8 User s Guide ...

Страница 2: ...e or use of this material This document contains proprietary information that is protected by copyright All rights are reserved No part of this document may be photocopied reproduced or translated to another language without the prior written consent of Hewlett Packard Company AdobeTM and AcrobatTM are trademarks of Adobe Systems Incorporated Microsoft MS MS DOS Windows and Windows NT are U S regi...

Страница 3: ...User s Guide PN D5908 90001 ...

Страница 4: ...or your safety always connect the equipment to a grounded wall outlet Always use a power cord with a properly grounded plug such as the one provided with this equipment or one in compliance with your national regulations This PC is disconnected from the power by removing the power cord from the power outlet This means the PC must be located close to a power outlet that is easily accessible For you...

Страница 5: ... Your PC s Hardware Control Panel 10 Using Your HP Enhanced Keyboard 11 Using Your HP Enhanced Mouse 12 Starting and Stopping Your PC 13 Starting the PC for the First Time 13 Initializing Your Software 13 After Your PC Has Restarted 14 Changing the Operating System 14 Starting Your PC 15 Stopping Your PC 16 Using Power Management 17 Using Security Features 17 Additional Information and Help 18 On ...

Страница 6: ...r 23 Replacing the Cover after Installing Accessories 24 Moving and Replacing the Power Supply 25 Moving the Power Supply 25 Replacing the Power Supply 26 Installing Memory 27 Installing Main Memory 27 Installing Mass Storage Devices 29 Connecting Devices 29 Installing Accessory Boards 32 PCI Slot Numbers Used in the PC s Setup Program 32 Installing the Board 33 Configuring Accessory Boards with P...

Страница 7: ...s Displayed on the Screen 39 Other Display Problems 39 If Your Keyboard Does Not Work 40 If Your Mouse Does Not Work 40 HP Setup Program 41 Hewlett Packard Support and Information Services 42 Regulatory Information 46 HP General Hardware Warranty 49 HP Software Product License Agreement and Software Product Limited Warranty 51 Physical Characteristics 53 Power Consumption 53 Acoustic Noise Emissio...

Страница 8: ...vi English ...

Страница 9: ...1 Setting Up and Using Your PC ...

Страница 10: ...r vertically on its side with the floppy drive at the top 3 Position the PC so that its rear connectors are easily accessible 4 Refer to the display s manual for information about the display Operating System Your PC s operating system is preloaded on your PC s hard disk drive and is set up when you start your PC for the first time Installation Tools No tools are required to set up your PC However...

Страница 11: ...nnector labeled Parallel 25 pin parallel connector for a parallel printer Serial 9 pin serial connector for a serial printer NOTE The Universal Serial Bus USB connectors can be used for USB accessories Most USB accessories are automatically configured as soon as they are physically attached to the PC USB is not supported by all operating systems although it is supported by the latest version of Wi...

Страница 12: ...ork Administrator know you are connecting your PC to the network Connect the network cable to the RJ 45 UTP Unshielded Twisted Pair LAN connector Once you have connected the network cable to your PC you must enable your network connection in the PC s Setup program To enter the PC s Setup program press during start up 10 100BT Connector ...

Страница 13: ... HP enhanced keyboard and a multimedia rear panel 1 Connect the HP enhanced keyboard to the PC NOTE When you connect the black keyboard jack to the rear of the PC the PC s internal speaker is deactivated You can then connect headphones or speakers to the rear of the keyboard to have sound go to the next step Redmicrophone socket Black speaker socket Red jack Black jack Standard keyboard connector ...

Страница 14: ...ay permanently damage your hearing Before putting on headphones place them around your neck and turn the volume down When you put on the headphones slowly increase the volume until you find a comfortable listening level and leave the volume control in that position 2 Connect the microphone and headphones speakers to the keyboard The speakers and microphone shown here are not supplied with your PC ...

Страница 15: ...ltimedia Accessories Some Models Only 3 Connect any remaining audio accessories such as a joystick or hi fi equipment to the multimedia rear panel The audio accessories shown here joystick musical instrument and hifi equipment are not supplied with your PC ...

Страница 16: ...ower by removing the power cord from the power outlet This means the PC must be located close to a power outlet that is easily accessible 1 Some models have a voltage selection switch as shown in the diagram below If your PC does not have a voltage selection switch go directly to step 2 If your PC does have a voltage selection switch a Remove the warning label covering the computer s power connect...

Страница 17: ...country before connecting the power supply cord To know if your PC has a voltage selection switch refer to the previous page 2 Connect the power cords to the display and the computer The connectors are shaped to go in one way only 3 Connect the display s power cord and the computer s power cord to a grounded outlet Display Power Cord Computer Power Cord Grounded Outlet ...

Страница 18: ...r on and off Hard Disk Activity Light This light glows flickers when your hard disk drive is being accessed The hard disk activity light will also work if you install a second IDE hard disk drive supplied by HP However if you replace this drive with a SCSI hard disk drive the hard disk activity light is not used Power on Status Light Flashes in Sleep Mode Hard Disk Activity Light Power On Off Butt...

Страница 19: ...nd your PC Access HP TopTools and customer information NOTE The HP enhanced keyboard requires the correct driver This driver is provided with all Windows NT 4 0 and Windows 95 preloaded systems The driver is only available for Windows NT 4 0 and Windows 95 Menu Key Press the Menu key to display the QuickLaunch keys of the HP enhanced keyboard on your screen Click any of the keys on the screen to d...

Страница 20: ...unctions Scrolling In a Windows application push the mouse wheel forwards to scroll down and backwards to scroll up Zooming In a Microsoft Office 97 compatible application hold the Ctrl key down and then push the mouse wheel forwards to zoom in enlarge and backwards to zoom out reduce Configuring the Mouse Using the mouse setup you can reassign each mouse button and the combination button wheel to...

Страница 21: ...lts To initialize your software 1 Turn on the display first and then the PC When the PC is switched on the Vectra Logo is displayed The PC performs a Power On Self Test POST Press if you want to view the POST details in the HP Summary Screen If an error is detected during the Power On Self Test the PC will automatically display the error You may be prompted to press to start the Setup program to c...

Страница 22: ...ils Changing the Operating System If you change the operating system used by your PC ensure that the PnP Operating System field in the Setup program is correctly set If you are using the preinstalled operating system this field should already be correctly set If you are using a Plug and Play operating system such as Windows 95 set the PnP Operating System field in the Main menu of the Setup progra...

Страница 23: ...om go vectrasupport When you switch on the computer it carries out the Power On Self Test POST while the Vectra logo is displayed If you wish to view the POST details press to get the HP Summary Screen If there is an error in the POST the error will automatically be displayed For more details refer to the Upgrade and Maintenance Guide This guide can be downloaded from HP s web site at http www hp ...

Страница 24: ...ng system if necessary and then press the power button on the control panel Stopping Your PC in Windows NT 4 0 or Windows 95 With some operating systems such as Windows 95 or Windows NT 4 0 the PC will automatically switch off when you shut down the operating system Refer to the operating system manual for details on how to shut down or exit the operating system ...

Страница 25: ...on Using Security Features Your PC s security features enable you to protect your PC from unauthorized use by using passwords Software Passwords NT Lock and HP Lock NT Lock the HP utility preloaded with Windows NT 4 0 and HP Lock the HP utility preloaded with Windows 95 allow you to set and use passwords For more information consult the online help by clicking the Start button and then clicking Pr...

Страница 26: ...formation by clicking the Start button and then clicking Programs HP Info Working Comfortably Using Sound describes how to get the most out of your sound system some models only For Windows NT 4 0 and Windows 95 users you can access this information by clicking the Start button and then clicking Programs HP Info Using Sound On Your PC On the HP Web Site The HP web site contains a wide range of inf...

Страница 27: ...training information for support and maintenance personnel Network Administrator s Guide network driver installation information for network administrators Service Handbook Chapters information on upgrade and replacement parts including HP part numbers The Upgrade and Maintenance Guide The Upgrade and Maintenance Guide is a downloadable document in Acrobat PDF format It contains detailed informati...

Страница 28: ...de and Maintenance Guide before installing any accessories in your PC NOTE To view and print the Upgrade and Maintenance Guide you must have Adobe s Acrobat Reader on your PC The Acrobat Reader comes preloaded on all Windows 95 and Windows NT 4 0 systems You can also download the Acrobat Reader free of charge from Adobe s web site Downloading The Upgrade and Maintenance Guide To download the guide...

Страница 29: ... In Your PC This chapter provides summary information about installing accessories in your PC For more detailed information refer to the Upgrade and Maintenance Guide available on HP s web site at http www hp com go vectrasupport ...

Страница 30: ...only 32 MB kit SDRAM 64 MB kit SDRAM 128 MB kit SDRAM 256 MB kit SDRAM Up to Four Accessory Boards Some slots may come with pre installed boards One or Two Free Front Access Device Shelves Zip Drive Tape Drive CD ROM Drive already installed on some models This space can be used For a Supplementary Hard Disk Drive or For a PCI Accessory Board ...

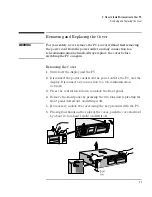
Страница 31: ...ain Removing the Cover 1 Switch off the display and the PC 2 Disconnect the power cords from the power outlets the PC and the display Disconnect any connection to a telecommunication network 3 Press the central latch down to unlock the front panel 4 Remove the front panel by pressing the two tabs down pivoting the front panel downward and lifting it off 5 If necessary unlock the cover using the ke...

Страница 32: ...hen you replace the cover 3 Ensure that the cover lock is unlocked 4 Lower the cover onto the computer aligning the front of the cover with the inner front edge of the computer frame and firmly slide it forwards into position 5 If required lock the cover using the key 6 Replace the front panel by first inserting the two lower hinges then pivoting it upwards into place The two tabs will click into ...

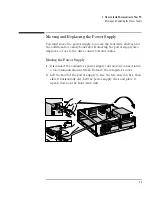
Страница 33: ...ory board slot Removing the power supply also improves access to the drive connectors and cables Moving the Power Supply 1 Disconnect the computer s power supply cord and any connection to a telecommunication network Remove the computer s cover 2 Lift the front of the power supply to free the two side catches then slide it horizontally out Lift the power supply clear and place it upside down on th...

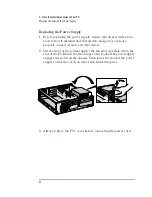
Страница 34: ...d and that all data and power cords are properly connected and correctly routed 2 Lift the front of the power supply the fan end and slide it into the rear of the PC Ensure that the hinge on the back of the power supply engages the notch on the chassis Then lower the front of the power supply so that the catch on either side slides into place 3 Always replace the PC s cover before connecting the p...

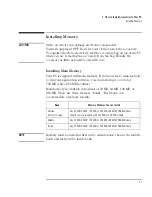
Страница 35: ...you need more main memory to run your application software you can install up to a total of 768 MB three 256 MB modules Main memory is available in modules of 32 MB 64 MB 128 MB or 256 MB There are three memory banks Each bank can accommodate a memory module NOTE Memory must be installed first in the outside bank then in the middle bank and lastly in the inside bank Bank Memory Modules You can Ins...

Страница 36: ...r with the slot s socket Slide the memory module into the slot at 90 to the system board NOTE If you need to remove a main memory module release the retaining clips and pull the module forward and out of the socket 4 Install any other accessories before replacing the cover Reconnect all cables and power cords 5 Check the HP Summary Screen to verify the new configuration To see the HP Summary scree...

Страница 37: ...M drive and a tape drive Up to two hard disk drives can be installed in your PC NOTE You can install a non IDE hard disk drive or CD ROM device but it will need an accessory board cable and driver software usually supplied with the device Contact the product vendor for further information Connecting Devices If you add a Zip drive hard disk drive CD ROM drive or tape drive you need to connect it to...

Страница 38: ...eled HDD For optimum performance use this cable to connect IDE hard disk drives that are Ultra ATA compatible A second Enhanced IDE drive cable that supports up to two IDE devices If you install a CD ROM drive or a Zip drive connect it to this cable This cable is labeled CD ROM The third cable is non IDE and has one connector for a floppy drive Up to four IDE devices can be connected to the system...

Страница 39: ...1 Bootable hard disk drive 2 CD ROM drive Master connector HDD Cable Master connector CD ROM Cable 2 Hard disk drives 1 CD ROM drive 1 Bootable hard disk drive 2 Second hard disk drive 3 CD ROM drive Master connector HDD Cable Slave connector HDD Cable Master Connector CD ROM Cable 1 Hard disk drive 1 CD ROM drive 1 Zip drive 1 Bootable hard disk drive 2 CD ROM drive 3 Zip drive Master connector H...

Страница 40: ...ull length 16 bit ISA board Slot 4 the bottom slot can be used for a half length 16 bit ISA board Slot 5 is a supplementary slot It is under the power supply and can be used for half length 32 bit PCI boards Alternatively this space can be used for a hard disk drive PCI Slot Numbers Used in the PC s Setup Program Your PC uses logical slot numbers in the Setup program You only need to know these PC...

Страница 41: ...and I O addresses are used by PC components such as the keyboard the communications ports network adapters and accessory boards Windows 95 Operating systems that support Plug and Play such as Windows 95 will automatically detect a newly installed Plug and Play accessory board and install the driver for this device if the driver is available Windows NT 4 0 For operating systems that do not support ...

Страница 42: ...p www hp com go vectrasupport Some operating systems such as Windows 95 can display the IRQs and I O addresses currently used by your PC Refer to the operating system documentation for more information Refer to the documentation supplied with the operating system for details on your operating system s capabilities and restrictions concerning non Plug and Play accessory boards Resetting the PC s Co...

Страница 43: ...er provides summary information that can help you solve problems you may encounter when using your PC For more detailed information refer to the Upgrade and Maintenance Guide available on HP s web site at http www hp com go vectrasupport ...

Страница 44: ...ctra PC users must first install the latest version of this utility and then ensure it is ready for use For more information about how and where to install this utility refer to the Vectra Hardware Diagnostics User s Guide available on the HP web site in PDF Adobe Acrobat format It is important that you use the latest version of this utility to diagnose hardware related problems If you do not HP d...

Страница 45: ...e performed Basic System Tests To verify the correct operation of your system s hardware you will need to carry out the Basic System Tests Advanced System Tests To perform more in depth testing of your system s individual components you can use the Advanced System Tests NOTE The advanced system tests are suitable for intermediate and advanced users only Support Ticket To produce a complete record ...

Страница 46: ...C follow this procedure 1 Check that the computer and display are turned on The power light should be illuminated 2 Check the display s contrast and brightness settings 3 Make sure that all cables and power cords are firmly plugged in 4 Make sure the power outlet is working If the problem continues contact the people in your organization who support and maintain the PCs on your network ...

Страница 47: ...g is Displayed on the Screen If nothing is displayed on the screen but the PC starts and the keyboard and other peripheral devices seem to operate properly 1 Ensure that you have entered the correct password if one is required to use this PC 2 Check that the display s brightness and contrast controls are properly set 3 Ensure that the display video cable is correctly connected 4 Make sure that the...

Страница 48: ...case get your keyboard repaired or replace it 5 If you are using the QuickLaunch keys of HP s enhanced keyboard ensure that you are using the correct driver This driver is provided with all Windows NT 4 0 and Windows 95 preloaded systems and is only available for Windows NT 4 0 and Windows 95 If Your Mouse Does Not Work 1 Ensure that the mouse is correctly connected to the the mouse connector and ...

Страница 49: ...ectra logo appears on your display press This will take you to the HP Summary Screen The Summary Screen will appear for only a short time To retain the screen indefinitely until you decide to leave it press The summary screen shows the basic configuration of your PC such as the amount of main memory To Go to the Setup Program To go immediately into the Setup program while the Vectra logo appears o...

Страница 50: ...reliability to give you many years of trouble free service To ensure that your computer system maintains its reliability and to keep you up to date with the latest developments HP and a worldwide network of trained and authorized resellers provide comprehensive service and support To learn more about HP service and support please refer to the support web site http www hp com go vectrasupport ...

Страница 51: ...connector 6 help online 18 HP Lock 17 HP Setup program 41 HP Summary screen 41 HP Support Information Services 42 HP Web site 18 I I O addresses used by your PC 19 IDE cables 29 IDE drives 29 connecting 29 information finding additional 18 HP services 42 initializing software 13 installing accessories 21 accessories types 22 accessory boards 32 accessory boards detailed 19 CD ROM drive 19 external...

Страница 52: ...n Data parameter in Setup 34 S scrolling using mouse 12 security cable installing 19 security features using 17 Setup program 41 software initializing 13 license agreement 13 starting and stopping PC 13 PC 15 PC for the first time 13 stopping PC 16 Summary screen 41 support HP 42 system board switches 19 T tape drive installing 19 technical information 19 tools required for installation 2 troubles...

Страница 53: ...Regulatory Information and Warranty ...

Страница 54: ...1994 EN61000 3 3 1995 FCC Title 47 CFR Part 15 Class B 2 ICES 003 Issue 2 VCCI 2 1 AS NZ 3548 1992 Supplementary information The product herewith complies with the requirements of the following Directives and carries the CE marking accordingly The EMC directive 89 336 EEC amended by the directive 93 68 EEC The Low Voltage Directive 73 23 EEC 1 The product was tested in a typical configuration with...

Страница 55: ...move the PC s cover without first removing the power cord and any connection to a telecommunication network Always replace the cover before switching on again Si le cordon secteur n est pas livré avec votre ordinateur utiliser un cordon secteur en accord avec votre code electrique national USA utiliser un cordon secteur UL listed de type SVT Canada utiliser un cordon secteur certifié CSA Pour votr...

Страница 56: ...enlos zurückgenommen um sie einer Verwertung bzw Entsorgung zuzuführen Notice for Japan This equipment is in the Class B category information technology equipment based on the rules of the Voluntary Control Council For Interference by Information Technology Equipment VCCI Although aimed for residential area operation radio interference may be caused when used near a radio or TV receiver Read the i...

Страница 57: ...is covered by the HP Software Product Limited Warranty located in your HP product manual HP does NOT provide support for this product configured as a network server We recommend HP NetServers for your network server requirements Unless otherwise stated and to the extent permitted by local law hardware products may contain remanufactured parts equivalent to new in performance or parts which may hav...

Страница 58: ...RE HEREBY LIMITED TO THE DURATION OF THE EXPRESS WARRANTY SET FORTH ABOVE Exclusive Remedy TO THE EXTENT ALLOWED BY APPLICABLE LOCAL LAW THE REMEDIES IN THIS WARRANTY STATEMENT ARE YOUR SOLE AND EXCLUSIVE REMEDIES EXCEPT AS INDICATED ABOVE IN NO EVENT WILL HP BE LIABLE FOR LOSS OF DATA OR FOR DIRECT SPECIAL INCIDENTAL CONSEQUENTIAL INCLUDING LOST PROFIT OR OTHER DAMAGE WHETHER BASED IN CONTRACT TO...

Страница 59: ...edges and agrees that the software may have been developed by a third party software supplier named in the copyright notices included with the software who shall be authorized to hold the Customer responsible for any copyright infringement or violation of this Agreement PRODUCT RECOVERY CD ROM If your computer was shipped with a product recovery CD ROM i The product recovery CD ROM and or support ...

Страница 60: ...em Non HP Software All pre installed and bundled Non HP software is warranted by the software vendor and is not warranted by HP Removable Media If supplied HP warrants the removable media if supplied upon which this product is recorded to be free from defects in materials and workmanship under normal use for a period of NINETY 90 DAYS from the date of purchase In the event the media proves to be d...

Страница 61: ...ches Depth 44 6 cm 17 5 inches Footprint 0 194 m2 2 08 ft2 Storage temperature 40 ºC to 70ºC 40 ºF to 158 ºF Storage humidity 8 to 80 relative non condensing at 40ºC 104 ºF Operating temperature 10 ºC to 40ºC 50 ºF to 104 ºF Operating humidity 15 to 80 relative Power supply Input voltage 100 127 V 200 240V ac some models have voltage selection switch Input frequency 50 60 Hz Maximum output power 1...

Страница 62: ... Windows 95 and Windows NT 4 0 Operating System User s Guide This manual How to Install Accessories In Your PC Summary information only Upgrade and Maintenance Guide for this PC http www hp com go vectrasupport Reference Find out about the different support options available and how to troubleshoot your computer HP Documentation MIS Kit for this PC http www hp com go vectrasupport Provides trainin...

Отзывы: