background image

5

EN

Section 2 


Getting Started

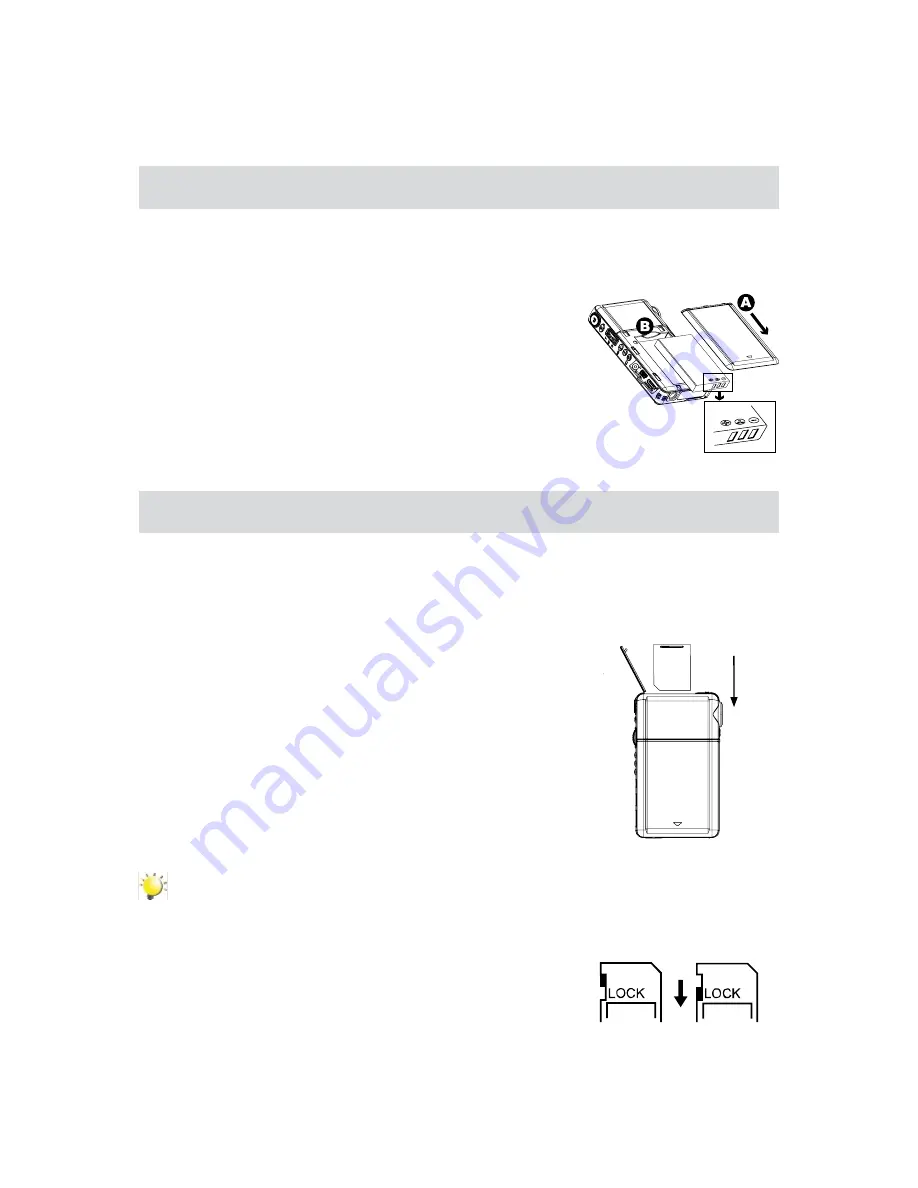
Loading the Battery

Before using the camera, users must load Lithium-ion rechargeable battery.

Follow the arrow A direction and slide to eject the battery cover.

1. 

Insert the battery following to the correct polarity marks ( + or -).

2. 

Close the battery cover firmly.

3. 

Inserting and Removing an SD Card

The camera comes with internal memory which allows you to store pictures and movies. You can expand 
the memory capacity by using an SD memory card. 

Insert the memory card into the right position. Please refer to the figure.

1. 

To remove an installed SD card, press the card inwards 

2. 

to release it.
When the card pops out, gently remove it from its slot.

3. 

Recommended memory capacity: 1GB above

4. 

  Note

When a memory card is fitted, movies/pictures are saved on card rather than on the built-in 

• 

memory.

Protecting data on an SD card: 

• 

S

D card is read-only 

by locking the SD card. No pictures and movies  can 
be recorded when the SD card is locked. Make sure 
the lock is on writeable position before recording any 
media.

Writeable 

position

Write-Protected 

Position

Содержание V5040U

Страница 1: ...HP V5040U Digital Camcorder User Manual ...

Страница 2: ...ayback Mode 17 Section 5 Setting Your Camera 25 Section 6 Viewing Pictures and Movies on a TV 29 Section 7 Viewing Pictures and Movies on PC 30 Section 8 Burning the Recorded Clip into DVD 31 Section 9 Uploading Video Files to YouTube 33 Section 10 Specifications and System Requirement 37 Section 11 Troubleshooting 39 Section 12 Getting Help 40 ...

Страница 3: ...ding feature With the exclusive built in YouTube Direct application you can upload the videos captured by the camera to YouTube more effortlessly ISO speed and color balance can either be adjusted automatically or allowed to be changed manually A 4x digital zoom increases you control over the movies and pictures you take The built in memory allows you to take pictures and video without memory card...

Страница 4: ...e Button Down Button TV Out Port Picture Shutter Button RECORD PLAY mode toggle RETURN Button Mini USB 2 0 port Light HDMI Out Port OK Button LED Video Resolution toggle Right Button Illumination light Left Button Power Button LCD Panel SD card Cover Macro Focus Switch Lens ...

Страница 5: ...4 EN Side View Bottom View Strap Hook Tripod Socket Microphone Speaker Battery Cover ...

Страница 6: ...capacity by using an SD memory card Insert the memory card into the right position Please refer to the figure 1 To remove an installed SD card press the card inwards 2 to release it When the card pops out gently remove it from its slot 3 Recommended memory capacity 1GB above 4 Note When a memory card is fitted movies pictures are saved on card rather than on the built in memory Protecting data on ...

Страница 7: ... press the Movie Shutter Button To take a picture press the Picture Shutter Button To view stored movies and pictures press RECORD PLAY mode toggle and RETURN Button once to switch to Playback Mode Press a second time to return to Record Mode Turning the Camera Off To turn off the camera you can either press the Power Button for one second or you can place the LCD panel back to its original positi...

Страница 8: ...e setting Power Button Press down for one second to turn on or turn off the camera RECORD PLAY mode toggle and RETURN Button functions Switch between Record Playback Mode 1 Return to the previous page 2 For quick review press it after recording 3 Movie Shutter Button Start to take movie 1 To stop recording press it again 2 Picture Shutter Button Start to take picture Macro Focus Switch Use this to...

Страница 9: ...corded 1 Movie Resolution HD 1080p 30fps HD 720p 30fps WVGA 60fps VGA 30fps QVGA 30fps Picture Resolution High Standard Low 2 Number of images that can still be taken at current resolution Recording time of movie that can still be taken at current resolution 3 Digital Light On Light On 4 Self timer enabled ...

Страница 10: ...al zoom 12 Stabilization Note Scene B W Classic Nagative effect can be previewed immediately without indicator on the LCD Movie Recording Press Movie Shutter Button to start recording When a movie is recording a time indicator will display on LCD monitor To stop recording press Movie Shutter Button again Press RECORD PLAY mode toggle and RETURN Button to view the recorded movie Five resolution set...

Страница 11: ...switch back to Normal when you are not taking close up pictures Using Digital Light or Light Function To use light function Press Left Button 1 the Digital Light icon will appear on the screen to extend dynamic range for backlight and high contrast sense so that the objects will be brighter and clearer Press again 2 the Light icon will appear on the screen The light will be turned on and keeps pro...

Страница 12: ...peration Display Screen Press 1 OK Button when in Record Mode Use Right Left Buttons to move between main menu 2 options which are Movie Mode Picture Mode and Effect Press Down Button to enter the folder of main option 3 you select Press Right Left Button to select the setting options 4 then press OK Button to validate Press RECORD PLAY mode toggle and RETURN 5 Button to exit ...

Страница 13: ...the camera setting Movie Resolution Operation Display Screen In Movie Mode submenu press Down Button to 1 enter Resolution Use Right Left Buttons to move between five 2 settings Press OK Button to validate the setting 3 Stabilization Operation Display Screen In Movie Mode submenu press Up Down Button 1 to enter Stabilization Use Right Left Buttons to choose On or Off 2 Press OK Button to validate ...

Страница 14: ... Motion Detect Use Right Left Buttons to choose On or Off 2 Press Menu OK Button to validate the setting 3 then press RECORD PLAY mode toggle and RETURN Button to back to Record mode Camera will start to record video automatically if 4 it detects a movement Stop recording if it does not detect a movement ...

Страница 15: ...ubmenu press 1 Down Button to enter Resolution Use Right Left Buttons to move between three 2 settings Press OK Button to validate the setting 3 Self timer The self timer allows you to take pictures with a ten second time delay The self timer light on the front of the camera will also blink The speed of blinking will increase just before the picture is taken Operation Display Screen In Picture Mod...

Страница 16: ...tones more natural Night Use Night mode for night scenes or low light conditions Backlight You can take shots when bright light is behind the subject B W The image is converted to black and white Classic The image is converted to sepia look is applied to the image Negative The image is converted as the negative of the normal Operation Display Screen In Effect submenu pre 1 ss Up Down Button to sel...

Страница 17: ... move between 2 four settings The change can be previewed immediately Press OK Button to validate the setting 3 ISO The camera adjust the ISO sensitivity of images automatically Two manual ISO sensitivity settings are available The larger the number the higher the sensitivity Auto The camera automatically adjusts ISO sensitivity ISO 800 ISO 1600 Operation Display Screen In Effect Submenu press Up ...

Страница 18: ...picture Fast forward Left Button Go to the previous movie picture Fast rewind Tele Button Up Button Zoom in Volume increase Wide Button Down Button Zoom out Volume reduce OK Button Menu ON Validate the setting RECORD PLAY mode toggle and RETURN Button functions Switch between Record and Playback modes 1 Return to the previous page 2 Movie Shutter Button Start playing the recorded movie ...

Страница 19: ...080p 30fps HD 720p 30fps WVGA 60fps VGA 30fps QVGA 30fps High Standard Low 2 Movie playback time counter 3 Current Number Total number of movie or picture 4 Movies is selected to upload to YouTube 5 Volume 6 Indicate the screen is in movie playback mode Play Pause 7 Magnification Indicator 8 Indicate the selected picture is locked ...

Страница 20: ...utton to select the specific 2 option Press Menu OK Button to enter Movie Picture 3 thumbnail preview folder Use direction buttons to locate the movies 4 picture you want to view Press Menu OK button to view the movies 5 picture Movie Playback Operation Display Screen In movie thumbnail preview folder use direction 1 buttons to locate the movies you want to view Press Menu OK button to play the mo...

Страница 21: ...tton to go to the Delete menu 2 Use Right Left Buttons to select the movie 3 Use Up Button to delete all movies or Down Button 4 to delete single movie Or Press RECORD PLAY mode toggle and RETURN Button to exit Before a movie is deleted a confirmation screen 5 will appear choosing Yes will execute the operation and No will cancel the operation Press Menu OK Button to validate the setting 6 Note If...

Страница 22: ...ons to select the movie 3 Use Up Button to select all movies or Down Button 4 to select single movie Press RECORD PLAY mode toggle and RETURN 5 Button to exit Repeat Movies This function automatically repeats playing single movie or all movies in order Operation Display Screen Use Up Down Buttons to select the Repeat One 1 option or Repeat All option Press Menu OK Button to start repeating press i...

Страница 23: ...to view the picture 2 Use Right Left Buttons to go to the next or last 3 picture While the picture is selected use Tele Button to 4 magnify To navigate the magnified picture press OK Button 5 to enter navigation mode The inner Magnification Indicator turns orange Use Direction Buttons to navigate the magnified picture Press OK Button again to exit navigation mode ...

Страница 24: ...picture 3 Use Up Button to delete all pictures or Down Button 4 to delete single picture Or Press RECORD PLAY mode toggle and RETURN Button to exit Before a picture is deleted a confirmation screen 5 will appear choosing Yes will execute the operation No will cancel the operation Press OK Button to validate the setting 6 Note If a memory card is inserted you can delete only those pictures stored o...

Страница 25: ... Use Right Left Buttons to select the picture 3 Use Up Button to lock unlock all pictures or Down 4 Button to lock unlock single picture Press RECORD PLAY mode toggle and RETURN 5 Button to exit Make Slide Show This function automatically repeats all pictures in order Operation Display Screen Use Up Down Buttons to select the Slideshow 1 option Press OK Button to start the slide show press it 2 ag...

Страница 26: ...or disable KeyPad tone and operation sound Operation Display Screen In setting submenu press Down Button to enter 1 Sound Use Right Left Buttons to choose On or Off 2 Press OK Button to validate the setting 3 Information To change Information setting by either hot key Up Button or Option Setting On Show the indicator s on the LCD screen Off Do not show the indicator s on the LCD screen Operation D...

Страница 27: ...n the camera SD Card When there is an SD Card in the camera No Do not format the built in memory When there is no SD Card in the camera SD Card When there is an SD Card in the camera Operation Display Screen In setting submenu press Up Down Button to 1 select Format Press OK Button to go to the Format confirmation 2 screen Use Right Left Buttons to choose Yes or No 3 Confirmation screen will appea...

Страница 28: ...ong Kong etc Operation Display Screen In setting submenu press Up Down Button to 1 enter TV Use Right Left Buttons to choose NTSC 60Hz 2 or PAL 50Hz Press OK Button to validate the setting 3 Language Use this option to select the language of user interface which you want Operation Display Screen In setting submenu press Up Down Button to 1 enter Language Use Right Left Buttons to choose the langua...

Страница 29: ...oose Yes or No 3 Choosing Yes will execute the operation No 4 will cancel the operation Press OK Button to validate the setting 5 The following table indicates the camera s default setting Setting Default Factory Setting Resolution HD 1080p for Movie Standard for Picture Stabilization Off Motion Detect Off Self timer Off Scene Auto ISO Auto WB White Balance Auto Sound On Information On TV Depends ...

Страница 30: ...ing them 4 on the LCD monitor 16 9 Note The camera can not run movie recording and picture taking when it is connected to an HDTV The LCD Panel does not display when the camera is connected to an HDTV Connecting to a Non High Definition 4 3 TV Connect one end of the AV cable to your camera s AV Out port 1 Connect the other end of the cable to a television 2 The steps for viewing stored pictures an...

Страница 31: ...creen appears 1 Click 2 Install Application Software Follow the on screen instructions to complete the installation Note The detailed information can be found in online help of all the bundled software Transferring Video and Pictures to a Computer You can transfer pictures or movies stored on your camera to a computer and send them in emails to friends or post them on websites To do this you shoul...

Страница 32: ... the movie clip into DVD You can share this DVD movie with family and friends by using regular DVD player To create a DVD Install ArcSoft MediaImpression Refer to Section 7 1 Click Windows Start 2 g All Programs g ArcSoft MediaImpression ArcSoft MediaImpression main Screen will appear on your desktop 3 Click Make Movie 4 ...

Страница 33: ...ion screen will appear 5 Select the folder that contains the video files you want to burn Select the files Click button to add the files into slide Click Burn to Disc 1 2 3 4 1 2 3 4 Click Start to start DVD burning 6 ...

Страница 34: ...on YouTube website To upload video files to YouTube Select the video clips 1 in Movie Playback Mode Connect the camera and computer with the supplied USB cable 2 After making a USB connection the auto run screen will appear Click YouTube Direct 3 g OK as the main screen appears automatically on the desktop Note If the auto run screen does not appear Click My Computer g DV X g dvap exe to execute t...

Страница 35: ...deo cilp 5 1 Upload single video clip or selected video clips In thumbnail screen click up down icon to change the pages Click on the video clip you want to upload Ctrl Button to select two or more video clips and then click Upload selected videos to youtube icon 2 Upload the video clips which are selected in the camera earlier Click Upload DV selected videos to youtube icon ...

Страница 36: ...ou do not have a YouTube account click SignUp to register a new YouTube account firstly 7 Then the YouTube sign up screen will appear Please follow the instruction on YouTube website If you want to save the user s name and password click Save User Info ...

Страница 37: ...36 EN Click Upload Videos to upload the video s 8 ...

Страница 38: ... useable for videos and pictures SD SDHC Card Slot support Image Resolution High 4000x3000 12M Pixels Std 2592x1944 5M Pixels Low 2048x1536 3M Pixels Movie Resolution HD 1080p 1440X1080 30fps HD 720p 1280X720 30fps WVGA 848X480 60fps VGA 640X480 30fps QVGA 320X240 30fps Light Digital light On Light On Off White Balance Auto Manual Daylight Fluorescent Tungsten ISO Auto 800 1600 Self timer 10 secon...

Страница 39: ... bit Color Display Note The LCD screen is manufactured using extremely high precision technology so over 99 99 of the pixels are operational for effective use However some tiny black and or bright dots white red blue or green may appear on the LCD screen These dots are a normal result of the manufaturing process and do not affect the recording ...

Страница 40: ...se read the detail Format instruction in Section 5 You may use a higher speed SD SDHC card Rating Speed MB s SD Class 6x 0 9 n a 10x 1 5 n a 13x 2 0 2 26x 4 0 4 32x 4 8 4 40x 6 0 6 66x 10 0 6 100x 15 0 6 133x 20 0 6 150x 22 5 6 200x 30 0 6 266x 40 0 6 300x 45 0 6 3 Why do some of my indoor pictures look blurry and dark Camera extends pictures exposure time under low light indoor condition Keep cam...

Страница 41: ...anty claims you will be required to provide a copy of your original dated sales receipt as proof of purchase and the issued RMA number End User customer shall be responsible for shipping charges when shipping the product to the service center The service agent will provide you with an address and you will also be responsible for any shipping charges to the warranty service center Once your product...

Страница 42: ...0454 Deutschland German 49 6950073896 Ireland English 353 1850882016 Italia Italian 39 269682189 Netherlands Dutch 31 202015093 Espana Spanish 34 914533458 Switzerland German French Italian 41 18009686 UK English 44 2073652400 North America United States English 1 866 694 7633 Canada English French 1 866 694 7633 ...

Страница 43: ...P N 7525C00115A ...

Отзывы: