4
5. To install the heat sink:
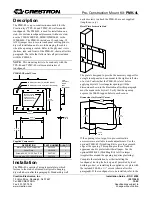
a. Center the heat sink properly over the additional processor.
b. Locate the bottom notched edge of the heat sink and, when placing the heat sink over the processor, be sure that
the notched edge faces the front panel of the HP Server.
Figure 3. Installing the Heat Sink
3. Fasten the rear heat sink clip by matching the holes of the clips with the tabs of the socket.
4. Fasten the front heat sink clip in the same fashion.
5. Re-install the air scoop, cover, and bezel onto the HP Server according to directions in the
HP Server Operations
and Maintenance Guide
.
Return power to the server and restore normal operation.
NOTE
HP recommends installing the heat sink supplied with the processor upgrade kit in
the following steps.
CAUTION
Ensure you have made good contact with the processor to avoid thermal overheating. If
you have not made good contact with the processor, it will overheat within 20 seconds of
power on and will shut down.
NOTE
When installing a second processor, the processor speed is set automatically. No manual
setting of switches is necessary.