RADIUS Authentication and Accounting
General RADIUS Setup Procedure
General RADIUS Setup Procedure
Preparation:
1. Configure one to three RADIUS servers to support the switch. (That is,
one primary server and one or two backups.) Refer to the documentation
provided with the RADIUS server application.
2. Before configuring the switch, collect the information outlined below.
Table 5-1.
Preparation for Configuring RADIUS on the Switch
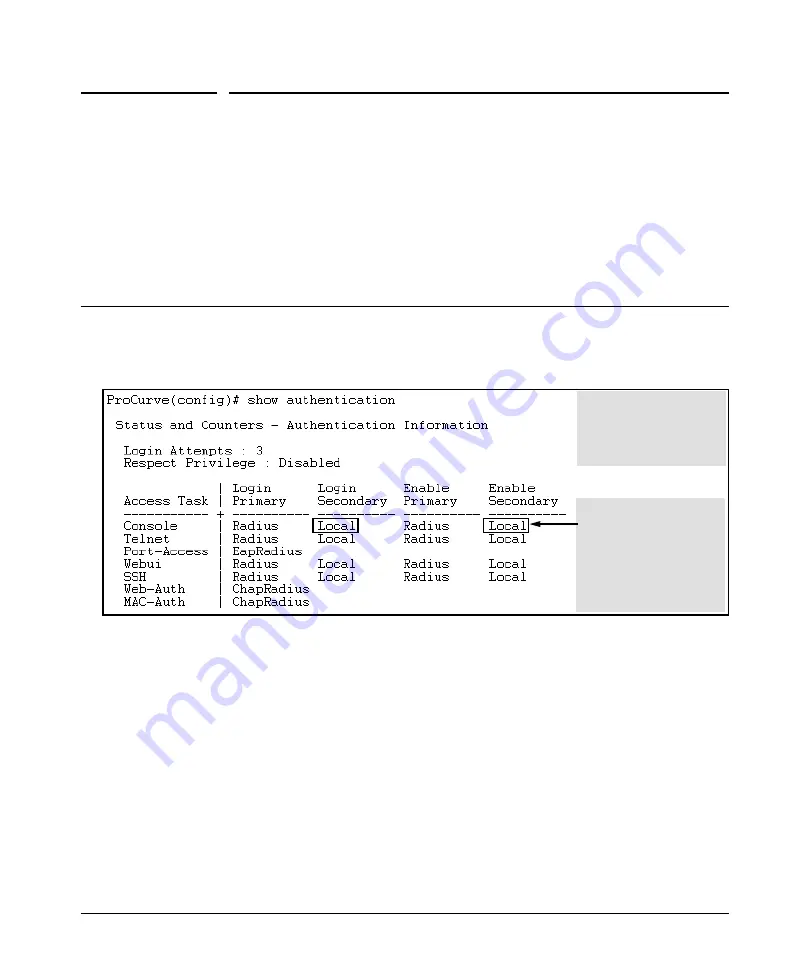
• Determine the access methods (console, Telnet, Port-Access (802.1X), web browser interface and/or SSH) for which
you want RADIUS as the primary authentication method. Consider both Operator (login) and Manager (enable) levels,
as well as which secondary authentication methods to use (local or none) if the RADIUS authentication fails or does
not respond.
Console access requires
Local as secondary
method to prevent lockout
if the primary RADIUS
access fails due to loss of
RADIUS server access or
other problems with the
server.
Note:
The
Webui
access
task shown in this figure is
available only on the
switches covered in this
guide.
Figure 5-1. Example of Possible RADIUS Access Assignments
• Determine the IP address(es) of the RADIUS server(s) you want to support the switch. (You can configure the switch
for up to three RADIUS servers.)
• If you need to replace the default UDP destination port (1812) the switch uses for authentication requests to a specific
RADIUS server, select it before beginning the configuration process.
• If you need to replace the default UDP destination port (1813) the switch uses for accounting requests to a specific
Radius server, select it before beginning the configuration process.
• Determine whether you can use one, global encryption key for all RADIUS servers or if unique keys will be required
for specific servers. With multiple RADIUS servers, if one key applies to two or more of these servers, then you can
configure this key as the global encryption key. For any server whose key differs from the global key you are using,
you must configure that key in the same command that you use to designate that server’s IP address to the switch.
• Determine an acceptable timeout period for the switch to wait for a server to respond to a request. ProCurve
recommends that you begin with the default (five seconds).
5-7
Содержание PROCURVE 2910AL
Страница 1: ...Access Security Guide ProCurve Switches W 14 03 2910al www procurve com ...
Страница 2: ......
Страница 3: ...HP ProCurve 2910al Switch February 2009 W 14 03 Access Security Guide ...
Страница 84: ...Configuring Username and Password Security Front Panel Security 2 36 ...
Страница 156: ...TACACS Authentication Operating Notes 4 30 ...
Страница 288: ...Configuring Secure Socket Layer SSL Common Errors in SSL setup 8 22 ...
Страница 416: ...Configuring Advanced Threat Protection Using the Instrumentation Monitor 10 28 ...
Страница 516: ...Configuring Port Based and User Based Access Control 802 1X Messages Related to 802 1X Operation 12 76 ...
Страница 527: ...Configuring and Monitoring Port Security Port Security Figure 13 4 Examples of Show Mac Address Outputs 13 11 ...
Страница 572: ...Using Authorized IP Managers Operating Notes 14 14 ...
Страница 592: ...12 Index ...
Страница 593: ......
Страница 594: ... Copyright 2009 Hewlett Packard Development Company L P February 2009 Manual Part Number 5992 5439 ...


