background image

8–1

HAFM server installation guide

8

HAFM Operation

After installing and properly configuring Windows 2000, HAFM, and the Web and 
FTP servers, you must remove the internal CD-ROM drive from the HP Omnibook 
6000/6200 PC and replace it with the internal Zip drive and blank disk. Do this while 
the PC is powered off.

Because the HAFM server application is installed as a Windows 2000 service, 
operation automatically begins after a power-on or restart of the HP Omnibook PC. 
This is an important aspect of the HAFM server application because the application 
continuously monitors the status of the Fibre Channel switches, directors, and fabrics, 
and alerts users through SNMP or e-mail if important system events occur, regardless 
of whether or not a user is logged on to Windows 2000. Additionally, the HAFM 
server can automatically phone home and notify HP Services when a switch requires 
service or a significant event occurs.

Once you have installed and configured the HAFM software, and you have rebooted 
the PC, the HAFM Services application automatically starts. When you log on to 
Windows 2000, two windows appear, the HAFM Services window and the HAFM 
Login window. These windows are described in “

HAFM Services Window

” on 

page 8–1 and “

HAFM Login Window

” on page 8–2, respectively.

To control the HAFM server, use the Windows Service Control Manager in the 
Administrative Tools folder under Control Panel. Because the application is installed 
as a Windows 2000 service, it automatically starts whenever the server PC is booted. 
Ordinarily, you should not need to stop the service or change its startup parameters, 
but if you do, it should be done as described in “

Service Control Manager

” on 

page 8–4.

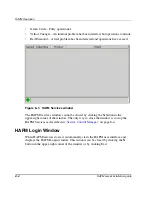
HAFM Services Window

An example of the HAFM Services window is displayed in 

Figure 8–1

. Its purpose is 

to display the operational status of the HAFM server. There are three potential states, 
which are represented by a graphical icon both in the window title bar and on the 
bottom status line of the window.

Содержание OmniBook 6000

Страница 1: ...erver installation guide Part Number A6582 96001 AA RT4KA TE First Edition August 2002 This document describes the setup and configuration requirements for the HP Omnibook 6000 6200 notebook PC to function as an HAFM Server ...

Страница 2: ...Hewlett Packard The information contained in this document is subject to change without notice Microsoft Windows and Windows 2000 are trademarks of Microsoft Corporation in the U S and or other countries All other product names mentioned herein may be trademarks of their respective companies Hewlett Packard Company shall not be liable for technical or editorial errors or omissions contained herein...

Страница 3: ...site xii HP Authorized Reseller xii 1 Introduction Introduction 1 1 2 System Requirements Requirements and Capabilities of the Omnibook PC 2 1 3 PC Setup and Configuration Drive Assignments 3 1 CMOS Setup 3 1 Install LAN Card Optional 3 2 4 Windows 2000 Setup and Configuration Power Options 4 1 Changing the Default Power Options 4 1 5 Internet Information Server Setup and Configuration Installing ...

Страница 4: ... Connection 7 20 Configure and Enable the Proactive Services Call Home via LAN Feature 7 21 Test Remote Notification 7 22 8 HAFM Operation HAFM Services Window 8 1 HAFM Login Window 8 2 Service Control Manager 8 4 Stopping and Starting the HAFM Server from a Local Client 8 4 Accessing the Service Control Manager 8 4 Using HAFM Server to Manage the SAN 8 5 9 Backing Up and Restoring the HAFM Server...

Страница 5: ...b 7 11 7 10 HA Fabric Manager Login dialog box 7 13 7 11 Date Time Properties dialog box 7 14 7 12 Date Time Properties dialog box Time Zone tab 7 15 7 13 Type of Connection window 7 17 7 14 Phone Number to Dial window 7 18 7 15 Connection Availability window 7 18 7 16 Ready to create your connection window 7 19 7 17 Test Remote Notification dialog box 7 23 8 1 HAFM Services window 8 2 8 2 HA Fabr...

Страница 6: ......

Страница 7: ...with the following Fibre Channel technology StorageWorks Fibre Channel Switches by HP Related Documentation In addition to this guide HP provides corresponding information hp StorageWorks product in a SAN environment planning guide for director 2 64 edge switch 2 16 and edge switch 2 32 A6534 96025 AA RS2DA TE hp StorageWorks SNMP reference guide for director 2 64 edge switch 2 16 and edge switch ...

Страница 8: ...stallation guide A7283 96001 AA RSTZA TE hp StorageWorks edge switch 2 32 service manual A7283 96002 AA RS2GA TE hp StorageWorks edge switch 2 32 product manager user guide A7283 96003 AA RS2HA TE hp StorageWorks edge switch 2 32 release notes A7283 96004 AV RSU0A TE hp StorageWorks edge switch 2 32 flexport upgrade instructions A7290 96001 AA RS33A TE hp StorageWorks edge switch 2 16 installation...

Страница 9: ... in damage to equipment or data IMPORTANT Text set off in this manner presents clarifying information or specific instructions NOTE Text set off in this manner presents commentary sidelights or interesting points of information Table 1 Document Conventions Element Convention Cross reference links Blue text Figure 1 Key names menu items buttons and dialog box titles Bold File names application name...

Страница 10: ...risk of electrical shock fire or damage to the equipment do not plug telephone or telecommunications connectors into this receptacle Any surface or area of the equipment marked with these symbols indicates the presence of a hot surface or hot component Contact with this surface could result in injury WARNING To reduce the risk of injury from a hot component allow the surface to cool before touchin...

Страница 11: ...tallations the stabilizing feet are attached to the rack In multiple rack installations the racks are coupled Only one rack component is extended at any time A rack may become unstable if more than one rack component is extended for any reason Getting Help If you still have a question after reading this guide contact an HP authorized service provider or access our website http thenew hp com HP Tec...

Страница 12: ...l Detailed specific questions HP Website The HP website has the latest information on this product as well as the latest drivers Access storage at http thenew hp com country us eng prodserv storage html From this website select the appropriate product or solution HP Authorized Reseller For the name of your nearest HP Authorized Reseller In the United States call 1 800 345 1518 In Canada call 1 800...

Страница 13: ... used for other tasks HP tests the HAFM application installed on the HAFM server but does not test for compatibility with other third party software Modifications to the HAFM server hardware or installation of additional software including patches or service packs may interfere with normal operation The chapters in this document are as follows System Requirements on page 2 1 describes the hardware...

Страница 14: ...es of the HAFM Backing Up and Restoring the HAFM Server on page 9 1 describes steps required to perform data backup and to restore the notebook to it s original configuration Sliding Shelf Installation for HAFM Server on page 10 1 describes steps required to install the sliding shelf for the HAFM server in a cabinet ...

Страница 15: ...lities Notebook PC HP Omnibook 6000 6200 Intel 333 Mhz 800 Mhz Pentium III 128 MB RAM 160 MB RAM 4 GB hard drive 18 GB hard drive Single Ethernet 10 100 Mbps interface Internal 3Com 10 100 Mini PCI adapter Zip Drive Internal Zip Drive 100 MB media CD ROM Drive Compliant1 1 The CD ROM is required for the initial install of HAFM and for subsequent updates The Zip drive is required to be installed wi...

Страница 16: ......

Страница 17: ...sed only for recovery or upgrade CMOS Setup Certain options must be configured properly in the CMOS Setup Utility The Setup Utility is entered by pressing the F2 key when prompted immediately after applying power to the HP Omnibook PC All options may be left at their default settings except for specific options under the Power APM tab as listed below in Table 3 1 Because the PC will always have an...

Страница 18: ...llation install the customer provided 3Com 10 100 Type III CardBus PC Card in the CardBus slot Display Time out Off Suspend Time out Off Hibernate Time out Off Hard Disk Time out Off Time out on AC Disabled Lid Switch Mode Turn Off LCD Resume On Serial Ring Disabled Resume On Time of Day Disabled Auto Suspend on Undock Never Auto Turn On on Dock Enabled Table 3 1 CMOS Settings Continued ...

Страница 19: ...l the dual CD set Because this process requires the use of a CD ROM drive replace the internal Zip drive with an internal CD ROM drive prior to performing the installation Power Options The default power options selected during the Windows 2000 installation allow the system to enter standby and hibernate modes after a period of inactivity Change these defaults to prevent the PC from ever entering ...

Страница 20: ...Windows 2000 Setup and Configuration 4 2 HAFM server installation guide Figure 4 1 Power Options Properties window 3 Choose Always On from the Power schemes drop down list 4 Click OK ...

Страница 21: ...n optional component called Internet Information Services IIS This component is not automatically installed during the system recovery process and must be installed and configured separately To install IIS 5 0 and configure the Web server and FTP server appropriately for HAFM use complete the steps described in the following section Installing IIS 5 0 To install the IIS complete the following step...

Страница 22: ...ck Details The Internet Information Services IIS dialog box displays 6 Because certain extensions are not required for HAFM operation clear the following check boxes FrontPage 2000 Server Extensions SMTP Service Visual InterDev RAD Remote Deployment Support 7 Click OK then click Next 8 When prompted with Please insert the Compact Disc labeled Service Pack Files into your CD ROM drive click OK ...

Страница 23: ...ion when IIS is first installed The FTP server must accept anonymous connections This is the default configuration when IIS is first installed The FTP server home directory must have both read and write access permissions Because the default setting for the home directory is read only complete the steps in Configuring the FTP Server Home Directory for Read Write Access on page 5 3 to enable write ...

Страница 24: ...operties dialog box 7 Ensure the Read and Write check boxes are selected and then click OK 8 From the Internet Information Services window right click Default FTP Site and choose New Virtual Directory The Virtual Directory Creation Wizard displays 9 Click Next in the Virtual Directory Creation Wizard 10 Enter HAFMan in the Alias field and then click Next 11 Enter c Program Files HAFM in the Path f...

Страница 25: ...HAFM_ServerInstall exe 2 The installer program will guide you through the installation process Iomega QuikSync Included in the HAFM application installation is the Iomega QuikSync application which is used to automatically back up all HAFM data to a Zip drive Because this application is installed and configured automatically no additional configuration is necessary When the entire HAFM server conf...

Страница 26: ......

Страница 27: ... the HAFM server and the switch products that it manages The optional private LAN requires the installation of an additional customer supplied PCMCIA NIC in the HAFM server The dedicated private LAN precludes the use of the HP OpenView Storage Area Manager application To connect the HAFM server to the LAN complete the following steps 1 Connect one end of the Ethernet patch cable supplied with the ...

Страница 28: ...the HP supplied Ethernet hub connect the cable to any available hub port 3 Optionally connect the HAFM server and managed switch products to their own dedicated private LAN supplied by the customer or to another Ethernet hub a Connect one end of a customer supplied Ethernet patch cable to the RJ 45 connector of the Ethernet adapter card installed in the PCMCIA slot at the right side of the HAFM se...

Страница 29: ...n name NOTE At some customer installations TCP IP addresses for the HAFM server may be allocated automatically using DHCP To configure TCP IP network information for the HAFM server 1 Power on the HAFM server The notebook PC performs a POST and starts the Windows 2000 operating system After the operating system starts the Begin Logon dialog box displays 2 Press Ctrl Alt Delete The Logon Informatio...

Страница 30: ...ndow displays 5 Double click System The System Properties dialog box displays 6 Click the Network Identification tab The Network Identification tab displays as shown in Figure 7 3 The Full Computer Name and Workgroup Domain fields display the names that were set up during Windows 2000 installation Record this computer name for reference if the HAFM server hard drive fails and must be restored ...

Страница 31: ...rties dialog box Network Identification tab 7 If the HAFM server name does not require change go to step 9 If the HAFM server is installed on a private corporate LAN and the computer name requires change click Properties The Identification Changes dialog box displays as shown in Figure 7 4 ...

Страница 32: ...K to return to the System Properties dialog box Record the changed computer name for reference if the HAFM server hard drive fails and must be restored 9 Choose Start Settings Network and Dial up Connections The Network and Dial up Connections window displays 10 Double click Local Area Connection The Local Area Connection Status dialog box displays as shown in Figure 7 5 ...

Страница 33: ...rver Configuration 7 7 HAFM server installation guide 7 7 Figure 7 5 Local Area Connection Status dialog box 11 Click Properties The Local Area Connection Properties dialog box displays as shown in Figure 7 6 ...

Страница 34: ... there is more than one Ethernet connection available at the laptop i e a PCMCIA NIC has been installed by the customer choose the Ethernet connection embedded in the laptop in the Connect using field 12 Double click Internet Protocol TCP IP The Internet Protocol TCP IP Properties dialog box displays as shown in Figure 7 7 ...

Страница 35: ...es dialog box 13 If the IP address is allocated automatically using a DHCP server click Obtain an IP address automatically or If the IP address is assigned manually click Use the following IP address Enter the IP address subnet mask and default gateway address obtained from the customer s network administrator ...

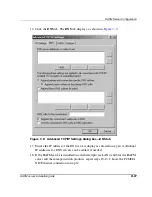
Страница 36: ...or If the IP address is assigned manually click Use the following DNS Server addresses Enter the IP address of the preferred and alternate DNS servers obtained from the customer s network administrator 15 Click Advanced The Advanced TCP IP Settings dialog box displays with the IP Settings tab as shown in Figure 7 8 Figure 7 8 Advanced TCP IP Settings dialog box IP Settings tab ...

Страница 37: ...P Settings dialog box DNS tab 17 Ensure the IP address of the DNS servers display as entered in step 14 Additional IP addresses for DNS servers can be added if needed 18 If the HAFM server is installed on a dedicated private LAN or hub for the HAFM server and the managed switch products repeat steps 10 13 Choose the PCMCIA NIC Ethernet connection in step 12 ...

Страница 38: ...it and event logs are time stamped with the date and time from the HAFM server The switch s system clock is synchronized with date and time of the HAFM server by default To set the date and time on the HAFM server complete the following steps 1 Power on the HAFM server The notebook PC performs a POST and starts the Windows 2000 operating system After the operating system starts the Begin Logon dia...

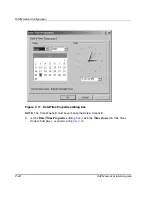
Страница 39: ...Figure 7 10 HA Fabric Manager Login dialog box 4 At the Windows 2000 desktop choose Start Settings Control Panel The Control Panel window displays 5 Double click Date Time The Date Time Properties dialog box displays with the Date Time page open as shown in Figure 7 11 ...

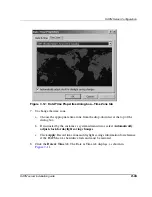
Страница 40: ... installation guide Figure 7 11 Date Time Properties dialog box NOTE The Time Zone field must be set before the Date Time field 6 At the Date Time Properties dialog box click the Time Zone tab The Time Zone tab displays as shown in Figure 7 12 ...

Страница 41: ...ne from the drop down list at the top of the dialog box b If instructed by the customer s system administrator select Automatically adjust clock for daylight saving changes c Click Apply Record time zone and daylight savings information for reference if the HAFM server hard drive fails and must be restored 8 Click the Date Time tab The Date Time tab displays as shown in Figure 7 11 ...

Страница 42: ...rts events via the LAN to a SANworks Management Appliance or other server running the HP Proactive Services software HP Proactive Services software is offered at no additional charge for subsystems covered under an on site warranty or on site storage hardware support contract To order Proactive Services software contact your Hewlett Packard customer service representative A choice of only one Call...

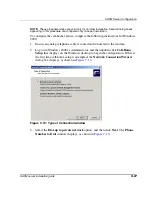
Страница 43: ...0 1 Ensure an analog telephone cable is routed and connected to the modem 2 Log on to Windows 2000 as Administrator and then double click Call Home Setup that displays on the Windows desktop to begin the configuration If this is the first time call home setup is attempted the Network Connection Wizard dialog box displays as shown in Figure 7 13 Figure 7 13 Type of Connection window 3 Select the Di...

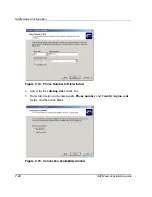
Страница 44: ... installation guide Figure 7 14 Phone Number to Dial window 4 Select the Use dialing rules check box 5 Enter information in the Area code Phone number and Country region code fields and then click Next Figure 7 15 Connection Availability window ...

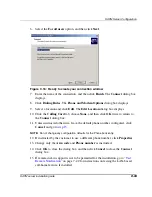
Страница 45: ...then click OK twice to return to the Connect dialog box 11 Unless instructed otherwise leave the default phone number configured click Cancel and go to step 15 NOTE Do not change any configuration defaults for the Phone book entry 12 If instructed by the customer to use a different phone number click Properties 13 Change only the Area code and Phone number as instructed 14 Click OK to close the di...

Страница 46: ...ype exit to close the Command Prompt window Configuring Windows 2000 to Enable a Dial up Connection Configure Windows 2000 to enable a dial up connection for the built in service user account The default configuration does not allow any remote dial in to the HAFM server Perform the following to enable a dial up connection to the HAFM server 1 Choose Start Settings Control Panel The Control Panel w...

Страница 47: ...ected to a LAN with access to the server running the HP Proactive Services software 2 Locate the rns properties file in the following location c Program Files HAFM Following is an example of file contents RnsDataDir c HAFMData RnsData RnsEventDir c HAFMData RnsData RnsLogDir c HAFMData Rnsdata CSGIpAddress CSGPort 2069 CSGExePath ms eventAsync 3 Using any ASCII text editor make the following chang...

Страница 48: ...lete the steps in the previous sections Configure and Enable Call Home Features and either Configure the Call Home via Dial out Feature or Configure and Enable the Proactive Services Call Home via LAN Feature Perform the following to test remote notification 1 Enable call home event notification through the HAFM server a In the Products or Fabrics View page choose Maintenance Configure Call Home E...

Страница 49: ...AFM server installation guide 7 23 5 Click Send Test Call home and e mail test messages are transmitted and an Information dialog box displays 6 Click OK 7 Verify that the intended users received the Call Home and e mail notifications ...

Страница 50: ......

Страница 51: ...a significant event occurs Once you have installed and configured the HAFM software and you have rebooted the PC the HAFM Services application automatically starts When you log on to Windows 2000 two windows appear the HAFM Services window and the HAFM Login window These windows are described in HAFM Services Window on page 8 1 and HAFM Login Window on page 8 2 respectively To control the HAFM ser...

Страница 52: ...dow The HAFM Services window cannot be closed by clicking the X button in the upper right corner of the window The only way to close the window is to stop the HAFM Services as described in Service Control Manager on page 8 4 HAFM Login Window When HAFM Services starts it automatically starts the HAFM user interface and displays the HAFM Login window This window can be closed by clicking the X butt...

Страница 53: ... server installation guide 8 3 Figure 8 2 HA Fabric Manager Login dialog box For more information about the HAFM Login and operation of the HAFM user interface please refer to the hp StorageWorks ha fabric manager user guide ...

Страница 54: ... complete the following steps 1 Choose Start Programs HAFM application 2 Click Stop Services 3 To resume services return to the Start menu locate the HAFM application and click Start Services Accessing the Service Control Manager Alternatively to access the Service Control Manager complete the following steps 1 Choose Start Settings Control Panel The Control Panel window displays 2 Double click Ad...

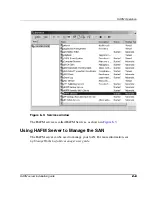
Страница 55: ...e 8 5 Figure 8 3 Services window The HAFM service is called HAFM Services as shown in Figure 8 3 Using HAFM Server to Manage the SAN The HAFM server can be used to manage your SAN For more information see hp StorageWorks ha fabric manager user guide ...

Страница 56: ......

Страница 57: ... contains HAFM configuration data director and switch definitions user names and passwords director and switch date and time operating mode port configurations operating parameters SNMP recipients and e mail recipients Log files HAFM application director and switch logs Director and switch firmware versions stored in the firmware library Configuration data for the director and switch products are ...

Страница 58: ...rmation dialog box displays d Type a Windows 2000 user name and password and click OK The Windows 2000 desktop opens and the HAFM Login dialog box displays e Type the user name and password and select a local host from the HAFM Server drop down list f Click Login The Products View page displays Record or Verify HAFM Server Restore Information Configuration information must be recorded to restore t...

Страница 59: ...el The Control Panel window displays c At the Control Panel window double click System The System Properties window displays with the General page open Record the Product ID number listed under the Registered to heading d Click Cancel to close the System Properties window e Close the Control Panel window and return to the Windows 2000 desktop Restore the HAFM Server Use these steps to restore the ...

Страница 60: ...of all HAFM sessions local and remote 2 Perform the following steps to obtain the new software version from the HP website If you have a CD ROM go to step 3 NOTE The following path is subject to change a At the HAFM server or other PC with Internet access open the HP website at http thenew hp com country us eng support html b Click the HAFM Downloads folder in the left panel c Choose the Director ...

Страница 61: ...rver PC a Press Ctrl Alt Del to display the Windows 2000 Logon Information dialog box b Type the user name and password and click OK The Windows 2000 desktop displays NOTE If required obtain the user name and password from the customer or next level of support The HAFM application automatically opens 9 At the HAFM application Login screen enter a user name password and HAFM server name all are cas...

Страница 62: ......

Страница 63: ...e HAFM Server Sliding Shelf into a Supported Cabinet Optional Use the following procedure as shown in Figure 10 1 to install sliding shelf brackets for the HAFM server 1 Select a U slot above the switch It is recommended to select the U slot immediately above the switch However other U slots above the switch may also be used 2 On each rack rear column locate the hole 1 that is 2 holes up from the ...

Страница 64: ...front tabs 1 see Figure 10 3 from the sliding shelf by removing the three screws for each tab Reinstall the rail front tabs to the sliding shelf one screw location forward from the original location Ensure that the distance from the rail front tab to the back of the shelf increases 7 Insert the shelf into the rack so that both rail rear slots 1 slide over the loose screws 2 on inside face of each ...

Страница 65: ...cket on a rail rear slot 8 Make sure that the sliding shelf and rails are horizontal see Figure 10 3 at the rack front 9 Push each of the rail front tabs 1 into the corresponding holes on the rack columns 2 10 At the back of the rack tighten the screws that attach the sliding shelf rails to the mounting brackets see Figure 10 2 2 ...

Страница 66: ...Sliding Shelf Installation for HAFM Server 10 4 HAFM server installation guide Figure 10 3 Positioning the sliding shelf bracket at the rack front ...

Страница 67: ...ntation related vii E equipment symbols x Ethernet cable 7 2 hub 7 2 Ethernet 10 100 2 1 F FTP server 5 1 configure 5 3 configure home directory 5 3 virtual directory 5 3 G getting help xi H HAFM data directory 9 1 HAFM Login window 8 1 8 2 HAFM server configure 7 1 configuring network information 7 3 connect to LAN 7 1 install 6 1 introduction 1 1 LAN connecting 7 1 operation 8 1 services 8 1 set...

Страница 68: ... private 7 2 public 7 1 LAN card install 3 2 M mode hibernate 4 1 standby 4 1 modem 2 1 O Omnibook PC setup 3 1 P PCMCIA NIC 7 1 Pentium 2 1 prerequisites ix R rack stability warning xi recording HAFM restore information 9 2 related documentation vii restoring the HAFM server 9 3 RJ 45 connector 7 1 S server FTP 5 1 Web 5 1 service control manager 8 1 symbols on equipment x system requirements HAF...

Отзывы: