487
Item Description
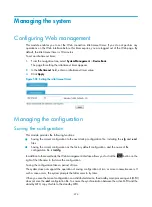
Adjust clock for
daylight saving time
changes
Adjust the system clock for daylight saving time changes, which means adding one
hour to the current system time.
Click
Adjust clock for daylight saving time changes
to expand the option, as shown
. You can configure the daylight saving time changes in the following
ways:
•
Specify that the daylight saving time starts on a specific date and ends on a specific
date. The time range must be greater than one day and smaller than one year. For
example, configure the daylight saving time to start on August 1st, 2006 at
06:00:00 a.m., and end on September 1st, 2006 at 06:00:00 a.m.
•
Specify that the daylight saving time starts and ends on the corresponding specified
days every year. The time range must be greater than one day and smaller than one
year. For example, configure the daylight saving time to start on the first Monday in
August at 06:00:00 a.m., and end on the last Sunday in September at 06:00:00
a.m.
Figure 516
Setting the daylight saving time
Configuring TR-069
TR-069 protocol, also called CPE WAN Management Protocol (CWMP), is a technology specification
initiated and developed by the DSL Forum. It defines the general frame, message format, management
method, and data model for the management and configuration of home network devices in the
next-generation network.
TR-069 is mainly applied to DSL access networks. In a DSL access network, user devices are large in
number and deployed separately usually in the customer premise. Therefore device management and
maintenance is hard to perform. TR-069 is designed to solve the problem by the idea of remote central
management of the Customer Premises Equipment (CPE) through an Auto-Configuration Server (ACS).
Содержание MSR SERIES
Страница 17: ...xv Documents 835 Websites 835 Conventions 836 Index 838 ...
Страница 20: ...3 Figure 3 Initial page of the Web interface ...
Страница 42: ...25 Figure 13 Firefox Web browser setting ...
Страница 59: ...42 Figure 27 Checking the basic service configuration ...
Страница 73: ...56 Figure 35 Sample interface statistics ...
Страница 156: ...139 Figure 139 Rebooting the 3G modem ...
Страница 168: ...151 Figure 152 Configuring Web server 2 ...
Страница 174: ...157 Figure 158 Configure the URL filtering function ...
Страница 187: ...170 Upon detecting the Land or Smurf attack on Ethernet 0 2 Router outputs an alarm log and drops the attack packet ...
Страница 242: ...225 Figure 233 Enabling the DHCP client on interface Ethernet 0 1 ...
Страница 247: ...230 Figure 236 The page for configuring an advanced IPv4 ACL ...
Страница 255: ...238 Figure 241 Advanced limit setting ...
Страница 298: ...281 e Click Apply 2 Configure Router B in the same way Router A is configured ...
Страница 354: ...337 Figure 339 Configuring a login control rule so Host B cannot access Router through the Web ...
Страница 400: ...383 Figure 387 Verifying the configuration ...
Страница 405: ...388 ...
Страница 523: ...506 Figure 530 Ping configuration page ...
Страница 538: ...521 a Click Device A on the topology diagram b Click Ethernet 0 2 on the panel diagram c Click Port Guard ...
Страница 744: ...727 Verifying the configuration In the case that the IP network is unavailable calls can be made over PSTN ...
Страница 775: ...758 Figure 785 Configuring a jump node ...
Страница 791: ...774 Figure 801 Configuring a jump node ...


