


HP E-MSM430, E-MSM460, E-MSM466 Dual Radio 802.11n Access Points Quickstart
7
Initial configuration (autonomous mode)
D.
Log in
1.
Wait until the Power light stops blinking and remains on.
2.
On the Login page, specify
admin
for both
Username
and
Password
and then select
Login
.
3.
Click through the other prompts for License and Registration.
4.
In some regions, a
Country
prompt appears. Select the country in which
the AP will operate.
Caution:
The correct country must be selected. See
Country of use
on page 3.
5.
At the password prompt it is recommended that you change the default
password and select
Save
. Passwords must be at least six characters
long and include four different characters.
The management tool is organized with menus and sub-menus. Instructions for
making menu selections, such as “select
Wireless > Local mesh
” instruct you
to select the
Wireless
menu and then the
Local mesh
sub-menu, as follows:
E.
Configure basic wireless protection
It is recommended that you at least configure basic wireless protection. See
Wireless protection
in the
MSM3xx / MSM4xx Access Points Management and
Configuration Guide
. To configure basic WPA protection:
1.
Select
VSC > HP
and then enable
Wireless protection
and set it to
WPA
.
2.
Under
Mode
, select
WPA or WPA2
, then under
Key source
, select
Preshared key
and specify a key of at least 20 characters. Select
Save
.
F.
Assigning an IP address to the AP
By default the AP operates as a DHCP client. This means that if the network
has a DHCP server, the AP will automatically receive a new IP address in place
of its default address of 192.168.1.1 upon connecting to the network. Use one
of the following methods to assign an IP address to the AP:
•
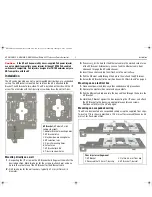
Pre-configure the DHCP
server
to assign a specific IP address to the AP.
To do this you need to specify the AP Ethernet MAC address and a
reserved IP address on the DHCP server. The AP Ethernet MAC address is
printed on the AP label identified as
LAN MAC
, and listed on the
management tool
Home
page as
Ethernet base MAC address
.
•
Let the DHCP server automatically
assign an IP address
. By default,
the DHCP server will assign an IP address after the AP connects to the
network. After the DHCP server has assigned the AP an IP address, you can
then find the IP address of the AP by looking for its Ethernet base MAC
address in the DHCP server log. For example after Step F.4 below, you could
go to the DHCP server log to retrieve the IP address assigned to the AP.
•
Assign a static IP address to the AP
. The address must be on the same
subnet as the network to which the AP will connect.
1.
Select
Network > DNS
, and set the DNS server address. Select
Save
.
2.
Select
Network > Ports
>
Bridge port
.
3.
Select
Static
and then
Configure
. For
IP address
set an address that
is on the same subnet as the network to which the AP will connect
after installation. Respect any DHCP server-mandated static address
ranges. Also set
Mask
and
Default gateway
.
4.
Select
Save
. Connection to the management tool is lost. You can later
reconnect to the management tool by specifying the new IP address.
G.
Test the wireless network
For the purposes of this example, the network must have a DHCP server and
an Internet connection. Broadband routers typically include a DHCP server.
1.
Disconnect your computer from the PoE switch or injector.
2.
Power off the AP by disconnecting the Ethernet cable from the AP.
3.
Use a standard Ethernet cable to connect the switch or the data in port of
the injector to the network.
4.
Reconnect and power on the AP. Use a standard Ethernet cable to reconnect
the AP to the PoE switch or the data and power out port of the injector.
5.
Enable the wireless network interface of your computer, and verify that it
is set to obtain an IP address automatically. For example, to do this in
Windows Vista, use
Control Panel > Network and Sharing Center >
Manage Network Connections > Wireless Network Connection
,
right-click
Properties
and select
Internet Protocol Version 4 (TCP/IPv4)
> Properties
, and make sure that
Obtain an IP address automatically
and
Obtain a DNS server address automatically
are both enabled.
6.
By default, the AP creates a wireless network named
HP
in the 5GHz band
for 802.11n and 802.11a users. Connect your computer to this wireless
network, specifying the preshared key you set earlier in step E.2.
7.
Confirm that you can browse the Internet using the wireless network.
E-MSM430-460-466-QS-Jan11-5998-0615-v55.fm Page 7 Wednesday, January 19, 2011 5:38 PM