background image

HP photosmart 715 user guide

2

Camera parts

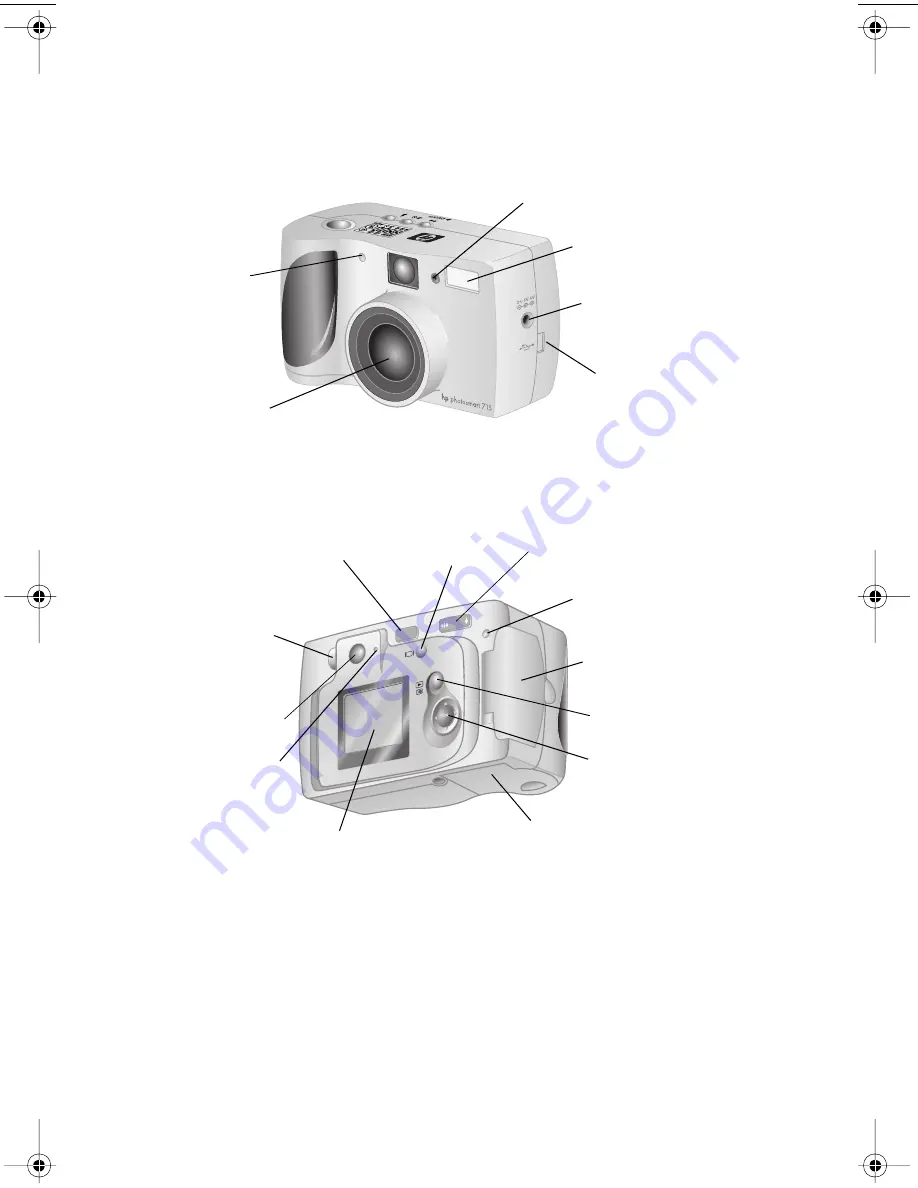
The following illustrations show the parts of the camera.


flash sensor

flash

lens

AC power 
adapter 
connection

USB 
computer 
connection

self-timer 
LED

5-

WAY


controller

PLAY

/

MENU

 button

PREVIEW

 button

ZOOM

 button

viewfinder

image 
display

ON

/

OFF


POWER


switch

viewfinder 
LED

CF memory 
card door

CF card 
access LED

diopter 
control

battery 
compartment 
door

HUG.book  Page 2  Tuesday, September 25, 2001  1:03 PM

Содержание 715

Страница 1: ......

Страница 2: ......

Страница 3: ...hp photosmart 715 digital camera user guide ...

Страница 4: ...ormance or use of this material Microsoft Windows and Windows NT are U S registered trademarks of Microsoft Corporation Pentium is a U S registered trademark of Intel Corporation Materials disposal This HP product contains the following materials that might require special handling at end of life Mercury in the fluorescent lamp in the liquid crystal display Lead in solder Alkaline manganese dioxid...

Страница 5: ... 9 Using focus lock 9 Using the macro focus setting 10 Using the optical or digital zoom 10 Using the self timer 11 Chapter 3 Managing images on the camera Viewing your images 13 Deleting your images 14 Creating a print order 16 Viewing small versions thumbnails of your images 18 Magnifying your images 19 Locking your images 20 Chapter 4 Adjusting the camera settings Using the flash 21 Changing th...

Страница 6: ...puter 38 Unloading images without using the camera software 39 Using a card reader 40 Printing photos on a printer equipped with a card reader 40 Chapter 6 Maintaining your camera Powering your camera 41 Determining if the batteries need to be changed 41 Replacing batteries 43 Using an AC power adapter 43 Maintaining the CF memory card 45 Formatting a CF memory card 45 Removing the CF memory card ...

Страница 7: ...v Table of Contents Appendix A Reference Symbols on the status LCD 63 Camera indicator lights LEDs 64 Camera menus 65 Camera specifications 66 Index 69 ...

Страница 8: ...vi ...

Страница 9: ...d printing your photos Your camera includes the following features 3 3 megapixel MP resolution 3x optical zoom or 2x digital zoom point and shoot simplicity automatic exposure automatic focus automatic flash with red eye reduction universal serial bus USB computer connection color image display for previewing and reviewing pictures economical digital film reusable CompactFlash CF memory card self ...

Страница 10: ...amera flash sensor flash lens AC power adapter connection USB computer connection self timer LED 5 WAY controller PLAY MENU button PREVIEW button ZOOM button viewfinder image display ON OFF POWER switch viewfinder LED CF memory card door CF card access LED diopter control battery compartment door ...

Страница 11: ...ment that is located under the CF memory card compartment door You might need to use a pointed object such as a paper clip to pull the end of the loop through 2 Pull the strap through the loop and then pull the knot tight macro symbol self timer symbol image quality symbol images remaining battery symbol digital zoom flash symbols SELF TIMER MACRO button FLASH button IMAGE QUALITY button SHUTTER b...

Страница 12: ...and slide the ON OFF POWER switch to turn on the camera 2 Press the right or left side of the 5 WAY controller until the language you want to use is highlighted on the image display 3 Press OK in the center of the controller to choose the language Step 4 Set the camera date and time 1 Press right or left on the controller to set the day and then press the bottom of the controller to select the nex...

Страница 13: ...the camera 4 Insert the CF memory card in the camera and gently push it all the way in The gray card ejection lever pops up when the card is seated correctly in the slot CAUTION The card should slide freely into the slot If it stops when it is only partially inserted turn the card over and try again Do not force the card into the camera 5 Fold the card ejection lever down against the card and clos...

Страница 14: ...HP photosmart 715 user guide 6 ...

Страница 15: ...he steady green light to the right of the viewfinder press the SHUTTER button all the way down to take the picture Wait for the beeps that indicate your picture has been taken and then release the SHUTTER button A red light appears next to the viewfinder to indicate that the image is being processed After the red light turns off the CF card access LED turns on to indicate that the image is copying...

Страница 16: ...ot of battery power To conserve battery power the camera automatically turns off the image display after 60 seconds if you do not press a button To preview a picture 1 Press the PREVIEW button to turn on the image display 2 Frame your picture in the image display by pointing the camera lens at your subject 3 Press and hold the SHUTTER button halfway down to allow the camera to adjust the focus and...

Страница 17: ...nd a blinking green light appears to the right of the viewfinder You can still take the picture but the results might not be optimal Using focus lock The automatic focus feature focuses on the subject in the middle of the picture and requires good contrast within that subject area If you do not want your subject to be in the middle of the image or if the subject lacks contrast use focus lock 1 Wit...

Страница 18: ...ts image quality The more you zoom in the greater the reduction in image quality To use the optical zoom 1 With the camera on frame your subject in the viewfinder 2 Press the right side of the ZOOM button to zoom in up to three times the normal view To return to normal view press the left side of the button 3 Take your picture To use the digital zoom 1 With the camera on press the button to turn o...

Страница 19: ...ight from the subject 2 With the camera on frame your subject in the viewfinder and then press the SELF TIMER button until the self timer symbol appears on the status LCD 3 Press the SHUTTER button all the way down and then release it The red self timer indicator light on the front of the camera blinks for 10 seconds with an increasing frequency After 10 seconds the camera takes the picture and th...

Страница 20: ...HP photosmart 715 user guide 12 ...

Страница 21: ...image display Viewing your images 1 Press the PLAY button to turn on the image display The last picture you took or viewed appears on the image display 2 Use the controller to scroll through your images Each time a new image appears on the display a status overlay bar also appears for a few seconds The status overlay bar gives you the following information about the current image Date and time the...

Страница 22: ...mages from the CF memory card After an image has been deleted it cannot be recovered Note Locked images cannot be deleted To delete one or more images 1 Press the button to turn on the image display 2 Press the MENU button to open the main menu and then press OK to select the Delete menu 3 Use the right or left side of the controller to scroll to the image you want to delete status overlay bar ima...

Страница 23: ...ing images use the up or down side of the controller to select Exit and then press OK To delete all images by formatting the CF memory card 1 Press the button to turn on the image display 2 Press the button again to open the main menu use the up or down side of the controller to scroll to the Setup menu and then press OK Format CF should be highlighted 3 Use the right or left side of the controlle...

Страница 24: ...ge display a printer icon appears on the leftmost side of the status overlay bar for images that you have added to the print order A print order creates a Digital Print Order Format DPOF file This file is stored with your images on the CF memory card You can print photos from your print order in one of two ways When you transfer your images from the camera to a computer the print order is copied a...

Страница 25: ...e is displayed on the image display 4 Select Yes to mark a single image If you want to mark or unmark another image use the right or left side of the controller to scroll to the image select Yes and then press OK Repeat this step until you have finished marking and unmarking images When you are finished press OK to exit Or Select Mark All or Clear All if you are marking or unmarking all the images...

Страница 26: ...isplay shows you up to nine of your images at one time depending on how many images you have stored on the CF memory card A yellow border frames the currently selected image 4 To advance to the next set of thumbnails use the controller to move the yellow border to the last image in the set and then press the down side of the controller Note To scroll to the previous set of thumbnails move the yell...

Страница 27: ...e image stored in memory To magnify a image 1 Press the button to turn on the image display and use the right or left side of the controller to scroll to the image you want to magnify 2 Press the button to display the main menu use the up or down side of the controller to scroll to the Display menu and then press OK 3 Magnification options include 2x and 4x Press the up or down side of the control...

Страница 28: ...on to turn on the image display 2 Press the button to open the main menu use the up or down side of the controller to scroll to the Lock menu and then press OK 3 To lock or unlock a single image use the right or left side of the controller to scroll to the image that you want to lock or unlock Use the up or down side of the controller to select Yes and then press OK Repeat this step until you have...

Страница 29: ...age quality set the instant review option change the date and time adjust the image display brightness turn the system beep off and on change the language Using the flash The camera offers four flash settings The current flash setting is indicated by a symbol on the status LCD Each time you turn the camera off and then on again the flash setting automatically reverts to AUTO FLASH Symbol Setting D...

Страница 30: ...cture If you are photographing people tell them to wait for the second flash before moving FLASH ON The flash will be used in all lighting conditions The amount of light provided by the flash will be adjusted according to the current lighting conditions Use this setting when the lighting for the entire picture is sufficient but the lighting for the subject is not as in a backlighting situation Thi...

Страница 31: ... Here are some important notes about the image quality setting You can use different image quality settings for different images The camera retains the current image quality setting until you change it even if you turn the camera off Because image quality affects the number of images that can be stored on a CF memory card the number of available images shown on the status LCD changes as you change...

Страница 32: ...o print to a size smaller than 20 3 by 25 4 cm 8 by 10 inches This is the default setting Digital zoom off 2048 by 1536 Digital zoom on 1024 by 768 BEST This setting produces the highest quality photos and uses the most memory Use this setting for taking pictures that you plan to crop and enlarge by using image editing software or print to a size larger than 20 3 by 25 4 cm 8 by 10 inches Same res...

Страница 33: ... review every picture immediately after you take it turn Instant Review off to conserve battery power To turn Instant Review on or off 1 Press the button to turn on the image display 2 Press the button to open the main menu use the down side of the controller to select the Setup menu and then press OK 3 Use the down side of the controller to select Instant Review 4 Use the right or left side of th...

Страница 34: ...ence the camera maintains the date and time for at least 15 minutes after you remove old batteries To change the date and time 1 Press the button to turn on the image display 2 Press the button to open the main menu use the down side of the controller to select the Setup menu and then press OK 3 Press the down side of the controller to select Date Time and then press OK 4 Press the right or left s...

Страница 35: ...to improve the visibility of the display To set the image display brightness 1 Press the button to turn on the image display 2 Press the button to open the main menu use the down side of the controller to select the Setup menu and then press OK 3 Use the up or down side of the controller to scroll to Brightness and then press OK 4 Use the right side of the controller to increase the brightness or ...

Страница 36: ...K 3 Use the up or down side of the controller to scroll to Beep 4 Use the right or left side of the controller to select On or Off and then press OK Changing the camera language You can change the language used for the camera menus to one of five languages English French German Italian or Spanish To change the camera language 1 Press the button to turn on the image display 2 Press the button to op...

Страница 37: ...printer with a slot for a CompactFlash CF memory card you can print your images directly from a CF memory card Check out HP s photosmart Web site at www hp com photosmart for great ideas and tips about how to use your images to create fun projects This chapter describes how to use the camera with the following equipment Microsoft Windows or Microsoft Windows NT 4 0 computer Macintosh computer Comp...

Страница 38: ...m photosmart Operating system Windows 98 Windows Millennium Edition Me Windows XP Windows 2000 or Windows NT 4 0 Processor 166 megahertz MHz Pentium or equivalent Memory RAM Windows 98 Windows Me Windows XP Windows 2000 32 megabytes MB Windows NT 4 0 64 MB Free hard disk space 180 MB Video display 640 by 480 pixels 256 bit color CD ROM Any speed Interface Windows 98 Windows Me Windows XP and Windo...

Страница 39: ...hipped with bonus software Keep the HP photosmart 715 CD ROM in the computer s CD ROM drive and continue to the next section to install the bonus software To install the bonus software 1 Click Start click Run and in the Open box type X Bonus setup exe where X is the drive letter assigned to your CD ROM drive 2 Click OK and then follow the instructions on the screen to install the bonus software Co...

Страница 40: ...memory card in the camera to a computer You can unload images from your camera in one of three ways automatically manually or by mounting the camera as a disk drive The automatic unload procedure is the preferred method For descriptions of the other methods see the online documentation with the HP Photo Imaging software Tip To conserve battery power use an HP approved AC adapter optional when you ...

Страница 41: ...ly print your images automatically lay out a photo album page To set up the automatic tasks in the HP Automatic Image Unload Software dialog box click Task Options For more information double click the HP Quick Reference Photo Imaging icon that is installed on your desktop with the software Using the camera with a Windows NT 4 0 computer Windows NT 4 0 does not support the USB interface so you can...

Страница 42: ... Double click the HP Photo Imaging Software icon on the Windows desktop The main window of the HP Photo Imaging Software opens 6 Click Unload Images in the main window Because no USB camera is found the software displays a dialog box in which you can select the drive letter for your CF memory card reader 7 Select the drive letter such as H for your CF memory card reader in the dialog box 8 Start t...

Страница 43: ...e camera to a Macintosh computer you must change the USB protocol setting to MSDC in the Setup menu on the camera s image display To change the USB protocol setting 1 Press the button to turn on the image display 2 Press the button again to open the main menu use the down side of the controller to select the Setup menu and then press OK 3 Use the up or down side of the controller to scroll to USB ...

Страница 44: ...ur computer s CD ROM drive 2 Double click the CD icon on the desktop 3 Double click the appropriate language folder and then double click the installer icon 4 Follow the instructions on the screen to install the software Certain versions of the camera are shipped with bonus software Keep the HP photosmart 715 CD ROM in the computer s CD ROM drive and continue to the next section to install the bon...

Страница 45: ...disconnecting the camera To connect the camera to a Macintosh computer 1 Make sure that the camera is turned off 2 Plug the smaller end of the USB cable supplied into the camera 3 Plug the other end of the cable into any USB port on the computer 4 Turn on the camera Note When the camera is connected to a computer only the switch operates The other camera buttons do not respond ...

Страница 46: ...he camera The status LCD displays PC to indicate the camera is connected to a computer 3 If the welcome screen appears on your computer screen click OK 4 After a few seconds the Automatic Image Unload window appears When the countdown timer expires the software begins unloading new images from the camera to the computer To pause the automatic unload click Pause You can set up your Automatic Image ...

Страница 47: ...ult images are stored in the Photo Impressions folder for example Macintosh HD ArcSoft PI Photos 2002 07 04 If you ever decide to delete the ArcSoft PI folder you must first move your images to another folder If you do not your images will be deleted from the hard disk when you delete the PhotoImpression folder You can unload images manually without using the ArcSoft software When you connect the ...

Страница 48: ... and Paste commands to transfer selected images to your hard drive Macintosh Double click the Untitled drive icon and then drag and drop the selected files to your hard drive Using a card reader You can use a CF memory card reader such as the SanDisk ImageMate or a PCMCIA adapter to view and save image files on your computer If you have a CF card reader installed on your computer insert the CF mem...

Страница 49: ...ce use batteries when you are taking pictures To preserve battery power use an AC adapter purchased separately when you are reviewing images on the display for an extended period of time or when you are transferring photos from the camera to your computer Determining if the batteries need to be changed The battery symbol on the status LCD indicates the charge level of the batteries There are three...

Страница 50: ...ine have the shortest To extend battery life When using the camera with a computer or when using the image display for extended periods of time use an AC power adapter that HP has approved for use with the digital camera Limit your use of the image display except when using an AC power adapter Use only batteries that are designed for digital cameras such as photo quality titanium alkaline photo li...

Страница 51: ...he camera when you connect an AC adapter To insert new batteries Make sure that the camera is off and see Step 2 Install the batteries on page 4 for specific instructions CAUTION Replace all the batteries at the same time Do not replace the batteries individually or use batteries of different types Always follow the instructions on the battery package when handling or disposing of batteries Using ...

Страница 52: ...r provides power to the camera It does not recharge the batteries To connect an AC power adapter 1 Plug the adapter into a power source such as a wall outlet or power strip 2 Connect the round end of the adapter cable to the camera Note If you want to use battery power remove the AC adapter from the camera If the AC adapter is connected to the camera even if it is not connected to a power source t...

Страница 53: ...emory card Most CF memory cards are already formatted when you buy them However if you buy a CF memory card that has not been formatted you need to format it before you can use it in the camera You might also have to format a CF memory card if you insert a new formatted card in the camera and it does not work the card was previously used in a different camera Formatting the card optimizes it for u...

Страница 54: ...soft lint free cloth to gently wipe the lens and status and image displays to clean off any fingerprints and dust Wipe the outside surfaces of the camera with a clean dry cloth Never use a rough cloth or abrasive cleaners which can scratch the camera Do not leave the camera in the sun or in a very warm location for example inside a car for long periods If you move the camera from a cold to a warm ...

Страница 55: ...rechargeable batteries Do not attempt to recharge these batteries Do not mix old and new batteries or batteries of different types Follow the battery manufacturer s safety instructions When disposing of batteries follow the battery manufacturer s disposal and recycling instructions or the guidelines that are recommended for your area Do not incinerate or puncture batteries Use only the HP approved...

Страница 56: ...HP photosmart 715 user guide 48 ...

Страница 57: ... card door The batteries are not functioning correctly Check the following conditions The type of batteries that you have installed in the camera may not be the appropriate type for a digital camera Use only four photo quality AA titanium lithium alkaline or NiMH batteries Make sure the batteries are inserted correctly The positive and negative poles may be reversed The charge in the batteries may...

Страница 58: ... use battery power disconnect the AC adapter from the camera If you want to use AC power connect the AC adapter to a working electrical outlet The camera does not respondwhen I press a button The camera is off Slide the switch to turn on the camera if you want to take a picture or turn on the image display if you want to review your images The camera is connected to a computer If the status LCD di...

Страница 59: ...tteries These batteries are available from various battery manufacturers The camera turns on and consumes battery power while you carry it loose in a purse or backpack Always carry the camera securely in a case The NiMH batteries you are using were recharged incorrectly You must recharge all four NiMH batteries after fully draining them four times for the batteries to reach their optimum capacity ...

Страница 60: ...amera requires a longer exposure Keep the camera very steady by placing it on a tripod until it takes the picture or improve the lighting conditions or use the flash A red light appears next to the viewfinder when I press the SHUTTER button The camera is still saving the last picture you took Wait a few seconds for the camera to finish processing the image and then press the SHUTTER button halfway...

Страница 61: ...to 60 cm 7 9 inches to 23 7 inches away from you use the macro focus setting For more information see Using the macro focus setting on page 10 The camera cannot find a focus because the subject does not provide enough contrast for the automatic focus system Try a different angle or change the lighting on your subject You can also use focus lock to set the focus on a different subject For more info...

Страница 62: ... the middle of the image or if the subject lacks contrast use focus lock to set the camera s automatic focus using a different subject For more information see Using focus lock on page 9 The subject moved while you took the picture If you are photographing a moving object try using focus lock You moved the camera while you took the picture Hold the camera steady as you press the SHUTTER button or ...

Страница 63: ...correctly Make sure that the USB cable is firmly connected at both ends The camera is connected to the computer through a USB hub and your USB hub is not compatible with the camera Connect the camera directly to a USB port on the computer The camera needs to be reset Turn the camera off and then on again The computer does not recognize the camera and the automatic image unload does not start The c...

Страница 64: ...otosmart for Tips for using your camera more effectively and creatively HP digital camera driver updates and software HP assistance If you cannot find an answer to your question using the sites listed above visit www hp com cposupport mail_support html From there you can discover how to contact HP through e mail phone and other methods Visiting related Web sites Links to third party Web sites are ...

Страница 65: ...Before you call Please have the following information ready before you call serial number found on the bottom of your camera product name date of purchase Obtaining support within the United States Free telephone support for one year Within one year of your purchase telephone support is provided to you free of charge If this is a long distance call for you long distance charges will apply Call 208...

Страница 66: ... convenience of door to door pickup with delivery packaging and freight prepaid by HP For more information please visit www hp com go hpsupportpack or call 1 888 999 4747 Obtaining support worldwide If you need help with your HP product please call the phone number listed below for the Customer Support Center in your country Telephone support is free for 1 year in Asia and the South Pacific and 30...

Страница 67: ...g the warranty period 877 621 4722 for support after the warranty period Chile 800 22 5547 Post sales Business Computing 800 360 999 Post sales Home Computing China 86 10 6564 5959 Colombia 9 800 919 477 Czech Republic 42 0 2 6130 7310 Denmark 45 39 29 4099 Egypt 202 7956222 or 7956222 local Finland 358 0 203 47 288 France 33 0 1 43 62 34 34 Germany 49 0 180 52 58 143 DM 24 min Euro 12 min Greece ...

Страница 68: ...gal 351 21 3176333 Puerto Rico 1 877 232 0589 Romania 40 1 315 44 42 or local 01 3154442 Russian Federation 7 095 797 3520 Moscow 7 812 346 7997 St Petersburg Singapore 65 272 5300 South Africa 086 000 1030 RSA 27 11 258 9301 outside RSA Spain 34 902 321 123 Sweden 46 0 8 619 2170 Switzerland 41 0 848 80 11 11 Taiwan 886 2 2717 0055 Thailand 66 2 661 4000 Turkey 90 216 579 71 71 Ukraine 7 380 44 4...

Страница 69: ...ftware interfacing parts or supplies not supplied by HP c unauthorized modification or misuse d operation outside of the published environmental specifications for the product or e improper site preparation or maintenance 6 TO THE EXTENT ALLOWED BY LOCAL LAW THE ABOVE WARRANTIES ARE EXCLUSIVE AND NO OTHER WARRANTY OR CONDITION WHETHER WRITTEN OR ORAL IS EXPRESSED OR IMPLIED AND HP SPECIFICALLY DIS...

Страница 70: ...O THE EXTENT LAWFULLY PERMITTED DO NOT EXCLUDE RESTRICT OR MODIFY AND ARE IN ADDITION TO THE MANDATORY STATUTORY RIGHTS APPLICABLE TO THE SALE OF THIS PRODUCT TO YOU Hardware repair services If you think your camera ADF or XPA needs repair first call the Customer Support Center which can help determine if service is required and direct you to a service site For more information see Contacting HP C...

Страница 71: ...ra indicator lights LEDs the menus that appear on the image display the camera specifications Symbols on the status LCD Batteries good Batteries low Batteries empty Automatic flash on Flash off Flash on Automatic flash with red eye reduction on Good image quality Better image quality A ...

Страница 72: ...s ready to take a picture Green blinking The camera cannot find a focus or light is insufficient to take the picture Red The camera cannot take a picture for one of the following reasons the flash is recharging the last picture is still being processed the CF memory card is full damaged unformatted or missing Self timer Red blinking The self timer is counting down 10 seconds and will then take the...

Страница 73: ...l display magnifications and reductions Lock Tag images as read only locked images cannot be deleted Setup Gain access to the following setup options Reformat the CompactFlash card Set date and time Enable or disable Instant Review Adjust image display brightness Turn the beep on or off Configure USB protocol Set the language that is used for the camera menus ...

Страница 74: ...al zoom 2x digital zoom Shooting modes Single shot Exposure control Automatic Aperture Wide f 2 8 to f 8 0 wide Tele f 2 5 to f 10 0 Shutter speed 4 ms f 2 0 and 2 ms f 8 0 Focus Normal TTL automatic focus 60 cm 23 7 inches to infinity Macro 20 cm to 60 cm 7 9 to 23 7 inches Sensitivity ISO 100 White balance Automatic Self timer 10 second delay Viewfinder Optical viewfinder Flash Built in flash wi...

Страница 75: ...rence 67 Interfaces USB Dimensions Height 74 mm 2 91 inches Width 127 mm 5 inches Depth 82 mm 3 23 inches with lens fully extended 63 mm 2 48 inches with lens in off position Weight 308 g 10 87 oz without batteries ...

Страница 76: ...HP photosmart 715 user guide 68 ...

Страница 77: ...d off 28 BETTER and BEST image qualities 24 blinking battery icon 42 green light 53 64 red light 64 self timer icon 64 blurry images 54 bonus software 31 36 bright images 55 brightness adjusting 27 C card reader 40 caring for camera 46 cautions batteries 47 CF memory card 5 safety 47 CF memory card capacity 52 caring for 47 cautions 5 deleting contents 45 deleting images 14 description 45 file nam...

Страница 78: ...ile 16 driver updates 56 E empty batteries 41 42 enlarging images 19 exposures automatic 9 using shutter button 9 extending battery life 51 F file name from CF memory card 13 flash adjusting for insufficient lighting 22 adjusting for red eye 22 fill 22 forcing off 22 provided too much light 55 range 54 recharging 52 64 types of settings 21 using 21 flash memory See CF memory card FLASH OFF setting...

Страница 79: ...talling batteries 4 bonus software 36 CF memory card 5 software on Macintosh computer 36 software on Windows computer 31 wrist strap 3 Instant Review 25 ISO sensitivity 66 L language changing 28 choosing 4 wrong one displayed 52 lens system 66 lighting adjusting for insufficient 22 flashing settings for 21 when low 53 lights on camera 2 64 Lock menu 65 locking focus 9 images 20 low lighting 53 M M...

Страница 80: ...amera 41 previewing See viewing Print menu 65 print orders creating 16 editing 17 printing from 16 status 13 printing images 16 29 without a computer 40 problems troubleshooting 49 purchasing AC adapter 44 card reader 40 CF memory card 45 HP SupportPack 58 Q quality of images See image quality Quick Reference Photo Imaging 33 R range for Auto Focus 54 for flash 54 recharging batteries 42 flash 52 ...

Страница 81: ... after batteries removed 26 setting 26 where shown 13 wrong one displayed 51 timer See self timer transferring images See downloading images troubleshooting problems 49 turn on camera does not 49 U unloading images pausing 33 to Macintosh computer 38 to Windows computer 32 without using software 39 unlocking images 20 unresponsive camera 50 updates for drivers 56 USB changing USB protocol setting ...

Страница 82: ... Windows computer bonus software 31 connecting camera to 31 downloading images 32 installing software 31 system requirements 30 unloading images 39 using camera with 30 using camera with NT 4 0 33 wrist strap attaching 3 Y yellow border 18 Z zooming 10 ...

Страница 83: ......

Страница 84: ......

Отзывы: