background image

(lawn mowers, forks etc..) children and domestic
animals may occur.

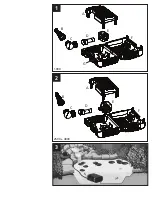
(Fig 3)

ASSEMBLY

1. Open the clips at either end of the strainer cage and
open the cage.

2. Remove the Wildlife Protection system (Fig1 – a).

3. Remove & unpack the ball joint, hosetails & outlet
adaptor (Fig 1 – b, c & d).

4.Remove the mains supply cable and unwind.

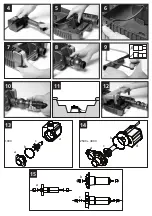
5. Screw the outlet adaptor onto the outlet of the pump.
Do not over tighten (Fig 4).

6. Locate the pump onto its mounting area ensuring that
the outlet adaptor rests in the recess in the lower part of
the cage (Fig 5).

Note: 

1000 model: The pump locates into a cradle that is

fixed to the lower cage (Fig 1 - g).

7. Locate the mains supply cable into the recess on the side
of the cage. Ensure it is seated in the correct position so
that the cable does not get trapped when the cage is
closed. (Fig 6).

8. Close the cage lid and secure by pressing in the centre of
the clips (Fig 7).

9. Checking that the ball joint’s inlet and outlet bosses are
in line, firmly screw the nut on to the screw thread on the
outlet adaptor (Fig 8).

10. Using small bore hoses leads to excessive restriction of
the water flow. The larger the diameter of hose that you
use the better the performance of the pump will be,
especially over long hose runs. The hosetail supplied with
this unit will accommodate 25mm (1"), 32mm (1.25") and
40mm (1.6") hose as well a ¾” BSP screw thread for
attaching fountain accessories. We would always
recommend that on pumps of this size, that the 40mm
diameter hose should be used when using the pump as a
waterfall pump or in combination with a filter (Fig 3). Once
you have selected the hose diameter you wish to use, cut
the steps off the hosetail which are smaller than the hose
diameter to eliminate restriction (Fig 9). Attach a suitable
length hose to the hosetail and secure with a suitable hose
clip and position the outlet end of the hose in the desired
position.

11. Screw the hosetail directly onto the outlet boss of the
ball joint (Fig 10). The ball joint can be rotated to allow the
hose to be directed away from the pump.

Pond Pump Position

12. For the best results, the pump should be positioned in
the deepest part of the pond.

This will ensure the best circulation of water in the pond
and when being used as a filtration pump, its solids
handling capability will be maximised.

For best results, the pump should not be placed directly on
the bottom of the pond. We recommend that the pump be
installed on a flat level platform which is raised
approximately 300mm above the bottom of pond. This will
ensure that sufficient water remains in the pond in the
event of accidental leakage of pond water (See fig 11).

Never use the mains supply cable to lift the pump, as this
may cause damage. We recommend fitting a lifting cord to

the handle on the strainer cage when the pump is installed
in deep water.

Wildlife Protection System (WPS) 

13. If you have fish or other wildlife in your pond, there
are periods in the year during which they may breed. At
this time the fish ‘fry’ are small and can be sucked into the
pump. To minimise this possibility, the Aquaforce range of
pumps has a unique Wildlife Protection System (WPS),
which reduces the inlet strainer hole size down to 2mm at
this critical time in fishes’ life cycle. To use this feature,
locate the WPS’s 4 legs into the corresponding area in the
lower cage as shown in Fig 12 ensuring that the WPS is the
correct way round. Close the top of the cage and secure
the clips. Whilst the WPS is in use, you may need to
unblock the Strainer Cage more frequently. Once the fish
or other wildlife have grown to a sufficient size you can
then remove the WPS from your pump’s cage and return
the strainer size to its maximum 6mm size.

The Hozelock Cyprio range of Aquaforce pumps have been
designed to allow fast and easy maintenance. To prolong
the life of your pump and keep your pump in peak
condition, you should follow these maintenance
guidelines.

Caution

: Always unplug or disconnect ALL appliances in

the pond from the electricity supply before putting your
hands in the water or starting maintenance.

1. When the pump is newly installed, you should check
your pump daily that it is performing correctly.

2. If you notice a drop in performance (low flow) you
should clean the strainer cage. Cleaning intervals will vary
depending on the condition of your pond’s water. This
could be as often as weekly in the summer months. To
clean the strainer cage, open the clips and remove the
pump. The cage can then be wiped clean of debris
blocking the strainer holes and washed in clean water. You
should also check that the pump chamber & rotor are not
blocked with debris.

3. At least once a year you should completely disassemble
the pump including the rotor assembly as described below
and wash all components in clean, fresh water. Replace
worn or broken parts.

Pump Dismantling & Assembly 

(Fig. 13 (1000) - Fig 14 (2500 & 4000))

a. Switch off the pump and remove the strainer cage as
described above and remove the pump.

b. Ensure the pump is cool before dismantling it.

c. Release the pump chamber (a) by rotating it until the
two retaining tongues are clear of the lugs on the motor
body.

d. Gently pull the pump chamber squarely away from the
motor body (d).

e. Pull the rotor assembly (c) out of the motor body (d).

Important!

Take extra care so as to not drop any of the

small components. See Fig 15-a for assembly of the 1000
rotor, Fig 15-b for the assembly of the 2500 rotor and Fig
15-c for assembly of the 4000 rotor.

f. Wash out all of the components in clean water. Do not
use detergents or other chemical cleaners.

g. Replace the rotor assembly into the motor body, refit
the pump chamber and return the pump to the strainer
cage.

4. If you live in a hard water area (water with high levels of
calcium or limescale content), the pump, rotor assembly

Typical Installation

Pump Assembly & Installation

Maintenance

Содержание Aquaforce 1000

Страница 1: ...2823 1580 1581 1582 Hozelock Ltd Midpoint Park Birmingham B76 1AB England Tel 44 0 121 313 1122 info hozelock com www hozelock com 43388 002 aquaforce 1000 2500 4000 ...

Страница 2: ...1000 2500 4000 A B D C E F G A B D C E F 1 2 3 ...

Страница 3: ...300mm a b c a a d c b a c b 2500 4000 1000 6 9 12 4 7 10 5 8 11 14 13 15 ...

Страница 4: ...om the electricity supply before putting your hands in the water whilst equipment is being installed repaired maintained or handled 4 Never use the mains supply cable to lift the pump as this may cause damage We recommend fitting a lifting cord to the handle on the strainer cage when the pump is installed in deep water 5 Do not operate or leave the pump in freezing conditions 6 Protect the pump fr...

Страница 5: ...Protection System WPS 13 If you have fish or other wildlife in your pond there are periods in the year during which they may breed At this time the fish fry are small and can be sucked into the pump To minimise this possibility the Aquaforce range of pumps has a unique Wildlife Protection System WPS which reduces the inlet strainer hole size down to 2mm at this critical time in fishes life cycle T...

Страница 6: ...FROM PUMP 1 Check the power supply is on 2 Check the fuse RCD and wiring 3 Check that the rotor assembly is not jammed blocked damaged or showing signs of excessive wear 4 Ensure that the strainer cage is clean 5 The thermal overload protection has tripped see INTRODUCTION If this pump excluding the rotor assembly becomes unserviceable within 3 years of the date of purchase it will be repaired or ...

Страница 7: ...r la personne responsable de leur sécurité Les enfants doivent être supervisés pour s assurer qu ils ne jouent pas avec l appareil Pour l Australie la Nouvelle Zélande seulement Cet appareil n est pas destiné à être utilisé par des jeunes enfants ou des personnes handicapées à moins qu ils ne soient supervisés par une personne responsable pour s assurer qu ils utilisent l appareil de manière sûre ...

Страница 8: ...uis positionnez la sortie de tuyau dans la position désirée 11 Screw the hosetail directly onto the outlet boss of the ball joint Fig 10 The ball joint can be rotated to allow the hose to be directed away from the pump La position de la pompe de bassin 12 Pour obtenir les meilleurs résultats la pompe doit être placée dans la partie la plus profonde du bassin Ceci permettra d obtenir la meilleure c...

Страница 9: ...nettoyer les dépôts de calcaire ou de tartre utilisez une petite brosse en nylon une brosse à dent par exemple Démontez la pompe comme décrit ci dessus et retirez le rotor Nettoyez les dépôts de tartre sur le rotor en utilisant de l eau propre Si le dépôt de calcaire s accumule la protection de surcharge thermale risque de se déclencher Voir INTRODUCTION 1 Vous devez retirer votre pompe du bassin ...

Страница 10: ...inweise kann zu Verletzungen Schäden am Produkt oder zum Verlust von Fischen führen 1 Diese Pumpe wurde speziell für Teiche entwickelt Die Pumpe nur für den Betrieb von Teichfiltersystemen Wasserspielen Wasserfällen etc verwenden Die Pumpe nicht für andere Zwecke benutzen z B in Swimming Pools Badezimmern Zentralheizungsanlagen etc Wird das Produkt anderweitig verwendet besteht die Gefahr einer Ve...

Страница 11: ...n werden 7 Das Pumpenkabel und das Verlängerungskabel sollten so verlegt werden dass sie angemessen vor einer Beschädigung geschützt sind insbesondere in Bereichen wo ein Kontakt mit Gartengeräten Rasenmähern Forken usw Kindern und Haustieren möglich ist Abb 3 MONTAGE 1 Klemmen an einem beliebigen Ende des Siebkäfigs öffnen und den Käfig öffnen 2 System zum Schutz von Wildleben herausnehmen Abb 1 ...

Страница 12: ...kel zu entfernen die die Sieblöcher verstopfen und anschließend in sauberem Wasser ausgespült werden Es sollte auch geprüft werden ob die Pumpenkammer und der Rotor frei von Partikeln sind 3 Mindestens einmal pro Jahr sollte die Pumpe einschließlich der Rotorbaugruppe wie nachstehend beschrieben vollständig auseinandergebaut werden und alle Teile sollten in sauberem frischem Wasser ausgespült werd...

Страница 13: ...w hozelock com 3 2 Jährige Garantie von Hozelock Cyprio NL INSTALLATIE EN BEDIENINGSHANDLEIDING LEES DEZE HANDLEIDING AANDACHTIG DOOR ALVORENS HET APPARAAT TE INSTALLEREN BEWAAR DE HANDLEIDING VOOR LATER GEBRUIK a Dierbeschermingssysteem b Slangkoppeling moer c Kogelscharnier d Uitlaatadapter e Pomp f Filterhuis g Pompframe alleen Aquaforce 1000 De pomp wordt elektrisch aangedreven en is ontworpen...

Страница 14: ...e zeefkooi gebruikt kan uw garantie vervallen 9 LET OP Dit product is niet geschikt voor water warmer dan 35 C 10 LET OP Gebruik dit product niet als de stroomkabel of de motor op enigerlei wijze beschadigd is De stroomkabel kan niet worden vervangen aangezien deze vast zit in de motorbehuizing en dient derhalve volgens plaatselijke regelgeving te worden verwijderd 11 Als u in een gebied woont met...

Страница 15: ...vast Tijdens gebruik van het DBS kan het zijn dat u de zeefkooi vaker dient schoon te maken Zodra de vissen of andere dieren voldoende gegroeid zijn kunt u het DBS uit uw pompkooi verwijderen en de zeefgrootte terugbrengen naar de maximale grootte van 6 mm De Hozelock Cyprio serie Aquaforce pompen is ontworpen voor snel en eenvoudig onderhoud Om de levensduur van uw pomp te verlengen en uw pomp in...

Страница 16: ...pdatum onbruikbaar wordt zal deze gratis worden gerepareerd of vervangen door ons te bepalen tenzij de pomp volgens ons is beschadigd of verkeerd is gebruikt Om deze 3 jarige garantie te verlengen naar 5 jaar dient u zich te registreren op http register hozelock com Wij accepteren geen aansprakelijkheid voor schade vanwege ongelukken onjuiste installatie of onjuist gebruik Onze aansprakelijkheid b...

Страница 17: ... o persone inferme senza l adeguata supervisione da parte di una persona responsabile che si assicuri che sappiano utilizzare l apparecchio in modo sicuro I bambini vanno sempre supervisionati per assicurare che non giochino con l apparecchio 3 ATTENZIONE Staccare la spina o scollegare dalla rete elettrica tutte le apparecchiature nel laghetto prima di immergere le mani nell acqua durante l instal...

Страница 18: ...el laghetto In questo modo si impedirà che la pompa risucchi detriti dal fondo del laghetto e si assicurerà che una quantità sufficiente di acqua rimanga nel laghetto nel caso di una perdita accidentale di acqua dal laghetto stesso vedere Fig 11 Non utilizzare il cavo di alimentazione per sollevare la pompa in quanto si potrebbe danneggiarla Se la pompa viene installata in acque profonde consiglia...

Страница 19: ...tro ridotto impedirà il normale flusso di uscita dalla pompa 3 Assicurarsi che la camera della pompa non sia ostruita PORTATA ASSENTE DALLA POMPA 1 Controllare che la pompa sia collegata alla rete elettrica 2 Controllare il fusibile l interruttore differenziale e le connessioni elettriche 3 Controllare che il gruppo rotore non si sia inceppato bloccato danneggiato o eccessivamente usurato 4 Contro...

Страница 20: ...erte de peces 1 Esta bomba ha sido diseñada para ser usada en estanques solamente Debe usarse únicamente para operar sistemas de filtración de estanques adornos acuáticos cascadas de agua etc No debe usarse para otro fin es decir no usar esta bomba en piscinas cuartos de baño sistemas de calefacción central etc Si el producto se usara para otra aplicación puede producir lesiones o dañar el product...

Страница 21: ...e sobre la rosca del adaptador de salida Fig 8 10 El flujo del agua se restringe demasiado si se usan mangueras de diámetro pequeño Cuanto mayor sea el diámetro de la manguera que se use mejor será el rendimiento de la bomba especialmente cuando se trata de largos tramos de manguera El acoplamiento de extremo de manguera que viene con esta unidad soporta mangueras de 25 mm 32 mm y 40 mm y además v...

Страница 22: ...tamiz 4 Si Ud reside en una zona de agua dura agua con un elevado contenido de calcio o de cal se debe limpiar regularmente la bomba el conjunto del rotor y la parte interior del motor La frecuencia de la limpieza que se requiere varía según la dureza del agua de manera que se debe revisar el equipo regularmente para constatar si hay indicios de acumulación de calcio Se puede usar una pequeña esco...

Страница 23: ...e från vattnet OBS AUTOMATISKT FRÅNSLAGNINGSDON För att göra pumpen hållbar och skydda mot skador är den utrustad med automatiskt överbelastningsskydd Detta stänger av pumpen om den blir överhettad Om detta inträffar ska du stänga av strömmen vid nätaggregatet till pumpen Ta reda på orsaken Ofta är det skräp som blockerar pumpinloppen eller hindrar pumphjulet Avlägsna blockeringen och vänta tills ...

Страница 24: ...åste placeras i ett torrt vattentätt hölje 4 En 10 mA eller 30 mA restströmanordning RCD måste monteras på nätaggregatet 5 Installationen måste stämma med alla gällande bestämmelser för ledningsdragning vid behov med skyddsrör av plast eller metall kring kabeln 6 VARNING Denna apparat måste anslutas till en jordad spänningskälla 7 Pumpsladden och förlängningskabeln ska dras och skyddas väl mot ska...

Страница 25: ...ren rakt från motorhuset d e Dra ut rotorn komplett c ur motorhuset d Viktigt Var särskilt försiktig för att inte tappa någon av smådelarna Se fig 15 a beträffande hopmontering av rotor 1000 Fig 15 b för hopmontering av rotor 2500 och Fig 15 c för hopmontering av rotor 4000 f Skölj ur alla komponenterna i rent vatten Använd inte tvättmedel eller andra kemiska rengöringsmedel g Sätt tillbaka rotorn...

Страница 26: ...estä Tarkista syy Syynä on tavallisesti pumpun syöttöaukon tukkiva tai juoksupyörän toimintaa estävä lika Poista esteet ja anna pumpun jäähtyä Kytke sitten pumpun virta uudelleen HUOMAA AQUAFORCE 2500 JA 4000 PUMPPU NOLLAUTUU VASTA KUN PÄÄVIRTALÄHDE KATKAISTAAN Seuraavien huomautusten noudattamatta jättäminen voi aiheuttaa vamman tuotevaurion tai kalojen kuoleman 1 Tämä pumppu on tarkoitettu käyte...

Страница 27: ...ohonleikkureiden hankojen jne lasten ja kotieläinten kanssa Kuva 3 KOKOAMINEN 1 Avaa suotimen kummassakin päässä olevat pidikkeet ja avaa suodin 2 Poista eläimistöä suojaava järjestelmä kuva 1 a 3 Poista ja pura kuulanivel letkunpää ja ulostulosovitin kuva 1 b c ja d 4 Poista sähköjohto ja avaa se kerältä 5 Kierrä ulostulosovitin pumpun ulostuloon Älä kiristä liikaa kuva 4 6 Sijoita pumppu asennus...

Страница 28: ...tietoja 2500 roottorin kokoamisesta ja kuvasta 17 c tietoja 4000 roottorin kokoamisesta f Pese kaikki komponentit puhtaalla vedellä Älä käytä puhdistusaineita tai muita kemiallisia aineita g Asenna roottoriyksikkö takaisin moottorirunkoon kiinnitä pumppukammio paikalleen ja palauta pumppu suotimeen 4 Jos asut kovan veden alueella veden kalkki tai kalkkikivipitoisuus on korkea pumppu roottoriyksikk...

Страница 29: ...pphetes Hvis dette skjer må du slå av strømmen til pumpen på hovednettforsyningen Kontroller årsaken Vanligvis er det rester som blokkerer inntaket i pumpen eller impelleren Fjern hindringen og vent til pumpen har kjølt seg ned Slå deretter på pumpen igjen MERK AQUAFORCE 2500 og 4000 DU MÅ SLÅ AV HOVEDNETTFORSYNINGEN FØR PUMPEN TILBAKESTILLES Hvis du ikke følger instruksjonene nedenfor kan det før...

Страница 30: ...beskytte kabelen 6 ADVARSEL Apparatet må kobles til en jordet forsyning 7 Pumpekabelen og skjøteledningen bør plasseres slik at den er beskyttet mot skader spesielt der det kan være kontakt med hageutstyr plenklipper gafler osv barn og husdyr Fig 3 MONTERING 1 Åpne klipsene på begge ender av filterburet og åpne buret 2 Fjern systemet for dyrevern fig 1 a 3 Fjern og pakk ut kuleledd slangestuss og ...

Страница 31: ...så du ikke mister noen av de små komponentene i bakken Se fig 15 a for montering av 1000 rotoren fig 15 b for montering av 2500 rotoren og fig 15 c for montering av 4000 rotoren f Vask alle komponentene i rent vann Bruk ikke vaskemidler eller andre kjemiske rensemidler g Sett rotorenheten inn i motorkroppen igjen sett pumpekammeret på plass og plasser pumpen i filterburet igjen 4 Hvis du bor i et ...

Страница 32: ... smørefedt til smøring og er derfor sikker at bruge i bassiner med fisk og planter Motoren består af en forseglet stator og en vandafkølet rotor Alle elektriske komponenter er isoleret fra vandet OBS AUTOMATISK AFBRYDER Pumpen er udstyret med automatisk termisk overbelastningsbeskyttelse der hjælper med til at sikre den en lang levetid samt forhindre beskadigelse Den slukker for pumpen hvis denne ...

Страница 33: ... med haveredskaber græsslåmaskiner og gravegrebe eller børn og husdyr INSTALLATION Fig 3 SAMLING 1 Åbn clipsene i hver ende af sifilterburet og åbn buret 2 Fjern Beskyttelse af dyreliv systemet Fig1 a 3 Tag kugleled slangenippel og udløbsadaptor ud pak dem ud Fig 1 b c d 5 Skru udløbsadapteren på pumpeudløbet Den må ikke overspændes Fig 4 6 Placér pumpen på dens monteringsområde idet det sikres at...

Страница 34: ...or samling af 1000 rotor Fig 15 b for samling af 2500 rotor og Fig 15 c for samling af 4000 rotor f Vask alle komponenter ud i rent vand Der må hverken bruges vaskemidler eller andre kemiske rengøringsmidler g Sæt rotorsamlingen tilbage i motorhuset genmontér pumpekammeret og sæt pumpen tilbage i sifilterburet 4 Hvis du bor i et område med hårdt vand vand med et højt indhold af calcium kalk skal p...

Страница 35: ...tas O motor consta de um estator vedado e um rotor arrefecido a água Todos os componentes eléctricos se encontram isolados da água ATENÇÃO CORTE AUTOMÁTICO Para ajudar a assegurar que a sua bomba dure muito tempo e para não sofrer danos a bomba inclui um elemento de protecção automática contra a sobrecarga térmica O elemento desliga a bomba em caso de sobreaquecimento Em tais casos deve se desliga...

Страница 36: ... bomba o conjunto do rotor e o interior do motor devem ser limpos a intervalos regulares ver MANUTENÇÃO 12 Utilizar apenas acessórios que tenham sido designados para serem utilizados com este produto A utilização de quaisquer outros acessórios pode invalidar a sua garantia 1 ADVERTÊNCIA Desligar ou desacoplar sempre todos os aparelhos do lago da respectiva fonte de alimentação antes de colocar as ...

Страница 37: ...esentupir mais vezes a caixa do coador Uma vez que os peixes ou outros animais selvagens tenham alcançado um tamanho suficientemente grande pode se retirar o WPS da caixa da bomba e o coador volta a ter o tamanho máximo de 6 mm A gama de bombas Aquaforce da Hozelock Cyprio foi concebida para permitir uma manutenção fácil e rápida Para prolongar a duração da bomba e manter a mesma nas melhores cond...

Страница 38: ...obrecarga térmica disparou ver INTRODUÇÃO Se esta bomba excluindo o conjunto do rotor se tornar inútil no prazo de 3 anos a contar da data em que foi comprada a bomba será consertada ou substituída por opção nossa gratuitamente a não ser que na nossa opinião tenha sido danificada ou mal utilizada Para aumentar esta garantia de 3 anos para 5 anos o cliente deve registar se em http register hozelock...

Страница 39: ...ezpiecze stwo Dzieci naleÃy pilnowaπ aby nie uÃywa y urzƒdzenia do zabawy Tylko Australia i NZ Z urzƒdzenia nie powinny korzystaπ dzieci ani osoby niepe nosprawne o ile nie znajdujƒ si one pod nadzorem osoby odpowiedzialnej dbajƒcej o ich bezpiecze stwo w trakcie uÃytkowania urzƒdzenia Dzieci powinny znajdowaπ si pod nadzorem osób doros ych Urzƒdzenie nie jest zabawkƒ 3 OSTRZE ENIE Zawsze przed w ...

Страница 40: ...ednio na dnie stawu Zalecamy zainstalowanie pompy na p askiej poziomej platformie znajdujƒcej si oko o 300 mm nad dnem stawu UniemoÃliwi to wsysanie zanieczyszcze bezpo rednio z dna stawu i w przypadku wycieku wody ze stawu w stawie pozostanie wystarczajƒca ilo π wody patrz rys 11 Nigdy nie naleÃy podnosiπ pompy za kabel zasilania moÃe to doprowadziπ do jej uszkodzenia JeÃeli pompa jest instalowan...

Страница 41: ...rawdziπ czy pompa jest pod ƒczona do zasilania 2 Sprawdziπ bezpiecznik wy ƒcznik róÃnicowo prƒdowy i okablowanie 3 Sprawdziπ czy zespó wirnika nie zosta zakleszczony zablokowany uszkodzony i czy nie jest nadmiernie zuÃyty 4 Sprawdziπ czy klatka filtrujƒca jest czysta 5 Ochrona termiczna przed przeciƒÃeniem zosta a w ƒczona Patrz WST P JeÃeli niniejsza pompa z wyjƒtkiem zespo u wirnika b dzie niezd...

Страница 42: ...Cz ci zamienne 1 Zespó komory pompy i uszczelka Z10005 Z10006 Z10007 2 Zespó wirnika 1680 1681 Z10000 3 Gwintowane z ƒcze wylotowe 1682 1682 1682 4 Z ƒcze kulowe Z10013 Z10013 Z10013 5 Stopniowane ko cówki do w Ãy i nakr tka Z10012 Z10012 Z10012 ...

Страница 43: ......
Страница 44: ...la croce Non smaltire apparecchiature elettriche con i rifiuti domestici utilizzare strutture di raccolta separate Contattare le autorità locali per informazioni sui sistemi di raccolta disponibili Se apparecchiature elettriche sono smaltite in discariche o sversatoi sostanze pericolose possono penetrare nella falda acquifera e quindi nella catena alimentare con possibili danni alla salute Nell UE...

Отзывы:

Похожие инструкции для Aquaforce 1000