background image

11 of 15

Indesit


Company

Service Manual UK

English

REVERSING THE DOORS

Fig 1:


Removing the Door and Top Hinge fittings

Open the door and ease the hinge cover strip out from above the door seal; starting from the area 
nearest to the hinge. Also remove the plastic plug button above the hinge pin at the top of the door.

Remove the hinge pin, whilst supporting the door.

Lift the door from the lower hinge.

Remove the hinge arm and bush, affixed at the top of the inner door and transfer to the left hand 
side.

Fig 2: 

Top Hinge, Blanking Plates and transfer to left hand side

Remove the plastic insert at each end of the control panel.

Remove the top hinge. Invert the top hinge and transfer to the other side. Insert the blanking plates 
in the control panel but in reversed positions to the originals.

Fig 3: Plinth, Bottom Hinge and Fixing Plate removal and transfer to left hand side

Remove the screws (T20 Torx) securing the plinth/kick plate.

Remove the bottom hinge and its fixing plate. Transfer them to the other side. Remove the hinge pin 
from the right hand side of the hinge and retain until the plinth is in place.

Insert the plinth blanking plate (supplied with the appliance) to the right hand side slot. Using a 
suitable tool push-out the similar size moulded area on the left hand side. Refit the plinth and lower 
hinge pin, using the hole on the left hand side.

Fig 4: Grab Handle, Blanking Plugs and bottom Bush/Closure Aid

Remove the grab handle from the left hand side and the plug buttons from the right hand side and 
transfer them to the opposite sides.

Remove the right hand bush closure aid from the bottom of the door and retain for right hand 
hinging. Fit the left hand bush/closure aid supplied with the appliance to the left hand side and 
secure with the screw.

Fig 5: Refitting the Door and Hinge Cover Strip

Lower the door onto the bottom hinge pin and manoeuvre it into position to locate the top hinge and 
hinge arm with bush. Replace the hinge pin ensuring that it is tight.

Replace the long hinge cover strip and the plug button at the top of the door.

Check that the door closes properly and that the door is sealing properly.

Содержание RZ150G

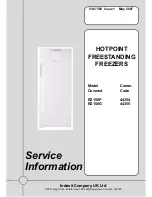
Страница 1: ...Company UK Ltd 2007 Reg Office Peterborough PE2 9JB Registered in London 106725 Service Information HOTPOINT FREESTANDING FREEZERS Model Comm Covered Code RZ150P 44354 RZ150G 44355 5407383 Issue 1 Ma...

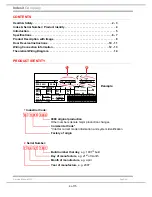
Страница 2: ...dless power tools are forbidden within the storage area working area and vehicles used to transport Isobutane 9 The carrying case for the scales and refrigerant must display a red flammability label P...

Страница 3: ...t aluminium canister placed in an upright position on the weighing scales provided 4 All used canisters must be a returned as scrap and therefore left out for the driver to collect and return for disp...

Страница 4: ...Bruto Brut Compr Kompr Syst R 134 a kg 0 090 Gross Bruto Brut 340 Net Util Utile Gross Bruto Brut Freez Capac Poder de Cong 75 Made in 13918 Test P S I Pressure HIGH 235 LOW 140 kg 24 h 4 0 Class Cla...

Страница 5: ...ic design so defrosting is actioned manually When the user defrosts the freezer the defrost water drains into the liner base and is channelled to a drain hole exiting through a spout moulded into the...

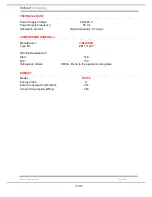
Страница 6: ...band models 40dB Climate Class Rating Plate A band SN N ST 10 C to 38 C Refrigeration Type Static Wire On Tube WOT DIMENSIONS WEIGHT Models RZ150 Height 1500 mm Width 600 mm Depth 655 mm Weight Gross...

Страница 7: ...uency 50 Hz Absorption Current Normal Operation 0 7 Amps COMPRESSOR WINDING Manufacturer JIAXIPERA Type I D ZBT1114CY Winding Resistance Start 16 0 Run 13 3 Refrigerant Grams R600a Refer to the applia...

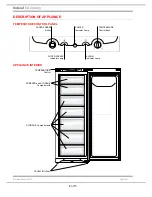
Страница 8: ...OF APPLIANCE TEMPERATURE CONTROL PANEL APPLIANCE INTERIOR SUPER FREEZE Button SUPER FREEZE Indicator Lamp ALARM Indicator Lamp TEMPERATURE Control Knob POWER Indicator Lamp FREEZER and STORAGE Compart...

Страница 9: ...9 of 15 Indesit Company Service Manual UK English NOTES...

Страница 10: ...anual Read the instructions on the next page fully and refer to the diagrams below before carrying out the door reversal Also before commencing the door reversal you will require the left door closure...

Страница 11: ...xing plate Transfer them to the other side Remove the hinge pin from the right hand side of the hinge and retain until the plinth is in place Insert the plinth blanking plate supplied with the applian...

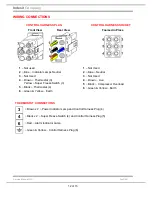
Страница 12: ...ed 4 Brown Thermostat 3 5 Black Thermostat 4 6 Green Yellow Earth 1 Not Used 2 Blue Neutral 3 Not Used 4 Brown Live 5 Black Compressor Overload 6 Green Yellow Earth Yellow Super Freeze Switch 3 THERMO...

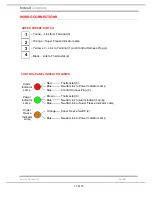
Страница 13: ...erminal 1 and Control Harness Plug 4 4 CONTROL PANEL INDICATOR LAMPS Alarm Indicator Lamp Red Thermostat 6 Blue Neutral Link to Power Indicator Lamp Blue Control Harness Plug 2 Power Indicator Lamp Br...

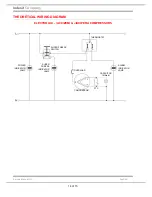
Страница 14: ...it Company English THEORETICAL WIRING DIAGRAM ELECTROLUX ACC ZEM JIAXIPERA COMPRESSORS OVERLOAD COMPRESSOR SUPER FREEZE INDICATOR LAMP POWER INDICATOR LAMP CAPACITOR if fitted SUPER FREEZE SWITCH ALAR...

Страница 15: ...anual UK English PARTS and ACCESSORIES To order parts and accessories contact our National Mail Order Parts Hotline 08709 077 077 Monday to Friday 8 00am to 5 30pm Saturday 8 30am to 12 00 noon or onl...

Отзывы: