background image

EN

9

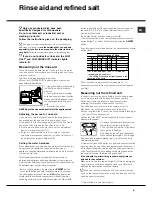
Rinse aid and refined salt

Only use products which have been

specifically  designed  for  dishwashers.

Do not use table salt or industrial salt, or

washing  up  liquid.

Follow  the  instructions  given  on  the  packaging.

If using a multi-functional product it is not necessary to

add rinse aid; however, 

we recommend that you add salt,

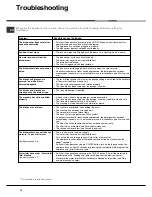
especially if you live in an area where the water is hard or

very hard.

 Follow the instructions given on the packaging.

If you do not add salt or rinse aid, the LOW

SALT

*

 and LOW RINSE AID

*

 indicator lights

remain  lit.

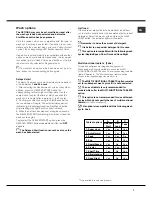
Measuring out the rinse aid

Rinse aid makes it easier for the crockery to dry, as water

runs off surfaces more readily and therefore does not leave

streaks or marks.

The rinse aid dispenser should be filled:
• When the LOW RINSE AID

*

 indicator light on the control

panel/dislay is illuminated;

1. Open the dispenser by turning

the lid (G) in an anticlockwise

direction.

2. Pour in the rinse aid, making

sure it does not overflow from the

dispenser. If this happens, clean

the spill immediately with a dry

cloth.

3. Screw the lid back on.

NEVER pour the rinse aid directly into the appliance tub.

Adjusting  the  amount  of  rinse  aid

If you are not completely satisfied with the drying results,

you may adjust the quantity of rinse aid used. Use a

screwdriver to turn the dosage adjuster (F) to one of the 6

pre-set positions (the default position is set to 4):

• If there are streaks on the crockery, set the adjustment

device to a lower number (1-3).

• If drops of water remain on the crockery or if there are

limescale marks present after the cycle has finished, set

the adjuster to a higher number (4-6).

Setting the water hardness

Every dishwasher is equipped with a water softener which, by

using refined salt designed especially for this type of

appliance, supplies water without limescale which is then used

to wash the crockery.
This dishwasher offers a setting which helps to reduce

pollution and optimises washing performance in accordance

with the water hardness level in your area. This information can

be obtained from your local water supplier.
- Switch on the appliance by pressing the 

ON/OFF

 button.

- Press the 

P

 button and hold for approximately 5 seconds;

two short beeps will sound, the text

 H2O

 will appear on the

display and the set hardness number will flash (the water

softening system is set by default to number 3). Press the 

P

button repeatedly until the desired hardness level has been
reached (1-2-3-4-5

*


see Water hardness table

), up to a

maximum of five levels.
(The default water softener setting is level 

3

).

- To exit the function, wait a few seconds or press one of the
option buttons

*

, or switch off the machine using the 

ON/OFF

button.
Even if using multi-functional tablets, the salt dispenser should

still be filled.

(°dH = hardness measured in German degrees - °f =

hardness measured in French degrees - mmol/l = millimoles
per litre)

Measuring out the refined salt

In order to achieve the best possible results using a wash

cycle, make sure that the dispenser is never empty.

Refined salt removes limescale from the water, thus

avoiding the formation of deposits on crockery.

The salt dispenser is located in the lower part of the

dishwasher (

see Description

) and should be filled:

• When the green float

*

 cannot be seen by simply looking at

the cap of the salt dispenser.

• When the LOW SALT

*

 indicator light on the control panel/

display is illuminated;

1. Remove the lower rack and unscrew

the container cap (anticlockwise).

2. The first time you do this: fill the water

tank right up to its edge.
3. Position the funnel

*

 (

see figure)

 and

fill the salt container right up to its edge

(this should hold approximately 1 kg); it is not unusual for a

little water to leak out.

4. Remove the funnel* and wipe any salt residue away from the

opening; rinse the cap under running water and then screw it

on, the head facing downwards so as to let the water flow out

of the four cracks which are arranged in a star shape on the
lower part of the cap. (Salt cap with green float

*

)

It is advisable to perform this procedure every time you

add salt to the container.

Make sure the cap is screwed on tightly, so that no detergent

can get into the container during the wash cycle (this could
damage the water softener beyond repair).

 When necessary, measure out the salt before a wash

cycle so that any saline solution which has leaked out of the
salt dispenser is removed.

*

 Only available in selected models.

G

F

Water Hardness Table


°dH °fH 

mmol/l 

level 

0 6 0  10 0 1 

6 11 11  20 1.1  2 

12  17  21 

30  2.1 

17 34 31  60 3.1  6 

34 50 61  90 6.1  9 

5

*


For values between 0°f and 10°f, we do not 
recommend the use of salt. 
* this setting may cause a slight increase in the 
duration of the cycle. 

Содержание LSF 935

Страница 1: ...es 8 Table of wash cycles Rinse aid and refined salt 9 Measuring out the rinse aid Measuring out the refined salt Care and maintenance 10 Shutting off the water and electricity supplies Cleaning the d...

Страница 2: ...hexagonal spanner red color with an opening of 8 mm in a clockwise direction to increase the height or in an anticlockwise direction to decrease the height Connecting the water and electricity supplie...

Страница 3: ...cal Assistance Service in order to prevent all potential hazards See As sistance The Company shall not be held responsible for any incidents that occur if these regulations are not observed Anti conde...

Страница 4: ...ls The number and type of wash cycles and options may vary depending on the dishwasher model Control panel Low Salt indicator light Low Rinse aid indicator light Washing indicator light Drying indicat...

Страница 5: ...saucepans which are not too soiled using the Loading examples as a guide Mugs and cups long sharp knives and serving utensils place these on the tip up compartments Tip up compartments with adjustable...

Страница 6: ...or light is illuminated and the time remaining until the end of the cycle is displayed 8 Two short beeps and one long one indicate the end of the wash cycle the Start Pause button switches off and the...

Страница 7: ...itches off and the wash cycle begins To deselect the DLEAYED START option press the DELAYED START button repeatedly until the text OFF appears The Delayed Start function cannot be set once the wash ha...

Страница 8: ...rance 10 Hrs Min Heavily soiled dishes and pans not to be used for delicate items 1 Super wash 25 g A 25 ml A 1 A Yes A B C 2 25 Normally soiled pans and dishes Standard daily wash cycle 2 Auto Normal...

Страница 9: ...ar on the display and the set hardness number will flash the water softening system is set by default to number 3 Press the P button repeatedly until the desired hardness level has been reached 1 2 3...

Страница 10: ...the water run to make sure it is clear and free of impurities before performing the necessary connections If this precaution is not taken the water inlet could become blocked and damage the dishwasher...

Страница 11: ...and to public health The crossed out dustbin is marked on all products to remind the owner of their obligations regarding separated waste collection For further information relating to the correct di...

Страница 12: ...ery has not been dried properly A wash cycle without a drying program has been selected The rinse aid has been used up or the dosage is too low see Rinse aid and salt The rinse aid dispenser setting i...

Страница 13: ...yldning af opvaskemiddel Tilvalgsfunktioner Programmer 20 Programtabel Afsp ndingsmiddel og salt 21 P fyldning af afsp ndingsmiddel P fyldning af salt Vedligeholdelse 22 Frakobling af vand og el Reng...

Страница 14: ...jden og drej venstre om for at mindske h jden se den medf lgende vejledning Tilslutning af el og vand Tilslutning til el og vandforsyning m udelukkende udf res af kvalificerede fagfolk Opvaskemaskinen...

Страница 15: ...men Hvis str mkablet er beskadiget skal det udskiftes af producenten eller dennes tekniske servicetjeneste s man undg r farlige situationer Se Service Producenten fral gger sig ethvert ansvar s fremt...

Страница 16: ...modeller Programnummer og type samt tilvalgsfunktioner varierer alt efter opvaskemaskinemodellen Betjeningspanel Display Kontrollampe for Mangel p afsp ndingsmiddel Kontrollampe for saltmangel Kontro...

Страница 17: ...gryder og pander som vist i Fyldningseksemplet Sm og store kopper lange og spidse knive serveringsbestik Anbring kopperne i klapperne Klapper med indstillelig h ldning H ldningen g r det muligt at op...

Страница 18: ...rtes vaskelampen lyser og p displayet vises programnummeret og den resterende tid til afslutning af cyklussen 8 Efter endt opvask vil to korte bip og et langt angive at programmet er afsluttet tasten...

Страница 19: ...t tilvalgsfunktioner skal man trykke p tasten FORSINKET START Den p g ldende kontrollampe t nder Med samme tast skal man indstille hvorn r programmet skal starte fra 1 til 24 timer 2 Bekr ft indstilli...

Страница 20: ...t snavsede gryder og tallerkener m ikke anvendes til mt lelige genstande 1 Super Wash 25 g A 25 ml A 1 A Ja A B C 2 25 Almindeligt snavsede gryder og tallerkener Dagligt standardprogram 2 Auto normal...

Страница 21: ...kemaskiner leverer vand uden kalk til opvask i opvaskemaskiner Denne opvaskemaskine kan man foretage indstillinger til reducering af forurening og optimering af vaskepr stationerne alt efter vandets h...

Страница 22: ...l be indtil det bliver helt klart og uden urenheder f r tilslutningen udf res I mod sat tilf lde kan man risikere at vandindgangen til stoppes og maskinen beskadiges Reng r j vnligt vandindtagningsfil...

Страница 23: ...edsm ssige og milj m ssige skader Symbolet med den overstregede affaldsspand findes p alle produkter for at minde om at de skal indsamles separat For yderligere oplysninger om korrekt bortskaffelse af...

Страница 24: ...iddel i Opvasken er ikke t r Der er valgt et program uden t rring Der mangler afsp ndingsmiddel eller doseringen er utilstr kkelig se Afsp ndingsmiddel og salt Doseringen af afsp ndingsmiddel er forke...

Страница 25: ...i oppvaskmiddel Vaskealternativer Programmer 32 Tabell over programmene Glansmiddel og mykgj ringsmiddel 33 Ha i glansmiddelet Ha i saltet Vedlikehold og ettersyn 34 Kople fra vann og str mtilf rselen...

Страница 26: ...en for ke h yden og mot urviseren for minske den se arket med innbyggingsanvisninger som er vedlagt dokumentasjonen Hydraulisk og elektrisk tilkobling Tilpasningen av det elektriske og det hydrauliske...

Страница 27: ...utsettes for trykk Dersom str mkabelen er delagt m denne byttes ut av produsenten eller dennes servicesenter slik at enhver fare unng s se assistanse Produsenten fraskriver seg ethvert ansvar dersom d...

Страница 28: ...ause Tast On Off Reset Tast for programvalg Tast for Forsinket start Display Tast for flerfunksjonstabletter Tast for halvfull maskin Programnummer Varsellampe Mangel p Salt Varsellampe Mangel p glans...

Страница 29: ...lite skitne i henhold til Eksempler p innlasting krus og sm kopper lange og spisse kniver arbeidsbestikk Plassere dem p de nedfellbare ristene Nedfellbare rister med variabel helling Hellingen gj r de...

Страница 30: ...t varsellampen for vasking tennes og programnummeret samt gjenst ende tid til syklusens slutt vises p skjermen 8 Til slutt h res to korte og ett langt bip som angir at programmet er ferdig start pause...

Страница 31: ...tiver trykk p tasten FORSINKET START den respektive varsellampen tennes Bruk den samme tasten til velge n r man nsker starte oppvasksyklusen fra 1 til 24 timer 2 Bekreft valget med start pause tasten...

Страница 32: ...0 timer min Veldig skittent servise og gryter skal ikke brukes til skj re gjenstander 1 Super Wash 25 g A 25 ml A 1 A Ja A B C 2 25 Normalt skittent servise og gryter Daglig standardprogram 2 Normal A...

Страница 33: ...askinen kan reguleres slik at forurensingen reduseres og man oppn r et bedre vaskeresultat iht vannets hardhetsgrad Denne opplysningen kan f s ved kontakte det lokale vannverket Sl p maskinen ved tryk...

Страница 34: ...at det er klart og rent f r tilkoplingen utf res Uten denne forholdsregelen er det fare at vanninnl pet tilstoppes og delegger oppvaskmaskinen Finnes bare p enkelte modeller Rengj re regelmessig filte...

Страница 35: ...alene de best r av optimeres og for unng mulige skader for helse og milj Symbolet med avfallsdunk med kryss over er satt p alle produkter for minne om kravet om separat innsamling For ytterligere oppl...

Страница 36: ...valgt et program uten t rking Glansmiddelet er oppbrukt eller doseringen er utilstrekkelig se Glansmiddel og salt Ikke korrekt regulering av glansmiddelet Serviset er ikke rent Det er lagt for mye op...

Страница 37: ...en P fyllning av diskmedel Disktillval Program 44 Programtabell Sk ljmedel och h rdningssalt 45 P fyllning av sk ljmedel P fyllning av h rdningssalt Underh ll och sk tsel 46 Avst ngning av vatten och...

Страница 38: ...ten av diskmaskinen Anv nd en 8 mm nyckel Vrid medurs f r att h ja och moturs f r att s nka st dfoten se instruktionsbladet f r inbyggnad som f ljer med dokumentationen Anslutningar av vatten och el A...

Страница 39: ...b jas eller kl mmas Om matningskabeln r skadad ska den bytas ut av till verkaren eller av dess auktoriserade verkstad f r att und vika alla typer av risker Se Kundservice F retaget avs ger sig allt an...

Страница 40: ...Antalet program och programtyper samt tillval varierar beroende p diskmaskinsmodell Man verpanel Display Kontrollampa f r Sk ljmedel saknas Kontrollampa f r Salt saknas Kontrollampa f r senarelagd sta...

Страница 41: ...l ga l ttsmutsade kastruller Lastningsexempel Glas och koppar l nga och vassa knivar serveringsbestick Placera dem p de uppf llbara hyllorna Uppf llbara hyllor med variabel vinkling Tack vare vinklin...

Страница 42: ...rollampan f r diskningen t nds och p displayen visas programmets nummer och terst ende tid f r programmet 8 N r programmet r klart h rs tv korta och en l ng ljudsignal Start paus knappen sl cks och di...

Страница 43: ...l har valts Kontrollampan t nds Anv nd samma knapp f r att v lja n r du vill att diskprogrammet fr n 1 till 24 timmar ska starta 2 Bekr fta valet med Start Paus knappen och nedr kningen b rjar Den val...

Страница 44: ...mt ligt diskgods 1 Super Wash 25 g A 25 ml A 1 A Ja A B C 2 25 Normalt nedsmutsat porslin och kastruller Dagligt standardprogram 2 Auto normal 21 g A 4 g B 21 ml A 4 ml B 1 A Ja A B C 1 50 F rdisk i...

Страница 45: ...askin medger en reglering som minskar f rorening och optimerar diskresultatet i f rh llande till vattnets h rdhet Information om vattnets h rdhet kan erh llas fr n kommunen Tryck p knappen ON OFF f r...

Страница 46: ...ls det r klart och utan orenheter Utan denna f rebyggande tg rd finns det risk f r att vatteninloppet t pps till och skadar diskmaskinen Reng r regelbundet vatteninsl ppsfiltret som sitter vid kranens...

Страница 47: ...pp separat f r att optimera tervinningen av materialet som ing r i apparaten och f rhindra potentiella skador p h lsan och milj n Den verkryssade papperskorgen som sitter p alla produkter p minner om...

Страница 48: ...nser p disken och glas F r stor m ngd diskmedel doseras Disken r fuktig Ett program utan torkning har valts Sk ljmedlet r slut eller otillr cklig dosering se Sk ljmedel och salt Felaktig reglering av...

Страница 49: ...minnot Ohjelmat 56 Ohjelmataulukko Huuhteluaine ja suola 57 Huuhteluaineen lis minen Elvytyssuolan lis minen Huolto ja hoito 58 Veden ja s hk virran pois sulkeminen Astianpesukoneen puhdistaminen Ik v...

Страница 50: ...en lis miseksi ja vastap iv n sen v hent miseksi katso ohjelappua joka on asiakirjojen liitteen Vesi ja s hk liit nn t S hk ja vesilaitteistojen sopeuttaminen asennusta varten tulee suorituttaa ainoas...

Страница 51: ...tt johto on vahingoittunut se tulee vaihdattaa v litt m sti valmistuttajalla tai valtuutetulla huoltoliikkeell jotta voidaan v ltt kaikki mahdolliset riskit Katso Huoltoapu Valmistaja kielt ytyy kaik...

Страница 52: ...letit N pp in Ohjelman valinta N pp in Viiv stetty k ynnistys N pp in Puolit ytt N ytt N pp in ja merkkivalo Start Tauko Merkkivalo Huuhteluaineen puuttumisen Merkkivalo Suola puuttuu Merkkivalo Viiv...

Страница 53: ...ukit pikkulautaset matalat salaattiastiat pannut matalat hieman likaiset kattilat t ytt esimerkkien mukaisesti Mukit ja kupit pitk t ja ter v t veitset tarjoiluv lineet aseta ne k ntyville v lisein mi...

Страница 54: ...lman alkaneen pesun merkkivalo syttyy ja voit n hd n yt ll ohjelman numeron ja jakson loppuun j ljell olevan ajan 8 Lopuksi kaksi lyhytt nimerkki ja yksi pitk nimerkki osoittavat ohjelman lopun n pp i...

Страница 55: ...ISTYS vastaava merkkivalo syttyy Samalla n pp imell valitse koska haluat k ynnist pesujakson v lill 1 24 tuntia 2 Vahvista valinta n pp imell Start Tauko ja k nteinen ajanlasku k ynnistyy valittu viiv...

Страница 56: ...likaiset astiat ja kattilat l k yt herkille astioille 1 Superpesu 25 g A 25 ml A 1 A Kyll A B C 2 25 Normaalilikaiset astiat ja kattilat P ivitt inen perusohjelma 2 Automaattinen normaalipesu 21 g A...

Страница 57: ...mista ja optimoida pesutulokset veden kovuuden mukaan Kovuustiedot ovat saatavilla paikalliselta vesilaitokselta K ynnist kone painaen n pp int ON OFF Paina n pp int P muutaman sekunnin ajan voit kuul...

Страница 58: ...vat puhtaat ja ettei niiss ole tukoksia Mik li t t varotointa ei suoriteta on olemassa vaara ett veden sis ntulokohta tukkiutuu vahingoittaen astianpesukonetta Olemassa vain tietyiss malleissa Puhdist...

Страница 59: ...itunnus on liitetty kaikkiin tuotteisiin muistuttamaan velvollisuudesta lajitella j tteet Kodinkoneiden asianmukaista h vitt mist koskevien lis tietojen saamiseksi haltijat voivat k nty paikallisen ju...

Страница 60: ...n annostelu on liiallista Astiat eiv t ole kuivia On valittu ohjelma ilman kuivausta Huuhteluaine on loppunut tai sen annostelu on riitt m t n katso Huuhteluaine ja suola Huuhteluaineen s t ei ole sop...

Отзывы: