background image

14

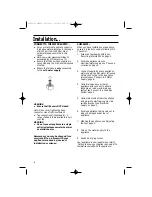
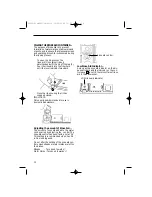
Detergent compartment with level

indicators:

Press the release lever to open the flap.

The side of the detergent compartment is
marked with lines, to help you determine
how much powder to add.
The capacity of the detergent container   is
15ml to the bottom line, 25ml to the middle
line and the compartment contains 40ml
when it is full.

Adding detergent:

Please observe the manufacturers
instructions printed on the detergent
packaging when determining the correct
dosage.
Depending on the level of soiling on the
items to be washed you can of course vary
these quantities
To close the lid of the detergent
compartment, slide lid across (1) then press
down firmly (2) until it locks.

-

If you are using detergent in tablet 
form, read the manufacturers      
recommendations on the packaging in 
order to determine where the tablets 
should be placed inside the          
dishwasher (eg. in the cutlery basket,
detergent compartment etc..).
Ensure that the lid of the detergent 
compartment is firmly closed, even if 
you are using tablets.

Release lever

1

2

FP105-01 DWF35/34/33/30  12/02/2002  10:23 am  Page 14

Содержание DWF30

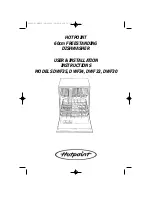
Страница 1: ...HOTPOINT 60cm FREESTANDING DISHWASHER USER INSTALLATION INSTRUCTIONS MODELS DWF35 DWF34 DWF33 DWF30 FP105 01 DWF35 34 33 30 12 02 2002 10 22 am Page 1 ...

Страница 2: ... cable off flush with the appliance dispose of separately to ensure that the appliance can no longer be plugged into a mains socket Electricity Supply Safety Information 3 Installation Choose a Location 4 Adjust the Feet 4 Connect to a Drainage System 5 Connect to the Water Supply 6 Check List 6 Getting to Know your Appliance 7 8 Before Using your Appliance Adjust the Water Softener 9 10 Filling t...

Страница 3: ...ging the plug Cut off and dispose of the supplied plug if it does not fit your socket WARNING To avoid a shock hazard do not insert the discarded plug into a socket anywhere else IMPORTANT WIRES IN THE MAINS LEAD ARE COLOURED IN ACCORDANCE WITH THE FOLLOWING CODE Green and yellow Earth wire to terminal marked E symbol or coloured green and yellow Blue Neutral wire to terminal marked N or coloured ...

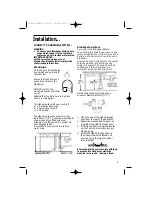
Страница 4: ...nt space is allowed for the appliance Ensure the electrical socket and water taps are easily accessible and that the water supply can be isolated if necessary Do not use an extension lead or multiple plug for connection to the electrical socket If your dishwasher is underneath a work surface with a hob You must add thermal insulation to the top of the machine ADJUSTING THE FEET It is essential tha...

Страница 5: ... must NOT be connected to a surface water drain Sink Waste System For under sink drainage Before connecting the drain hose remove any internal restrictions This will prevent a build up of debris which could cause a blockage Remove any restrictions from the waste spigot and ensure that the sealing bung is removed The hose should be routed such that it is raised to a minimum height of 800mm 31 2 Not...

Страница 6: ...ed your appliance ensure it is ready to use by following this Check List 1 Dispose of packaging safely see Recycling Information on page 2 2 Position appliance close to electrical water supply see Choose a Location on page 4 3 Connect supplied hose to appliance water supply confirm water is flowing before connecting to the appliance inlet valve see Connect to a Water Supply page 6 4 Untie drainage...

Страница 7: ... Salt Indicator 9 Half Load Selection Button 5 Low Rinse Aid Indicator for Upper Basket washing 6 Selection Indicators DWF35 only 7 Numerical Display 10 Programme End Light DWF33 30 only 11 Programme End Buttons Reset 1 7 6 9 11 8 2 3 4 5 1 7 6 8 2 3 4 5 1 10 6 2 3 4 5 DWF35 DWF34 DWF33 and DWF30 11 11 7 FP105 01 DWF35 34 33 30 12 02 2002 10 23 am Page 7 ...

Страница 8: ...artment Locking Mechanism 11 Detergent Compartment 5 11 9 3 8 7 6 2 1 4 10 Before Using your Appliance Before using your Dishwasher you must carry out the following steps to ensure you obtain the best possible wash performance from your appliance Follow these 4 steps Adjust the Water Softener Fill the Salt Container Fill the Rinse Aid Container Add detergent Model No Serial No Rating plate sample ...

Страница 9: ...mme can now be adjusted After releasing the Economy 50 and Mains Switch buttons the normal 65 and the Economy 50 light neons will be illuminated showing that the factory set value is 2 see table below The Salt Indicator light will continue to flash until the setting is chosen To change the setting Press the Economy 50 button Each depression of the button increases the set value by one 0 3 If the N...

Страница 10: ...WF35 and DWF34 only dH fH Clarke mmol l 0 6 0 11 0 8 0 1 1 7 8 12 15 9 10 1 2 1 4 9 10 16 17 11 12 1 5 1 8 11 12 18 21 13 15 1 9 2 1 13 16 22 29 16 20 2 2 2 9 17 21 30 37 21 26 3 0 3 7 22 30 38 54 27 38 3 8 5 4 31 50 55 89 39 62 5 5 8 9 Press and hold the Economy 50 button and set the mains switch 1 to ON before releasing the programme button again The indicator light for the Economy 50 button fla...

Страница 11: ...e of the water is displaced and drains away When you have done this clean off any remnants of salt from the area around the neck of the container Replace the lid back onto the container ensuring that it is not cross threaded The LOW SALT Indicator 4 on the front panel will light up initially but will extinguish when the salt solution has become sufficiently concentrated NOTE Models DWF35 and DWF34...

Страница 12: ...in domestic dishwashers Adjusting the amount of Rinse Aid The amount of rinse aid added to the water can be varied by adjusting the control The rinse aid control has been factory set at 3 5 This setting is recommended when Sun All in One is being used Do not alter the setting of the rinse aid con trol unless streaks or water marks are left on the dishes Streaks Turn knob towards Water Marks Turn k...

Страница 13: ...s of very hard water you may need to use some salt in addition to Sun All in One to prevent scale deposits on your dishes and dishwasher Simply fill the rinse aid container with Sun All in One Rinse Aid prior to using the dish washer and then add a Sun All in One tablet in the detergent dispenser The Low Salt indicator light will come on after a few washes with Sun All in One This is completely no...

Страница 14: ...hen determining the correct dosage Depending on the level of soiling on the items to be washed you can of course vary these quantities To close the lid of the detergent compartment slide lid across 1 then press down firmly 2 until it locks If you are using detergent in tablet form read the manufacturers recommendations on the packaging in order to determine where the tablets should be placed insid...

Страница 15: ...r paint should not be put in the dishwasher Our recommendation In future only purchase table or kitchenware that has been confirmed as being dishwasher proof Washing contents of UPPER basket only DWF 35 If you only have a small number of dishes to wash put them all into the upper basket and place cutlery into the upper cutlery basket Then press the half load button 9 This saves energy and water If...

Страница 16: ...DWF 34 only Non delicate Soups casseroles sauces potatoes pasta rice eggs roast or fried food a lot stuck on hard a little Pre rinse 50 Wash 70 First rinse Second rinse Drying Drying Drying Second rinse First rinse Main rinse Main rinse Wash 65 Rinse aid 65 Rinse aid 65 Rinse aid 70 Rinse aid 55 Pre rinse Pre rinse Wash 50 Wash 35 very little loosely attached Soups potatoes pasta rice eggs roast o...

Страница 17: ... takes place Cups and Glasses Upper basket Cutlery Cutlery should always be inserted in random order with the blades pointing downwards take care with knife blades This enables the jet of water to reach the individual items more easily Pots and Pans Lower basket Folding Spikes To improve stacking of pots and pans the spikes can be folded down Do not overload the appliance It may reduce the quality...

Страница 18: ...ainst other items being washed Place glasses cups and small bowls on the additional cup rack This additional cup rack can be swivelled in or out as required Long items serving cutlery salad servers or knives should be placed on the shelf so that they do not obstruct the rotation of the spray arms The shelf can be folded back when not required for use Long stemmed glasses can be placed against the ...

Страница 19: ...N Press the mains switch to ON The indicator lights light up according to the last selected programme The same programme will run again if no other programme button is pressed Models DWF35 and DWF34 only The numerical display 7 shows the expected duration of the programme The programme starts automatically Models DWF33 and DWF30 only The programme starts automatically End of Programme Models DWF35...

Страница 20: ...d set the mains switch 1 to ON Release both buttons Either 1 ON or 0 OFF flashes in the numerical display 7 Press the normal wash button to change the setting Set the mains switch 1 to OFF The new setting is stored in the dishwasher memory Altering the programme It is possible to change the programme within 2 minutes of switching the dishwasher ON Should it be necessary to change the programme aft...

Страница 21: ...id is required Also check the level indicator on the container IMPORTANT Filters The filters prevent large particles of food or other objects from getting inside the pump This residue can occasionally block the filters The filter system consists of a filter cylinder a flat fine filter and depending on the Model a microfilter Inspect the filters for obstructions every time the dishwasher has been u...

Страница 22: ...Switch off at the mains and remove the plug from the socket Turn off the water supply Disconnect drain and water input hoses Remove screws in underside of work surface Pull out the appliance carefully withdrawing hoses at the same time Transporting the Dishwasher Drain water from the dishwasher Secure all loose parts The dishwasher should only be transported in an upright position If not kept upri...

Страница 23: ... arm through water Lid in detergent compartment can not be closed Detergent compartment has been overfilled Mechanism is clogged with remnants of detergent Indicator lamps do not go out after washing has finished Main switch is still set to ON Remnants of detergent stuck inside dispenser Compartment was damp when it was filled up with detergent Compartment must be dry before detergent is added Wat...

Страница 24: ...alt has been put in appliance Water softener was set too low Lid on salt container is not screwed tight If you used a phosphate free detergent try a detergent containing phosphates and compare results Dishes cutlery etc have not been dried Selected programme did not include drying function Amount of rinse aid was set too low Items were removed from dishwasher too soon Glasses have a dull appearanc...

Страница 25: ...otpoint appliances in your kitchen Hotpoint offer two Service Cover Plans to give you complete peace of mind They enable you to extend your first 12 months labour guarantee by either 1 or 4 years so that you can have FREE repairs during the membership period Service Cover FREE service repairs during the period of cover At an additional cost Service Cover with Maintenance includes an Annual Electri...

Страница 26: ...units when carrying out repairs service work but in locations where the Engineer advises you that it will be impossible to move appliances without risk of damage they will only proceed with your approval that no liability is accepted Guarantee Terms Conditions Your Guarantee is only applicable in the United Kingdom or Republic of Ireland and is subject to provision s that your appliance Has been u...

Страница 27: ...FP105 01 DWF35 34 33 30 12 02 2002 10 23 am Page 27 ...

Страница 28: ...misuse Genuine Parts Accessories Mail Order Hotline UK 08709 077 077 Republic of Ireland 01 842 6836 Extended Warranty To join UK 08709 088 088 Republic of Ireland 1850 502 200 For further product information 08701 50 60 70 All Hotpoint Services are offered as an extra benefit and do not affect your statutory rights General Domestic Appliances Limited Morley Way Peterborough PE2 9JB Part No FP105 ...

Отзывы: