background image

2

GB

Where to put your dryer 

• Place your dryer at a 

distance from gas ranges, 

stoves, heaters, or cooktops 

because flames can damage 

the appliance. The dryer 

should be installed in an 

ambient room temperature 

of between 20 to 23°C 

for optimum performance. 

But will function if the room is between 14 and 

30°C. If you are going to install the appliance 

under a work counter, be sure to leave a 10 mm 

space between the top and any other objects 

on or above the machine and a 15 mm space 

between the sides and lateral furnishings or 

walls. This is to ensure proper air circulation.

The appliance must be installed with the rear 

surface placed against a wall. 

Ventilation

• When the dryer is in use, there has to be 

adequate ventilation. Make sure you put your dryer 

in an environment that is not damp and has proper 

air circulation throughout. Airflow around the dryer 

is essential to condense the water produced during 

the washing, the dryer will not operate efficiently in 

an enclosed space or cupboard.

! If using the dryer in a small or cold room 

some condensation will be experienced.

!

We do not recommend that the dryer is 

installed in a cupboard but the dryer must never 

be installed behind a lockable door, a sliding 

door or a door with a hinge on the opposite 

side to that of the dryer door.

1

2


H<1m

1

2

Fig. 

Fig. 

B

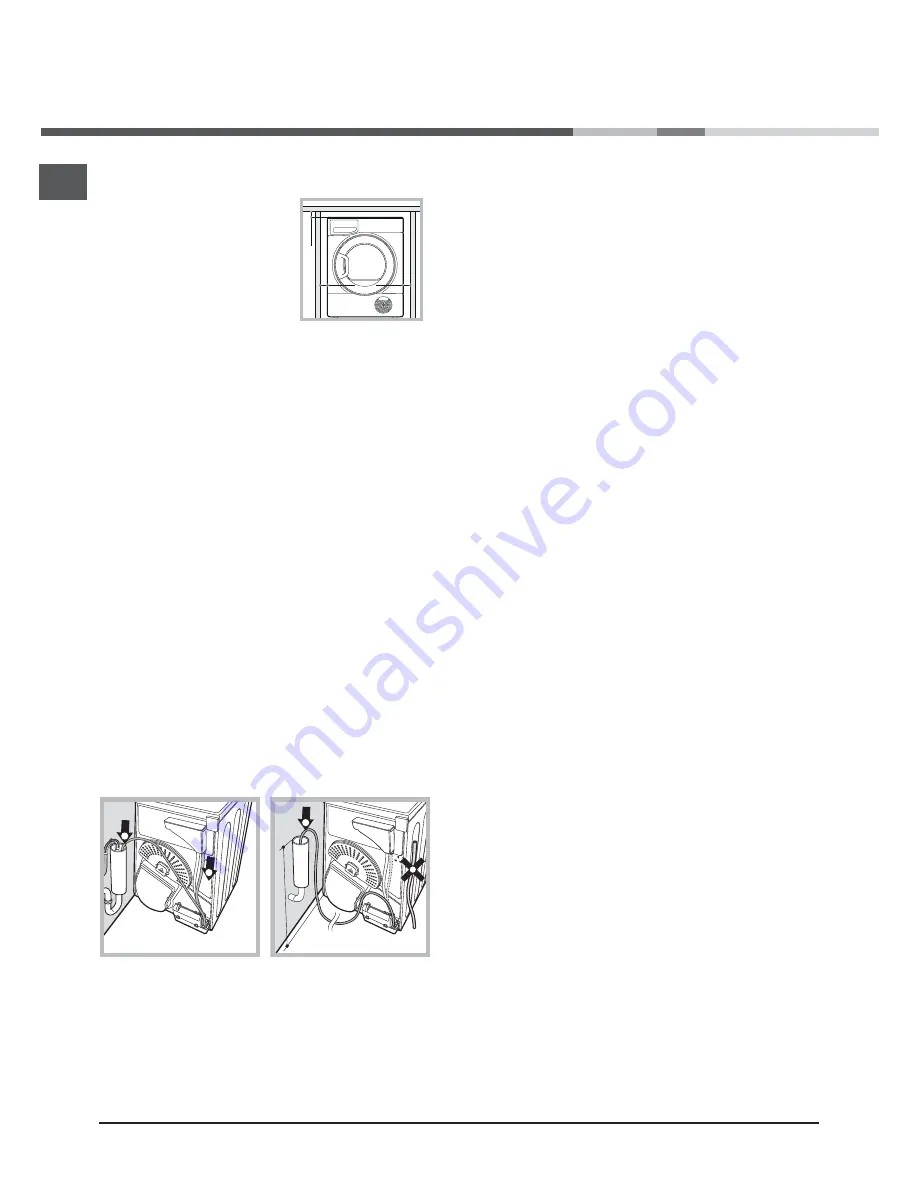
Water Drain

If the machine is positioned close to a drain it is possible to drain the 
condensed water directly without using the waterbottle. In which 
case it is no longer necessary to empty the water bottle at the end 
of each cycle. If the Dryer is positioned above or close to a Washing 
Machine the same drainage can be used. Just remove the tube 
indicated in figure 

and connect it to the drainage. If the drainage 

is further away than the length of the tube it is possible to buy and 
connect a tube of the same diameter and the necessary length  in 
order to reach the drain. To install the new tube just substitute the 
existing one as indicated in figure 

B

 inserting it in the same place.

!


The drain tube has to be below 1 m from the bottom of 

the Dryer.
! Once the Dryer has been installed please assure that 
the drain tube is not bent or kinked.

Electrical connections 

Before plugging the appliance into the socket, 

check the following: 

•  Make sure your hands are dry.

•  The socket must have an earth connection.

•  The socket must be able to withstand 

the machine’s maximum power output as 

indicated on the rating plate.

•  The power supply voltage must fall within 

the values indicated on the data plate.

•  The socket must be compatible with the 

dryer’s plug. Should this not be the case, 

replace the plug or the socket.

! DO NOT USE EXTENSION CORDS. 

! The dryer must not be installed outdoors, 

even if the space is sheltered. It can be very 

dangerous if exposed to rain or storms.

! Once installed, the dryer’s electrical wire and 

plug must be within reach.

! The power cord must not be bent or 

squashed.

! If the plug being replaced is a non-rewirable 

type, then the cut-off plug must be disposed of 

safely. DO NOT leave it where it can be inserted 

into a socket and create a shock hazard.

! The power must be regularly checked. If the 

supply cord is damaged, it must be replaced 

by the manufacturer, its service agent or 

similarly qualified persons in order to avoid 

a hazard.  (see Assistance). New or longer 

electric cords are supplied by authorised 

dealers at a supplementary cost.

! The manufacturer denies any 

responsibility should any of these rules 

not be followed

.

!

 If in doubt about any of the above 

consult a qualified electrician

.

Levelling the tumble dryer

The dryer must be installed level for correct 

operation.

When you have installed your dryer in its final 

location check that it is level first side-to-side, 

then front to back. If the dryer is not level, 

Installation

10 mm

15 mm

15 mm

Содержание FTCD 972

Страница 1: ... reminds you to read this instruction manual Keep this manual at hand for immediate reference whenever necessary Always store this manual close to the tumble dryer and remember to pass it on to any new owners when selling or transferring the appliance so they may familiarise with the warnings and suggestions herein contained Read these instructions carefully the following pages contain important i...

Страница 2: ...onnect a tube of the same diameter and the necessary length in order to reach the drain To install the new tube just substitute the existing one as indicated in figure B inserting it in the same place The drain tube has to be below 1 m from the bottom of the Dryer Once the Dryer has been installed please assure that the drain tube is not bent or kinked Electrical connections Before plugging the ap...

Страница 3: ... consumption Partial load is half the rated load 2 based on 160 drying cycles of the standard cotton programme at full and partial load and the consumption of the low power modes Actual energy consumption will depend on how the appliance is used 3 Weighted average of 3 cycles at full load and 4 cycles at half load Regulation 932 2012 Energy consumption in kWh for program Synthetics full load 0 68 ...

Страница 4: ...rylic fibres at high temperatures Do not turn off the dryer when there are still warm items inside Clean the filter after each use see Maintenance Empty the Water Container after each use see Maintenance Clean the Heat Pump filter unit at regular intervals see Maintenance Do not allow lint to collect around the dryer Never climb on top of the dryer It could result in damage Always follow electrica...

Страница 5: ...can result if the metal reinforcements come loose during drying Do not tumble dry rubber plastic articles such as shower caps or babies waterproof covers polythene or paper Do not tumble dry rubber backed articles clothes fitted with foam rubber pads pillows galoshes and rubber coated tennis shoes Remove all objects from pockets such as lighters and matches WARNING Never stop the dryer before the ...

Страница 6: ...ffect the dryer s performance Emptying the water container after each cycle 2 Remove the water container and empty it into a sink or other suitable drain outlet then replace it correctly Always check the water container and empty it before starting a new drying cycle Failure to empty the water container may cause the following The dryer stops heating thus the load may still be damp at the end of t...

Страница 7: ...vacuum cleaner every so often Do not use solvents or abrasives Have the dryer checked regularly by authorised technical personnel in order to ensure that the electrical and mechanical parts work safely see Assistance Water container Heat pump filter unit Cover Catches Filter Handle Air intake Heat Pump Protection System The heat pump system has a compressor protection feature that operates if you ...

Страница 8: ...ning them Wring out garments to remove the maximum amount of water possible Do not load the dryer when garments are dripping wet Maximum load sizes Do not overload the drum The following values indicate the weight of dry garments Natural fibres maximum kg Synthetic fibres maximum kg Laundry amber if the programme has been paused or flashing green if on standby waiting to start a programme see Star...

Страница 9: ...ring the programmes progress Some automatic programmes do not allow the dryness level to be changed or do not have all the dryness level options To change the language current selection must flash on the first line of the display Press the On Off button to turn off the display then press and hold all 3 buttons Heat Level Timed Dry and Sensor Dry for 5 seconds Press the Heat Level or the Timed Dry ...

Страница 10: ...mes are selected the time displayed throughout the cycle is the actual time remaining When Automatic programmes are selected the time displayed is an estimate of the time remaining When the programme is selected the display shows the time required to dry a full load The time remaining is constantly monitored during the drying cycle and is updated to show the best forecast The colons between the ho...

Страница 11: ... is entered fabrics are cooled this phase should always be allowed to complete 11 At the end of the drying cycle a message is displayed if END OF CYCLE CLEAN FILTER AND EMPTY WATER BOTTLE is shown the buzzer will beep 3 times Note If the SOUND option was selected the buzzer beeps 3 times every 30 seconds for 5 minutes if END OF CYCLE CREASE CARE is shown Crease Care option has been selected and if...

Страница 12: ...es 2 5 kg Synthetics 2 kg Denim 2 kg 2 Unload the dryer immediately after the end of the programme hang fold or iron the articles and put them away in the closet Should this not be possible repeat the programme 3 Synthetics This is a programme for items of Synthetic with low heat setting or Synthetic Cotton mixtures with medium heat setting 4 kg Refresh Refresh is not a drying programme and should...

Страница 13: ... the washing machine with a spin speed between 1200 1400 rpm As this is a treatment programme aimed to protect your dark coloured clothes the programme duration could be more than 4 hours It dries to Cupboard Dry level 3 kg 7 Anti Allergy This programme has the Seal of Approval endorsement from Allergy UK which reflects the effective reduction and elimination of allergens from the clothes with the...

Страница 14: ...ppropriate Note If you have selected the Sound option this option is not available Quick Dry This option is for small loads up to 1kg Note can only be used with the Cupboard Dry setting TIME DISPLAY The display shows either the amount of time delay remaining or an indication of the amount of time left for a drying programme see The Display The display also shows if there is a problem with your dry...

Страница 15: ...gramme has not sensed the required final moisture in this time the dryer will complete the programme and stop Check the above points and run the programme again if the results are still damp contact the Service Centre see Service If the display shows a fault Turn off and remove the plug Clean the filter and the heat pump filter unit see Maintenance Then replace the plug turn on and start another p...

Страница 16: ...chine Repairing it yourself or having a nonauthorised person try to repair it could cause harm to one or more persons and to the machine and could invalidate the spare parts warranty Call an authorised technician if you experience problems while using the machine Please note that it is an offence for an unqualified person to undertaken any servicing or repair work that involves breaking into the s...

Страница 17: ...int ariston it Questo simbolo ti ricorda di leggere questo libretto istruzioni Tenere a portata di mano il presente libretto così da poterlo consultare facilmente a ogni evenienza Tenere il libretto sempre vicino all asciugatrice nel caso in cui l apparecchio venga venduto o ceduto ad altre persone ricordarsi di consegnare loro questo libretto così da permettere anche ai nuovi possessori di conosc...

Страница 18: ...il contenitore di raccolta dell acqua dopo ogni ciclo Se l asciugatrice viene posizionata sopra o di fianco a una lavatrice può condividere lo stesso scarico È sufficiente scollegare il tubo indicato alla figura A e collegarlo allo scarico Se lo scarico si trova più lontano della lunghezza del tubo per raggiungerlo è possibile acquistare e collegare un tubo di diametro identico e della lunghezza n...

Страница 19: ...o se l asciugatrice è dotata in un sistema di gestione elettronico minuti 30 Durata ponderata a pieno carico e carico parziale Tt minuti 3 187 Consumo energetico in kWh del prog Cotone Standard pieno carico Edry 2 2 19 Consumo energetico in kWh del prog Cotone Standard carico parziale Edry 2 1 17 Consumo di energia in Watts in modalità spento a pieno carico Po Watt 0 17 Asciugatrice Condens Classe...

Страница 20: ...dell acqua e il condensatore non sono posizionati correttamente vedi Manutenzione Non sovraccaricare l asciugatrice vedi Bucato per le massime dimensioni di carico Non inserire capi completamente bagnati Seguire sempre con attenzione tutte le istruzioni riportate sulle etichette per il lavaggio dei capi vedi Bucato Non caricare capi grandi eccessivamente voluminosi Non asciugare fibre acriliche ad...

Страница 21: ...no rinforzi in metallo es reggiseni con ferretti in metallo Se i ferretti si staccano durante l asciugatura possono danneggiare l asciugatrice Non inserire nell asciugatrice articoli in gomma solida in plastica come cuffie per la doccia o teli impermeabili di protezione per bambini polietilene o carta Non inserire nell asciugatrice articoli foderati in gomma solida capi con imbottiture in schiuma ...

Страница 22: ...ne dell asciugatrice vedi figura Rimozione del filtro 1 Tirare verso l alto il manico in plastica del filtro vedi figura 2 Pulire il filtro dal laniccio e riposizionarlo correttamente Assicurarsi che il filtro sia inserito completamente a filo con la guarnizione dell asciugatrice Non utilizzare l asciugatrice senza avere prima reinserito il filtro in sede Controllo del cestello dopo ogni ciclo Ruo...

Страница 23: ...o che sarà stato riavviato il ciclo Pulizia dell asciugatrice Le parti esterne in metallo e in plastica e le parti in gomma possono essere pulite con un panno umido Periodicamente ogni 6 mesi pulire con l aspirapolvere la griglia della presa d aria frontale e gli sfiati sul retro dell asciugatrice per rimuovere eventuali accumuli di lanugine laniccio e polvere Inoltre rimuovere gli accumuli di lan...

Страница 24: ...nte Pulsante icona BLOCCO SICUREZZA BAMBINI Premere e tenere premuto questo pulsante dopo aver selezionato il programma desiderato e altre opzioni ciò evita che le impostazioni del programma vengano cambiate il display mostrerà brevemente BLOCCO TASTI Quando l icona è accesa gli altri pulsanti sono disabilitati Tenere premuto il pulsante per cancellare l icona scomparirà il display mostrerà brevem...

Страница 25: ...ificare la selezione attuale della lingua deve lampeggiare sulla prima riga del display Premere il pulsante On Off per spegnere il display quindio premere e tenere premuto tutti e 3 i tasti livello di calore asciugatura temporizzata e livello di asciugatura per 5 secondi Premere il pulsante livello di calore o il pulsante asciugatura temporizzata e scorrere in alto o in basso nell elenco Quando la...

Страница 26: ...i programmi temporizzati il tempo visualizzato durante il ciclo è il tempo rimanente attuale Quando viene selezionato un programma automatico il tempo visualizzato è una previsione del tempo rimanente Quando il programma è selezionato il display indica il tempo necessario per asciugareun carico pieno Il tempo residuo viene costantemente monitorato durante il ciclo di asciugatura e il tempo viene m...

Страница 27: ...me il pulsante Start Pause vedere la sezione Comandi 10 Durante gli ultimi minuti dei programmi di asciugatura prima del termine del programma viene inserita la fase ASCIUGATURA A FREDDO i tessuti vengono raffreddati questa fase deve sempre essere attivata per terminare il ciclo 11 Al termine del ciclo di asciugatura viene visualizzato un messaggio Se viene visualizzato FINE CICLO PULIRE FILTRO SV...

Страница 28: ...mali 1 Non caricare il cestello oltre la capacità massima I seguenti valori si riferiscono al peso degli indumenti asciutti Tessuto Carico massimo Cotone e Misto cotone 2 5 kg Sintetico 2 kg Jeans 2 kg 2 Svuotare l asciugatrice subito dopo la fine del programma appendere piegare o stirare i capi per poi riporli nell armadio Se ciò non fosse possibile ripetere il programma 3 Sintetici Si tratta di ...

Страница 29: ...più bassa Il carico deve essere centrifugato in lavatrice ad una velocità di rotazione tra i 1200 1400 giri al minuto Poiché si tratta di un programma di trattamento mirato a proteggere i vostri vestiti di colore scuro la durata del programma potrebbe essere superiore alle 4 ore Asciuga al livello di Capi asciutti pronti per l armadio 3 kg 7 Programma Anti Allergy Questo ciclo vanta l approvazione...

Страница 30: ...e le funzioni di pre e post antipiega se appropriate Asciugatura rapida Questo opzione è per piccoli carichi fino a 1kg Nota bene può essere utilizzato solo con l impostazione Ripiegare DISPLAY TEMPO Il display mostra sia il periodo di tempo di avvio ritardato rimanente che il periodo di tempo rimasto per un programma di asciugatura vedere la sezione Il Display Il display indica inoltre se c è un ...

Страница 31: ... vedere la sezione Il Display e vedere Avvio e programmi Per motivi di sicurezza i programmi dell asciugatrice hanno una durata massima di 5 ore Se un programma automatico non ha rilevato l umidità finale richiesta entro questo intervallo l asciugatrice completerà il programma e si arresta Controllare i punti sopra indicati e far funzionare nuovamente il programma Se i capi risultano ancora umidi ...

Страница 32: ...ve essere sostituita con una nuova unità di condensazione Per avere maggiori informazioni contattare il centro assistenza più vicino Nota I gas contenuti in un unità sigillata non sono pericolosi per la salute ma se fuoriescono avranno un impatto sul riscaldamento globale Prima di telefonare al Centro di assistenza Seguire la guida alla risoluzione dei problemi per vedere se è possibile porre rime...

Отзывы: