background image

3 . 5 ” D U A L  

S A T A  

R A I D  

S T O R A G E  

I n s t a l l a t i o n  

G u i d e


RAID 1 (Safe)

It allows the device automatically to copy data to both hard 

drives. It stores all data in duplicate on separate drives to protect against data loss 
due to drive failure. It provides the highest level of data protection for critical data 
that you cannot afford to lose if a hard drive fails. The capacity is equal to the 
smaller of the two hard drives. 

If one drive fails, the SAFE volume is still usable, but it is in a vulnerable state 

because its mirrored hard drive is inaccessible. When the offline drive comes back 
online, the appliance begins a rebuild process immediately to restore data 
redundancy.   

Although the volume remains available during the rebuild process, the volume is 

susceptible to data loss through damage to the remaining drive until redundancy is 
restored at the end of the rebuild and verification process. Host access takes 
precedence over the rebuild process. If you continue to use the SAFE volume 
during the rebuild, the rebuild process will take a longer time to complete, and the 
host data transfer performance will also be affected.   


NOTE:

 Under 

“Safe Mode”, Drive 

B

 would start to Rebuild .       

              The Link LED of Drive B would flash in Rebuilding state 
 

Drive A 

250GB 

Drive B 

250GB 

Dual Bay Disk 

Port 0          Port 1 

Equal hard drives   


Drive A 

250GB 

Drive B 

750GB 

Dual Bay Disk 

Port 0          Port 1 

Safe 

250GB 

Unequal hard drives   


Safe   

250GB 

Содержание X2-Rack

Страница 1: ...3 5 Dual SATA Mobile Rack External Raid Storage USER MANUAL Include Hardware Installation Guide RAID MODE Selection HDD Formatting Guide Software Installation Guide...

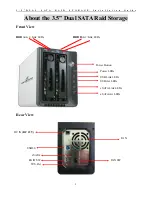
Страница 2: ...a t i o n G u i d e 2 About the 3 5 Dual SATA Raid Storage Front View Rear View Power Button Power LEDs USB Link LEDs USB Act LEDs e SATA Link LEDs e SATAAct LEDs HDD B Act Link LEDs HDD A Act Link LE...

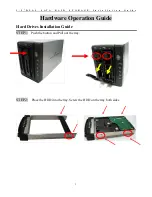
Страница 3: ...I D S T O R A G E I n s t a l l a t i o n G u i d e 3 Hardware Operation Guide Hard Drives Installation Guide STEP1 Push the button and Pull out the tray STEP2 Place the HDD into the tray Screw the HD...

Страница 4: ...D S T O R A G E I n s t a l l a t i o n G u i d e 4 STEP3 Push the tray to the end until the HDD is connected with SATA connector STEP4 Push tray into Aluminum housing and secure them together Note Se...

Страница 5: ...ps as below to set HDD operation mode Backup data before formatting hard drives The device can support two equal or unequal capacity hard drives RAID SW SYS Rst JBOD RAID 0 RAID 1 Normal Mode JBOD RAI...

Страница 6: ...ves When using a SATA host controller JBOD should only be used if the SATA host controller provides Port Multiplier PM support If a host is not PM aware only a single drive is presented drive A No suc...

Страница 7: ...of the physical hard drives A and B Once the hard drive A and B are connected to the SATA connector 1 and 2 set jumper switch to BIG mode and reformat the hard drive A and B together to combine one BI...

Страница 8: ...ata speed but no data redundancy Two equal hard drives The capacity is double of the smaller hard drives Two unequal hard drives The capacity is equal to the sum of both hard drives Drive A 250GB Dual...

Страница 9: ...the appliance begins a rebuild process immediately to restore data redundancy Although the volume remains available during the rebuild process the volume is susceptible to data loss through damage to...

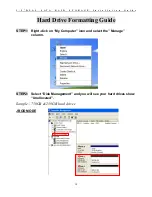
Страница 10: ...t a l l a t i o n G u i d e 10 Hard Drive Formatting Guide STEP1 Right click on My Computer icon and select the Manage column STEP2 Select Disk Management and you will see your hard drives show Unall...

Страница 11: ...3 5 D U A L S A T A R A I D S T O R A G E I n s t a l l a t i o n G u i d e 11 BIG MODE RAID 0 FAST MODE...

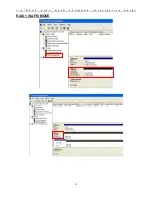
Страница 12: ...3 5 D U A L S A T A R A I D S T O R A G E I n s t a l l a t i o n G u i d e 12 RAID 1 SAFE MODE...

Страница 13: ...S A T A R A I D S T O R A G E I n s t a l l a t i o n G u i d e 13 STEP4 Press OK button to initialize hard drive STEP5 The hard drive will show Online Right click the Unallocated block and selects Ne...

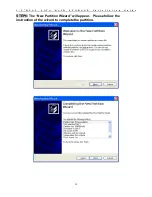
Страница 14: ...3 5 D U A L S A T A R A I D S T O R A G E I n s t a l l a t i o n G u i d e 14 STEP6 The New Partition Wizard will appear Please follow the instruction of the wizard to complete the partition...

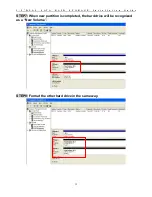
Страница 15: ...A L S A T A R A I D S T O R A G E I n s t a l l a t i o n G u i d e 15 STEP7 When new partition is completed the hard drive will be recognized as a New Volume STEP8 Format the other hard drive in the...

Страница 16: ...product support information 2010 2011 Hornettek LLC All Rights Reserved Hornettek the Hornettek logo the original product images taken by Hornettek and all Hornettek based trademarks are registered in...

Отзывы: