


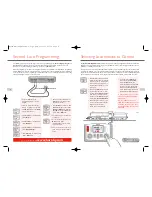


Direct
Reg
Paged
Operate
Features
Direct/Reg/Paged
Adr:0003
Operate
Adr:0003
Features
Adr:0003
Address
Read
Write – Adr:0003
Accel
000
Decel
000
StartV
000
Name
–
Name
–
Steps
128, 28,14
Fav
Yes/No
CV
Read
Write
Version
XXX
Man ID
XXX
– CV 0001
R
– CV 0001
W
CV
Read
Write
Version
XXX
Man ID
XXX
– CV 0001
R
– CV 0001
W
Config
Dir
Power
RailCom
SP.Table
Address
Decoder
– Normal
– Reverse
– DCC Only
– DCC & DC
– Enabled
– Disabled
– CV#2#5#6
– CV#67 – 94
– Short
– Extended
– Multi
– Acc
Loco
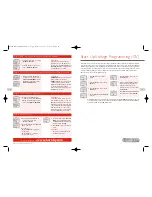
Direct
Reg
Paged
Features
Direct/Reg/Paged
Adr:0003
Features
Adr:0003
Address
Read
Write – Adr:0003
Train 0
On/Off
RailCom
On/Off
Clock
On/Off
Set Clk
00:00
Clock X
00
Loco Log
Name/Address
Fav
On/Off
Language
English
French
Italian
Spanish
German
Reset
Confirm
Acc
Unit
Gp Create
Gp Adr – Adr:0003
Loco1 – Adr:0001
Loco2 – Adr:0002
Gp Dissolve
Gp – Adr:0003
Dissolved
Dbl Hdr
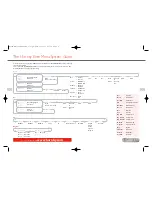
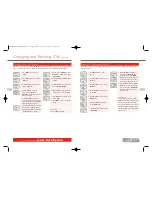
Access the menu options by pressing the
Menu
button on the Elite Unit. ROTATING
Control 1
will cycle through
the items shown in
RED
.
Select a menu item by PRESSING
Control 1
.The unit will then display the chosen sub-menu shown in
GREY
.
Rotate
Control 1
to scroll through the headings.
The Hornby Elite Menu System Guide
6
7
For more information visit:
www.hornby.com
Acc
Accessory
Accel
Acceleration
Clock X
Clock Speed
CV
Configuration Variable
Dbl Hdr
Double Heading
Decel
Deceleration
Dir
Direction
Fav
Favourite
Gp Adr
Group Address
Gp Create
Group Create
Gp Dissolve
Group Dissolve
Man ID
Manufacturer ID
Operate
Operations Mode
Reg
Register
SP.Table
Speed Table
Start V
Start Voltage
Set Clk
Set Clock
Elite HBook updated 6.3.07_Q6.qxd 13/3/07 13:09 Page 4


