GB
15
o
* Certain Models only ** May vary according to model
Remote control function ON
Remote control function OFF
50cm
8
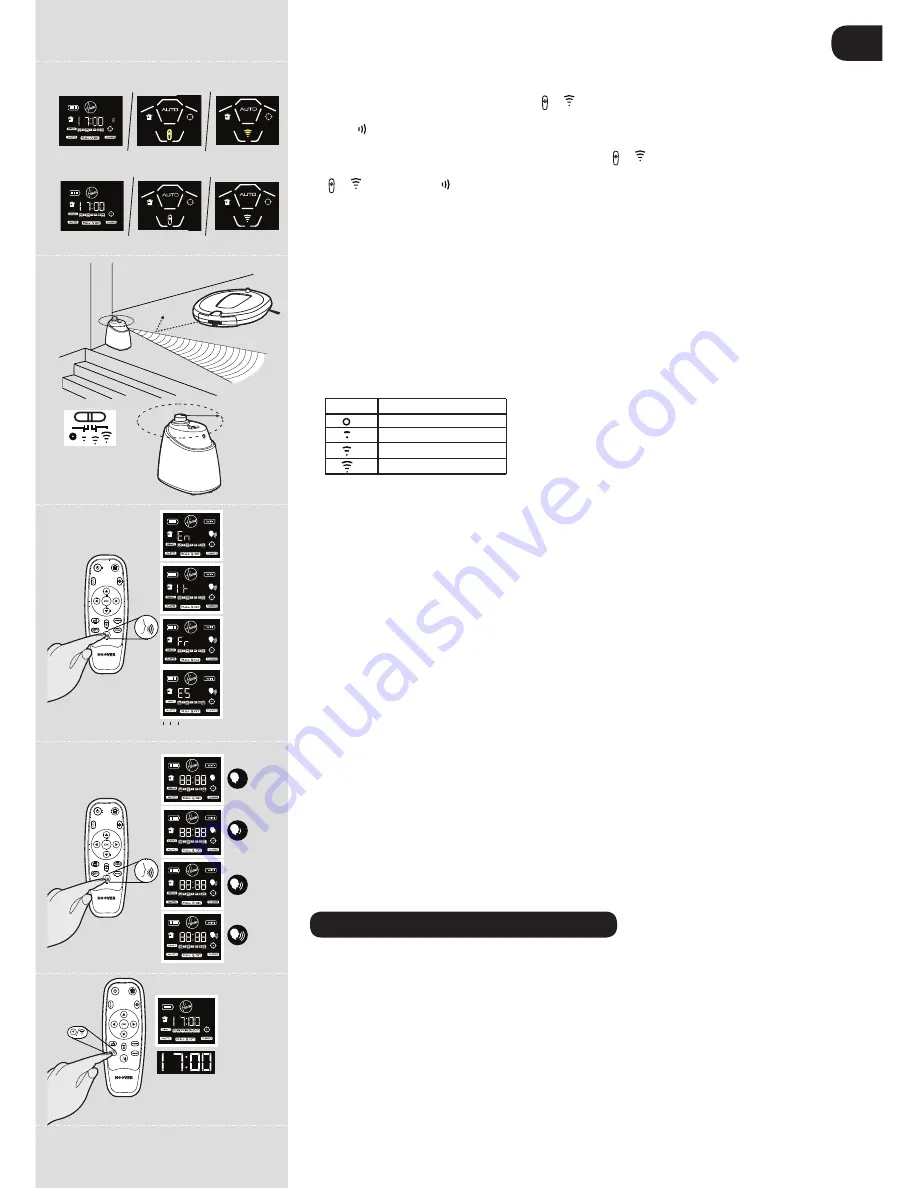
reMote CoNtroL** set UP [Fig.6]
To install batteries see cleaner maintenance – Replacing the batteries.
Every time you switch On the robot, press the or button** on the main product for 4 seconds to
activate the remote control function.when this button on the robot is illuminated* or when on LCD** the
indicator appears it means that the remote control function is active and vice versa.
Note:
The remote control can work through walls because it works on radio waves and not infrared.
The remote control function can be activated by pressing the or button** on the main product for 4
seconds. This function will be also reset when the main product is switched off. when the lamp under
the or button** or the icon on the LCD** (depending on the model) will be illuminated, this
indicates the remote control function is available.
VirtUAL BArrier** set UP [Fig.7]
To install batteries see cleaner maintenance – Replacing the batteries
The virtual barrier is used to prevent the Robo.com³ entering certain rooms or areas. Before setting the
virtual barrier remember to:
• Remove any obstacles from the direct path of the virtual barrier.
• The virtual barrier should be placed on the same surface that Robo.com³ is operating on.
• Ensure the virtual barrier is more than 3m away from the charging station.
Note: We recommend to use a physical obstacle to prevent robo.com³
entering any danger area.
1. Position the virtual barrier so that the infrared transmitter is pointing across the area you want to
create the barrier.
2. Slide the selector switch to the desired length of the barrier.
icon range type
Off
Short
Medium
Long
3. Check the virtual barrier provides adequate cover whilst the Robo.com³ is operational.
Note:
The battery power usage relates directly to the infra red level. For longer battery life to choose
the correct range icon.
Note:
The near infrared transmitter will stop the Robo.com³ coming any closer than 50cm to the virtual barrier.
CHANGiNG tHe VoiCe LANGUAGe
*
[Fig.8]
The Robo.com³ is able to communicate in English, French, Italian or Spanish. The default language is
English. To change this:
With remote Control
1. Turn the Robo.com³ on.
2. Press and hold the Voice Button* for 4 seconds until you hear the current language setting.
3. Press the Voice button* again until you hear the next language. Repeat this until you hear the
desired language setting.
4. Once selected the Robo.com³ will change the settings. Do not press the remote control again.
With Wi-Fi Application*
Following the instruction in the wi-Fi Application*.
Note:
The language information will appear for 5 seconds on the display.
ADjUstiNG roBo.CoM³ VoiCe VoLUMe
*
[Fig.9]
With remote Control
1. Press the voice button to select the desired volume. You can select Low, Medium, High or OFF.
2. The volume will appear on the display.
With Wi-Fi Application*
Following the instruction in the wi-Fi Application*.
Note:
The voice volume will appear on the display for 5 seconds.
USINg YOUR ROBO.COM³ CLEANER
Power on
1. Press the ON/OFF power switch on the side of the Robo.com³.
2. The LCD screen will illuminate.
Note:
If your Robo.com³ is already switched on, but in standby mode, it can be activated from the
remote control or pressing one of the touch sensitive buttons.
Note:
The touch sensitive buttons on the Robo.com³ can be unreliable if your hands are wet.
settiNG tHe DAy/tiMe oN tHe robo.com³
[Fig.10]
With remote Control
1. Press the time setting button, a flashing line will appear below the day icon.
If this button is pressed
for an extended time the wi-Fi function will be switched ON/OFF.
2. Use the up and down arrow on the remote control until the line appears below the correct day. Press
the OK confirmation button to confirm.
3. The hour display will flash. Press the up and down arrow on the remote control until the correct hour
DEMO
DEMO
Fig.6
Fig.7
Fig.8
Fig.9
Fig.10
DEMO
Содержание Robo.com3
Страница 1: ...User MANUAL ...
Страница 14: ...PRINTED IN P R C 48010192 ...


