GB
* Certain Models only ** May vary according to model
12
water. Remove excess water and leave to dry before re-using.
5. Re-assemble when fully dry.
rePLACiNG tHe BAtteries
WArNiNG:
Only use approved replacement parts for your Robo.com³. Using parts not validated by
Hoover are dangerous and will invalidate your guarantee.
WArNiNG:
If the Robo.com³ virtual barrier* and remote control* is not to be used for several months
please remove the Batteries and store in a dry location.
WArNiNG:
Always make sure your device is switched off before changing your batteries.
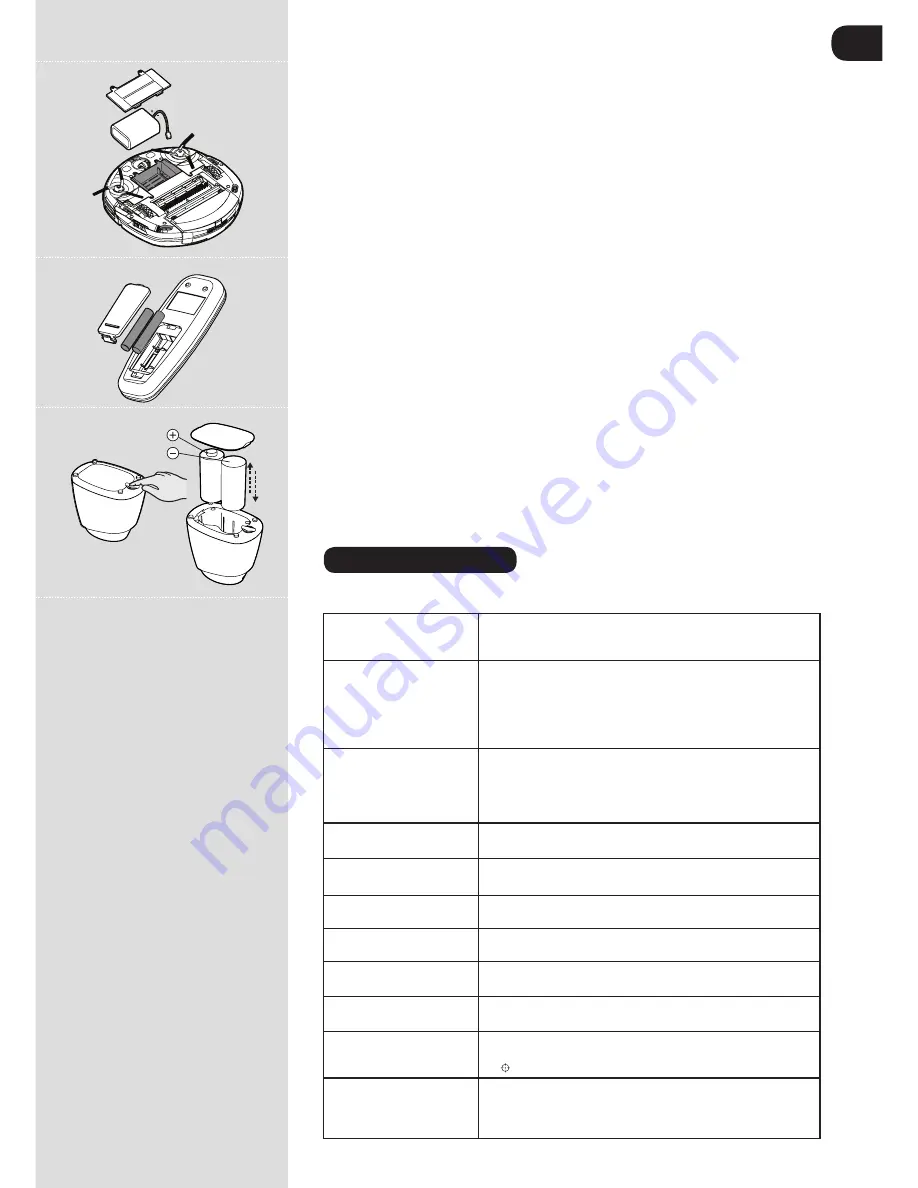
rePLACiNG tHe roBo.CoM³ BAtteries
[Fig.26]
The Robo.com³ is fitted with a rechargeable Lithium ion battery pack. Replace with Battery Pack Ref. (RB219)
1. Turn the Robo.com³ over and place on a level surface. Remove the screws from the battery cover
and then remove it.
2. Remove the old battery pack and replace with the new battery pack, ensuring the polarity is
correct.Replace the cover.
3. Recharge the Robo.com³, referring to ‘main product recharge’.
4. Dispose of the batteries safely. Used batteries should be taken to a recycling station and not
disposed of with household waste.
rePLACiNG tHe reMote CoNtroL BAtteries
[Fig.27]
The remote control is fitted with 2 x AAA batteries.
1. Remove the battery cover.
2. Remove the old batteries and replace with the new batteries ensuring the polarity is correct. Replace the cover.
3. Dispose of the batteries safely. Used batteries should be taken to a recycling station and not disposed of with
household waste.
rePLACiNG tHe VirtUAL BArrier BAtteries
[Fig.28]
The virtual barrier is fitted with 2 x D batteries.
1. Turn the virtual barrier over and rotate the retaining clip. Remove the battery cover.
2. Remove the old batteries and replace with the new batteries ensuring the polarity is correct. Replace the cover.
3. Dispose of the batteries safely. Used batteries should be taken to a recycling station and not disposed of with
household waste.
TROUBLESHOOTINg
The following is a list of commonly encountered problems and solutions.
If any of these problems persist contact your local Hoover representative.
The Robo.com³ does not
work
•
Check that the Robo.com³ is switched on.
•
Check that the dust container, filter and motor are clean.
•
Check if the Robo.com³ needs to be charged.
Cleaning power is weak
Turn power off and:
•
Empty dust container.
•
Check and clean the filter and motor.
•
Check and clean the Floor Brushes
•
Check and clean the sensors.
•
Check and clean the drive wheels.
The Remote Control** does
not work
•
Check the batteries.
•
Check the battery of the Robo.com³.
•
Move the Remote Control** closer to the Robo.com³.
•
To check whether the indicator is illuminated,
referring to
‘remote control set up’
The Robo.com³ does not
automatically charge
•
Make sure there are no barriers between the Robo.com³ and
the charger station.
The Robo.com³ is very noisy
while cleaning
•
Clean the dust container and filter.
•
Check the brushes and drive wheels for dirt and debris.
Robo.com³ stops working/
cleans intermittently
•
Check the cleaning times set.
Robo.com³ fails to detect
stairs
•
Check and clean the sensors.
Robo.com³ is trapped
•
The Robo.com³ will attempt to free itself but in some cases
assist the Robo.com³ manually.
Robo.com³ is not working but
there is no error code display
•
Contact your local Hoover representative
The smartphone doesn’t
connect to the Robot
•
Choose thewi-Fi Network “HOOVER
_
XXX“
•
Insert the Robot Password that you can get pushing the
button on Robot for at least 4 seconds
wIFI* function doesn’t work
•
Check if your wI-Fi router is available.
•
Check if the APP is correctly installed in your smartphone
•
Check if the wi-Fi icon is illuminated, if not please refer to
‘wi-Fi set up’
Fig.26
Fig.27
Fig.28
Содержание Robo.com3
Страница 1: ...User MANUAL ...
Страница 14: ...PRINTED IN P R C 48010192 ...


