background image

ON UPHOLSTERY

1. 

Immediately 

vacuum up as

much of the spill as possible.

2. Follow the furniture manufacturer’s
instructions for spot cleaning the
upholstery, using your cleaner

whenever possible.

NOTE: Do not attempt to pick up

a solvent based product with this
cleaner.

Maintenance

The following sections are concerned with proper maintenance of the
cleaner. Familiarize yourself with these home maintenance tasks and keep
this owner’s manual in a convenient place where you can refer to it when
needed. Proper use and care of your cleaner will ensure continued
cleaning effectiveness.

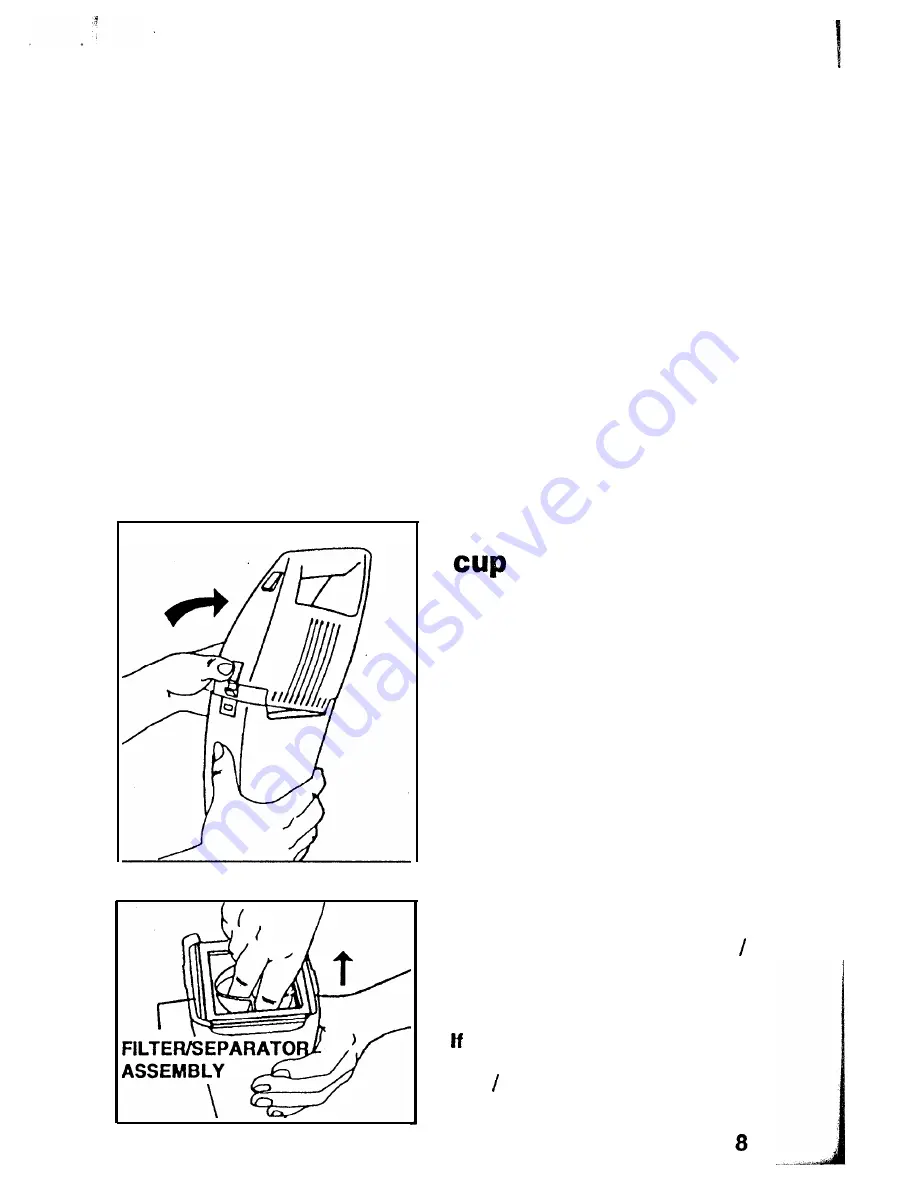
Emptying collector

The dirt, liquid and wet, debris

picked up by your cleaner is

deposited into the collector cup.

Empty cup after each use.

1. 

Hold cleaner in a vertical

position, as shown. Grasp cup

section; depress latch and remove
motor/handle section of cleaner

from cup.

2. With collector cup in hand, grasp
center ribs of filter and lift out filter 
separator assembly.

3. Empty collector cup.

 you have not finished your

cleaning task, 

shake any debris off

filter   separator assembly and
replace it in the cup.

Содержание Dubl-Duty

Страница 1: ...S lU3 05 s y 904 Owner s Manual R DuW Wet Dry Cleaner Review this manual before operating cleaner...

Страница 2: ...faces The model and serial number are located on the bottom of the cleaner motor housing For your personal records please enter the COMPLETE model and serial number in the spaces provided and retain t...

Страница 3: ...an collector cup filter and separator after picking up any perishable food items Use extra care when cleaning on stairs Do not put any object into openings Do not use with any opening blocked keep fre...

Страница 4: ...ve purchased and the parts included A Hand held cleaner B Wall bracket C Charger and cord D Screws E Anchors F Squeegee G Crevice tool Be sure to charge your Dubl Duty cleaner for 16 hours before usin...

Страница 5: ...NOT RETURN THIS PROD UCT TO THE STORE OR SEND IT TO NORTH CANTON FOR SERVICE Mounting wall bracket The wall bracket included with your cleaner is designed for both storing and recharging the cleaner C...

Страница 6: ...ger into 110 120 volt electrical outlet Before charging make sure the tools deluxe model only are not attached to the cleaner Hold cleaner with nozzle pointing down and opening in handle section align...

Страница 7: ...ces such as dresser drawers upholstered furniture stairs and baseboards Squeegee may be used on hard surfaces to pick up liquids and to assist in drying surface Attach either tool to cleaner by pushin...

Страница 8: ...tely vacuum up as much of the spill as possible 2 For oily spills work some low sudsing carpet shampoo into the area according to the directions on the container Vacuum up shampoo and spill residue co...

Страница 9: ...a convenient place where you can refer to it when needed Proper use and care of your cleaner will ensure continued cleaning effectiveness Emptying collector The dirt liquid and wet debris picked up by...

Страница 10: ...recommended that any components of this product be washed in a dishwasher 1 To remove filter from separator lift up one corner then pull edges of filter away from separator 2 Pemove any debris wash an...

Страница 11: ...into collector cup 9 If soiled wipe motor handle section with a damp cloth Do not immerse in water 10 Reattach cup assembly to motor as shown Hang cleaner back on wall bracket for storage and rechargi...

Страница 12: ...king from cleaner Service 1 Empty cup 2 Recharge battery To obtain approved HOOVER service and genuine HOOVER parts locate the nearest Hoover Factory Service Center or Authorized Hoover Warranty Servi...

Отзывы: