background image

Befor

e y

ou Begin

Before you begin

This cleaner must be operated in accordance with these instructions and used only for domestic 
household cleaning to remove DRY dirt and dust from household carpets, flooring, walls and fabrics.  
This cleaner is not fit to be used as an industrial cleaner hence will void the manufacturer’s warranty  
if used inappropriately.

Please read these instructions thoroughly

This will ensure you obtain full benefit from your new cleaner. Keep this Instruction Manual  
in a handy place for future reference.

Important

Always switch the cleaner off and remove the plug from the electricity supply before cleaning 
your appliance, when not in use, or attempting any maintenance task. The cleaner must only be 
connected to an AC supply at the voltage shown on the rating plate. This cleaner should only 
be used for its intended purpose as described in these instructions.

11305_HV_Heritage_5650_MultiSteamer_Manual_FA.indd   5

25/08/11   4:49 PM

Содержание 5650 Heritage

Страница 1: ...Heritage Chemical Free Cleaning Accessories Included Compact 5650 HERITAGE LargeCapacity MultiPurpose SteamCleaner 11305_HV_Heritage_5650_MultiSteamer_Manual_FA indd 1 25 08 11 4 49 PM...

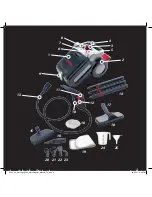
Страница 2: ...1 9 11 10 12 13 20 21 22 23 15 10 24 25 16 19 17 18 14 6 7 8 2 3 5 4 11305_HV_Heritage_5650_MultiSteamer_Manual_FA indd 2 25 08 11 4 49 PM...

Страница 3: ...Thermostat indicator light 8 Steam adjustment knob 9 Hose inlet and cover 10 User handle 11 Trigger lock button 12 Steam trigger 13 Hose 14 Extension tubes x 3 15 Window squeegee 16 Steam pad to be fi...

Страница 4: ...11305_HV_Heritage_5650_MultiSteamer_Manual_FA indd 4 25 08 11 4 49 PM...

Страница 5: ...ructionsthoroughly This will ensure you obtain full benefit from your new cleaner Keep this Instruction Manual in a handy place for future reference Important Always switch the cleaner off and remove...

Страница 6: ...lding 4 Burnscanoccurfromtouchinghotparts hotwaterorsteam Usecautionwhendrainingtheappliance afteruseastheremaybehotwaterintheunit 5 Thefillercapmustnotbeopenduringuse ensureitiffirmlysealedbeforecomm...

Страница 7: ...notaddcleaningsolutions scentedperfumes oilsoranyotherchemicalstothewater usedinthisappliance asthismaydamagetheunitormakeitunsafeforuse 17 Usetapwaterordistilled purifiedwaterifthetapwaterinyourareai...

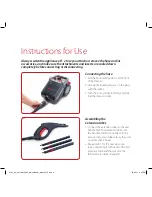
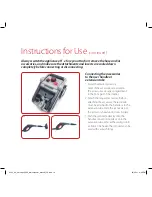
Страница 8: ...he socket 3 Push the hose connector firmly and fully into the cleaner socket Assemblingthe extensiontubes 1 Connect the extension tubes to the user handle Push the extension tubes onto the handle conn...

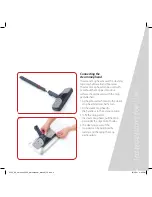
Страница 9: ...ith the mop pad attached 1 Fit the elbow attachment to the steam mop head and twist half a turn 2 Fit the steam mop head to the handle or to the extension tube 3 To fit the mop pad to the steam mop he...

Страница 10: ...andle or to the extension tube Slide the jet nozzle into the accessory head until it locks in place 3 Push the jet nozzle directly onto the handle connection nozzle or onto the extension tube as far a...

Страница 11: ...ushing on and turning in a clockwise direction to lock into place 5 Fit the window squeegee to the jet nozzle by pushing on and turning clockwise to lock into place This nozzle can be used with or wit...

Страница 12: ...w that the cleaner is maintaining the correct temperature 4 Ensure the trigger lock button is off Push the lock from the left side to lock the trigger and push from the right to release the lock 5 Pre...

Страница 13: ...forwards over the area do not hold the steam jet towards one area for too prolonged periods 7 To stop the steam jet release the steam trigger and wait until the cleaner has stopped emitting steam com...

Страница 14: ...by pressing down and turning in an anti clockwise direction 4 Fill the boiler with a maximum of 1 5 litres of water by using the measuring jug and funnel provided Warm water may be used which will red...

Страница 15: ...econds before fully unscrewing the filler cap Refillingthe oiler 1 Place the cleaner on a flat level surface 2 Make sure the cleaner is switched off and not connected to the mains power supply 3 Press...

Страница 16: ...he rack Make sure the cord storage rack is returned into original position before using the device Warning ensuretheapplianceiscooleddowncompletelybefore emptying cleaningorstoring Afteruse 1 Switch t...

Страница 17: ...the cleaner off and disconnect from the mains power supply Wait until the cleaner has cooled down completely 2 Empty the boiler 3 Use a commercially available descaler as stated in the package specifi...

Страница 18: ...DISPOSALOFYOUROLDAPPLIANCE 1 All electrical and electronic products should be disposed of separately from the municipal waste stream via designated collection facilities appointed by the government or...

Страница 19: ...xtension 31300535 Hose Assembly 31220425 Assorted Tool Kit 31600038 Elbow Attachment Steam Mop Head 31110204 Squeegee Tool 31140078 Please contact Hoover Customer Care 1300 360 845 to find your local...

Страница 20: ...Waverley Victoria 3150 or on 1300 360 845 M onday Friday 9am 5pm EST The decision t o repair or r eplace the cleaner is a t the sole discr etion of Hoover Floorcare If Hoover Floorcare decide to repai...

Отзывы: