Honeywell V800 Скачать руководство пользователя страница 7

NOTE: When replacing a control, cut off old compression

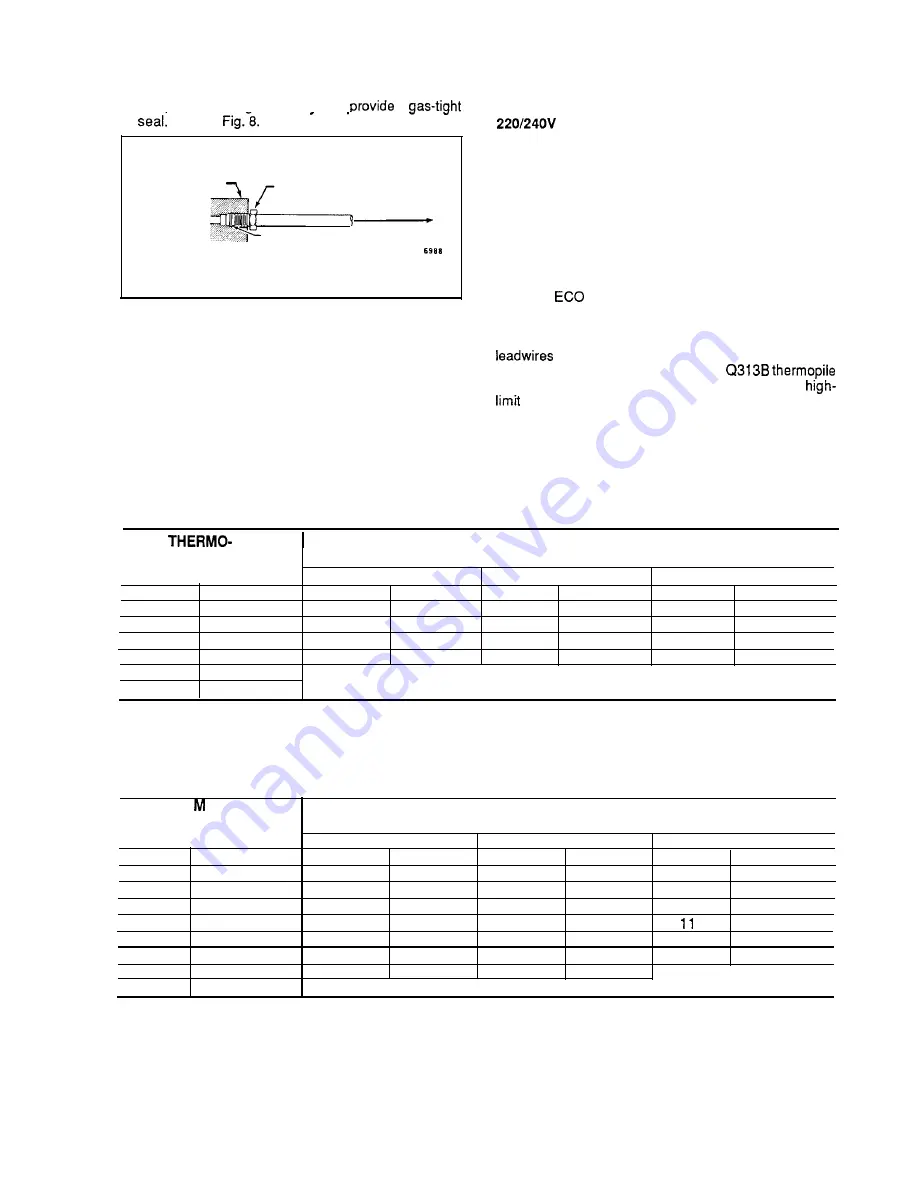
fitting and replace with new compression fitting pro-
vided on new combination gas control. Never use old
compression fitting as it mav not 

 a 


 Refer to 

GAS CONTROL
( I N L E T  

E N D

)

BODY

TIGHTEN NUT ONE TURN
BEYOND FINGER TIGHT

TO PILOT BURNER

FITTING BREAKS OFF

AND CLINCHES TUBING
AS NUT IS TIGHTENED

FIG. 8-ALWAYS USE NEW COMPRESSION FITTING.

4. Push tubing into pilot gas tapping on outlet end of

the control until it bottoms. While holding tubing all the

way in, slide fitting into place and engage threads. Turn

until finger tight. Then tighten one more turn with wrench.
Do not overtighten.

5. Connect other end of tubing to pilot burner accord-

ing to pilot burner manufacturer’s instructions.

CONNECT THERMOCOUPLE (24V, 10OV, 120V, and

 models)

The thermocouple connection to the power unit or

ECO connector (Figs. 6 and 7) is an electrical connection
and must be clean and dry. Never use pipe compound.

Tighten only 1/4 turn beyond finger tight to give good
electrical continuity.

CONNECT ECO (Standard capacity 24V, 10OV, 120V,
and 220/240 models)

If the 

 is provided, the leadwires must be

equipped with insulated 1/4 in. female quick-connect ter-
minals. Leadwire lengths must not exceed the lengths
shown in Tables 5 and 6. Connect the high-limit or ECO

 to the two terminals on the ECO

If ECO is not provided, connect a 


generator in place of the thermocouple to act as the 

 for the system.

TABLE 5—MAXIMUM LENGTH OF SUPPLEMENTARY LIMIT LEADWIRES

WHEN USING Q340A THERMOCOUPLE.

COUPLE

MAXIMUM LEADWIRE LENGTH X 2  (wires)

LENGTH

AWG NO. 14

AWG NO. 16

AWG NO. 18

in.

m

in.

m

in.

m

18

in.

m

0.5

35

0.9

22

0.6

13

24

0.3

0.6

29

0.7

18

0.5

11

30

0.3

0.8

23

0.6

15

0.4

9

36

0.2

0.9

17

0.4

11

0.3

6

48

0.2

1.2

DO NOT USE.

72

1.8

TABLE 6—MAXIMUM LENGTH OF SUPPLEMENTARY LIMIT LEADWIRES

WHEN USING Q309A THERMOCOUPLE.

COUPLE

MAXIMUM LEADWIRE LENGTH X 2 (wires)

L E N G T H

AWG NO. 14

AWG NO. 16

AWG NO. 18

in.

m

in.

m

in.

m

12

in.

m

0.3

47

1.2

30

0.8

18

18

0.5

0.5

41

1.0

26

0.7

16

24

0.4

0.6

35

0.9

22

0.6

14

30

0.4

0.8

29

0.8

18

0.5

36

0.3

0.9

23

0.6

15

0.4

9

40

1.0

0.2

19

0.5

12

0.3

7

48

1.2

0.2

11

0.3

7

0.2

60

1.5

DO NOT USE.

7

60-2019-7

Содержание V800

Страница 1: ...l of gas flow Available in standard opening and step opening pressure regulator models Can be mounted from O to 90 degrees from the vertical position of the gas control knob El Controls with the prefix V require 30 mV thermo couple and suitable pilot burner Controls with the prefix VS require 750 mV ther mopile generator in a self generating Powerpile system If gas or power supply is interrupted m...

Страница 2: ...ELS AVAILABLE straight through outlet Refer to Fig 3 Ambient Temperature Range Models available V400A Combination Gas Control with either 1 2 in left for 32 F to 175 F 0 C to 79 C hand or right hand side outlet Reducer fittings included to fit variety of sizes V800A C Combination Gas Control with either 1 2 in TRADELINE pack with cross reference label and left hand or right hand side outlet specia...

Страница 3: ...RAVITY CAPACITY BY Manufactured 0 60 0 516 Mixed 0 70 0 765 Propane 1 53 1 62 TABLE 2 CAPACITIES AND PIPE SIZES INLET OUTLET CAPACITYb CAPACITYb MODEL SIZE cfh m lhr NUMBER ELECTRICAL CONNECTIONS VALVE OPERATOR TYPE CONNECTION 10OV 120V and 36 in 0 9 mm 2201240V leadwires 2 112 X 318 110 3 1 V801 VS821 l 2x l 2 225 5 1 V400 V800 112 x 314 250 5 8 V810 VS820 314 x 314 I 335 15 9 314 x 3 4 1450 112 ...

Страница 4: ...l l SIOE VIEW 30 END VIEW OUTLET w TI v5306 ILL sTRATE0 v53070RV8305FIRESS RE REG LAToR 24V MOOELS 3 1 2 89 120V MOOEL 3 5 8 2 MANUAL MODELS 2 13 16 71J FOR V5308 AOO 5 8 16 TO DIMENSIONS GIVEN S DEOUTLETS LEFT ANO R GI IT HAND STANOAROONLYONTRAOEL NE MODELS CONTFIOLWITH24V VALVE OPERATOR SHOWN L NEVOLT MOOELi iASCC3VER FOR CONDU TCONNECT ON TOP SURFACE EC J CONNECTOR AVAILABLE FOR STANOARDCAPAC T...

Страница 5: ...resuit in fire or expiosion 1 Disconnect power supply before wiring to prevent electrical shock or equipment damage 2 Never apply a jumper across or short valve coil terminals This may burn out heat anticipator in thermostat r IMPORTANT These gas controis are shipped with protective seals over inlet and outiet tappings Do not remove seals until ready to connect piping OPTiONAL PiPiNG PATTERNS TRAD...

Страница 6: ...L r 1 PRESSURE INSTALL REGULATOR LONG ADJUSTMENT SCREW IN BENEATH COVER OUTSIOE CREW W CORNER MANUAL GAS CONTROL KNOB 3 76 mml ALL BENDS flLLIC TUBING SHO LD BE SMOOTH CAUTION HUTOFFTHE MAIN GAS SUPPLY BEFORE REh CIVING END CAP TO PREVENT GAS FROM FILLING THE WORK AREA TEST FOR GAS LEAK AGE WHEN INSTALLATION IS COMPLETE 6933D FIG 4 sEDIMENT TRAP INSTALLATION INSTALL CONTROL 1 This control can be m...

Страница 7: ...tight to give good electrical continuity CONNECT ECO Standard capacity 24V 10OV 120V and 220 240 models If the ECO is provided the leadwires must be equipped with insulated 1 4 in female quick connect ter minals Leadwire lengths must not exceed the lengths shown in Tables 5 and 6 Connect the high limit or ECO Ieadwires to the two terminals on the ECO If ECO is not provided connect a Q313B thermopi...

Страница 8: ...ws a Slip conduit fittings over integral leadwires and screw securely into hole in operator cover b Cut flexible conduit to appropriate length Slip conduit over leadwires and attach to fittings c Route and connect both flexible conduits to junc tion box Connect integral wires to control circuit Do not splice except within a junction box LINE VOLTAGE OPERATOR OR CONTROLLER L2 I I 1 Ll 1 JUNCTION BO...

Страница 9: ...on Bubbles indicate gas leak 2 If leak is detected tighten pipe connections 3 Stand clear of main burner while lighting to prevent injury caused from hidden leaks which could cause flash back in the appliance vestibule Light main burner 4 With main burner in operation paint pipe joints in cluding adapters and control inlet and outlet with rich soap and water solution 5 If another leak is detected ...

Страница 10: ...c Always replace cap screw and tighten firmly to ensure proper operation 4 If desired outlet pressure or flow rate cannot be achieved by adjusting the control check the control inlet pressure using a manometer at the inlet pressure tap If inlet pressure is in normal range refer to Table 9 re place the control Otherwise take the necessary steps to provide proper gas pressure on the control Step Ope...

Страница 11: ... such as in the commercial cooking and agricultural and industrial industries because In many such applications particularly commercial cooking the equipment operates 100 000 200 000 cycles per year Such heavy cycling can wear out the gas control in one to two years Exposure to water dirt chemicals and heat can damage the gas control and shut down the control system The maintenance program should ...

Страница 12: ...s control if the pilot flame becomes extinguished or too small for satisfactory burner ignition As the pilot burns it constantly heats the thermo couple or Powerpile generator providing current for the Pilotstat power unit in the gas control A properly burning pilot supplies the power unit with enough current to keep the safety valve open and allow pilot gas flow If the pilot goes out or decreases...

Страница 13: ...LET GAS CONTROL ON p LOT OFF KNOB SERVO PRESSURE REGULATOR D MAIN VALVE woRK NG GAS lMAIN VALVE PRESSURE CHAMBER DIAPHRAGM 12 882 FIG 14 GAS FLOW THROUGH THE V800 COMBINATION GAS CONTROL FAMILY 13 60 201 9 7 ...

Страница 14: ... disconnect Ieadwiresto lower left TH terminal and lower right PP terminal to isolate valve operator coil from balance of circuit Measure resistance of coil If coil is not 2 ohms 10 percent replace VS824A Valve Operator 4 For all other models use an acvoltmeterto measure voltage across terminals TH and TR If a No voltage is present check the control circuit for proper operation b 24 Vac is present...

Страница 15: ...e the pilot access panel located below and behind the gas control unit 7 Find the pilot follow metal tube from gas control The pilot is between the two burner tubes behind the pilot access panel 8 Turn knob on gas control counterclockwise m t o PILOT 9 Push in control knob all the way and hold in immedi ately Iightthe pilot with a match continue to hold the control knob in for about one 1 minute a...

Отзывы: