www.honeywell.com/security
+1 800 323 4576 (North America only)
https://www.honeywellsystems.com/ss/techsupp/index.html
© 2014 Honeywell International Inc. All rights reserved. No part of this publication may be reproduced by any means without written
permission from Honeywell. The information in this publication is believed to be accurate in all respects. However, Honeywell cannot
assume responsibility for any consequences resulting from the use thereof. The information contained herein is subject to change
without notice. Revisions or new editions to this publication may be issued to incorporate such changes.
Document 800-06519 – Rev C – 02/2014
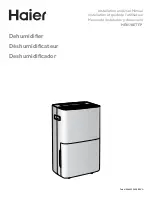
Installing a 5-inch Dome Bubble on your HD3 equIP Series camera
You can install a 5-inch dome bubble (that you have
purchased separately) on your HD3 equIP Series camera so
that the 3-inch camera matches your existing 5-inch dome
cameras.
1.
Install the 5-inch dome adapter plate:
•
Without a 4S Box
: Use the supplied screws to
directly attach the 5-inch dome adapter plate to the
ceiling or wall, with the gasket between the adapter
plate and the mounting surface.
•
With a 4S Box
: Use your own screws to attach the
adapter plate to the 4S box, which is already
installed in the ceiling or wall, with the gasket
between the adapter plate and the mounting surface.
2.
Connect the wires. Refer to the HD3 equIP Series Quick
Install Guide or User Guide for instructions about
connecting the wires.
3.
Secure the HD3 equIP Series camera assembly to the
5-inch dome adapter plate by inserting it into the 5-inch
dome adapter plate then twisting it clockwise until it
clicks securely into place.
4.
Adjust the camera field of view. Refer to the HD3 equIP
Series Camera Quick Install Guide or User Guide for
instructions about adjusting the camera Field of View.
5.
Install the 5-inch dome bubble (that you have purchased separately):
a.
Slip the looped end of the safety lanyard on the 5-inch dome bubble onto the
safety lanyard hook on the 5-inch dome adapter plate.
b.
Install the 5-inch dome bubble by placing it on the 5-inch dome adapter plate
with the tabs to the left of the slots, then rotating it clockwise until the locking
tab clicks securely into place.
Screw holes
Attach camera
assembly
4 tabs
Safety lanyard hook
Attach 5-inch dome bubble
3 tabs
5-Inch Dome Adapter Plate
Locking tab