background image

W

innox · Edition 12.20

EN-3

electrical Wiring

All the electrical wiring must comply with all applicable local codes 
and/or standards such as:


– NFPA Standard 70


– IEC 60364


– CSA C22


– BS7671

Gas Piping

All the gas piping must comply with all applicable local codes and/
or standards such as


– NFPA Standard 54


– ANSI Z223


– EN 746-2

Where to Get the standards?
the nFPA standards are available from:

National Fire Protection Agency  
Batterymarch Park  
Quincy, MA 02269  
 www.nfpa.org 

the AnsI standards are available from

American National Standard Institute  
1430 Broadway  
New York, NY 10018  
 www.ansi.org 

the UL standards are available from

333 Pfingsten Road  
Northbrook, IL 60062  
 www.ul.com 

the FM standards are available from

1151 Boston-Providence Turnpike  
PO Box 9102  
Norwood, MA 02062  
 www.fmglobal.com/approvals 

Information on the en standards and where to get them is 

available from

Comité Européen de Normalisation  
Stassartstraat 36  
B-1050 Brussels  
Phone: +32-25196811  
Fax: +32-25196819  
 www.cen.eu  
 
Comité Européen de Normalisation Electronique  
Stassartstraat 36  
B-1050 Brussels  
Phone: +32-25196871  
Fax: +32-25196919  
 www.cenelec.org 

Checklist before installation
Intake

Provide an opening in the burner room of at least one square inch 
per 4000 BTU/h (1,17 kW) to supply the burner intake with fresh, 
outdoor, combustion air. 
If there are corrosive fumes or materials in the surrounding air, find 
an uncontaminated source to supply air to the burner, or provide a 
sufficient air filtering system.

exhaust

Do not allow exhaust fumes to accumulate in the work area. Provide 
some positive means for exhausting from the furnace and the building.

Access

Make sure that you install the burner in such a way that you can gain 
easy access for inspection and maintenance.

environment

Make sure the local environment matches the original operating 
specifications. Check the following items:


– Voltage, frequency and stability of the electrical power


– Fuel type and supply pressure of the fuel


– Availability of enough fresh, clean combustion air


– Humidity, altitude and temperature of air


– Presence of damaging corrosive gases in the air


– Prevent direct exposure to water

InstALL FLAMe sensoR

 1 

Install the flame sensor into the 1/2" NPT opening in the rear 
cover.

 2 

Make sure that you connect the flame sensor of a burner to the 
electrical circuit of that burner.

 DAnGeR


– Connecting the flame sensor of a burner to the electrical circuit 

of the wrong burner can result in a fire or explosion. 

There are two different types of flame sensors; UV scanner and 
flame rod.

UV scanner


The UV scanner must be compatible to the flame monitoring 
control that is used. Refer to the manual of your selected control 
for proper selection of the scanner.

Flame Rod
note: 

 Only specific burner sizes with alloy or silicon carbide com-

bustors can use a flame rod, see Technical Information Winnox.


For detailed information on how to install and connect a flame rod, 
refer to Eclipse ignition components technical literature.

spark plug


Install the spark plug into the opening in the rear cover.

note: 

 Do not apply any grease to the threads of the spark plug or 

bad grounding of the spark plug may occur, resulting in a weak spark. 


If flame monitoring controls other than those recommended in 
the Design Guide are used contact Eclipse to determine how the 
burner performance may be affected, adjustments may vary from 
Eclipse published values. Consult with the engineer who specified 
the alternate control for limitations.

InstALL BURneR

Chamber opening

 1 

Provide an opening in the chamber wall at least 1/2" (12 mm) 
larger in diameter than the outside diameter of the combustor 
(1/4"–6 mm per side).


The combustor diameter can be found here: page 17 (Di-
mensions).
 

 2 

Provide an accessible pressure tap on the chamber wall to meas-
ure the pressure inside the firing chamber.


The pressure tap should be located near the burner.

Chamber wall

Minimum 
1/4" (6mm)
space per 
side

Combustor 

Slots

Chamber opening

Содержание Eclipse Winnox WX0850

Страница 1: ... breach of warranty negligence strict liability or otherwise is limited to the furnishing of replacement parts and Honeywell Eclipse will not be liable for any other injury loss damage or expenses whether direct or consequential including but not limited to loss of use income or damage to material arising in connection with the sale installation use of inability to use or the repair or replacement...

Страница 2: ...ls To reduce the risk limit exposure to these chemi cals work in a well ventilated area and wear approved person al protective safety equipment for these chemicals CAUTION This manual gives information for the use of these burners for their specific design purpose Do not deviate from any instructions or application limits in this manual without written advice from Honeywell Capabilities Only quali...

Страница 3: ...age frequency and stability of the electrical power Fuel type and supply pressure of the fuel Availability of enough fresh clean combustion air Humidity altitude and temperature of air Presence of damaging corrosive gases in the air Prevent direct exposure to water INSTALL FLAME SENSOR 1 Install the flame sensor into the 1 2 NPT opening in the rear cover 2 Make sure that you connect the flame sens...

Страница 4: ...er piping The burner is factory assembled and shipped as ordered Note If you have to realign the pipes please observe the following CAUTION Do not attempt to redirect piping by removing the inner circle boltsE Internal burner parts will be damaged 1 Remove the outer A four bolts only E A A Redirect piping 2 Rotate the rear cover and replace bolts When reassembling ensure the following B C D F Burn...

Страница 5: ... there are no leaks in the gas and air lines 2 Make sure all the components of the flame monitoring control system are properly installed This includes verifying that all switch es are installed in correct locations and all wiring pressure and impulse lines are properly connected 3 Make sure components of spark ignition system are installed and functioning properly 4 Make sure that the blower rota...

Страница 6: ...the air butterfly valve towards the back of the burner as shown in figure Air butterfly valve open direction If it doesn t refer to the actuator s literature for instructions on how to reverse the direction Closed Open in this direction only Open Back Air butterfly valve open direction Step 2 Set low fire air 1 Start combustion air blower 2 Drive control motor to low fire position 3 Measure the ai...

Страница 7: ... flame signal is too low use the bypass regulator B and or the adjustable limiting orifice C to increase the pressure at Tap E and provide better flame signal However this can have a negative impact on emissions and or nozzle life 10Close all pressure taps Pilot start option D B C Tap E A Main gas shut off valve train Pilot gas shut off valve train Low fire start with pilot start option WARNING Th...

Страница 8: ...as butterfly valve to 75 open See step 4 figure Manual butterfly valve adjustment Note To adjust manual butterfly valve a Loosen set screw b Turn dial c Tighten set screw 2 With burner lit drive control motor to high fire position 3 Measure air loading line pressure from tap C to the chamber See step 2 figure Air differential pressure 4 Refer here page 13 Air ΔP vs Input Find your measured high fi...

Страница 9: ...s 4 Check ignition spark plugs and proper gap 5 Check valve motors and control valves for free smooth action and adjustment 6 Check for proper operation of the ventilating equipment 7 Test the interlock sequence of all safety equipment manually make each interlock fail noting that related equipment closes or stops as specified by the manufacturer 8 Test flame monitoring control system by manually ...

Страница 10: ...valve position The burner goes out when it cycles to high fire Not enough gas pressure into the ratio regulator Check the start up settings Measure the gas pressures and adjust them where necessary Check for valve train pressure loss Loading line to the ratio regulator is leaking Repair the leak in the loading line Not enough gas flowing to the burner Adjust the ratio regulator to increase the gas...

Страница 11: ... 5 3 7 WX0500 WX0600 7 5 5 5 WX0850 15 11 Input remote blower All information is based on laboratory testing Different chamber conditions will affect the data Eclipse reserves the right to change the construction and or config urations of our products at any time without being obliged to adjust earlier supplies accordingly WX0050 Pressure at air inlet 9 w c 22 5 mbar WX0100 WX0600 Pressure at air ...

Страница 12: ...59 WX0400 347 158 WX0500 505 229 WX0600 456 207 WX0850 1435 651 Burner without blower Model Weight lbs kg WX0050 107 49 WX0100 124 56 WX0200 180 82 WX0300 228 104 WX0400 224 102 WX0500 338 153 WX0600 289 131 WX0850 1135 515 Fuel type HHV WOBBE Index Fuel Symbol Gross heating value HHV Speci fic gravity WOBBE Index Natural Gas CH4 90 1000 BTU ft3 11 1 kWh m3 0 60 1290 BTU ft3 Propa ne C3H8 2525 BTU...

Страница 13: ...10 15 20 25 30 0 600 1200 1800 2400 3000 3600 0 10 20 30 40 50 60 70 0 200 400 600 800 1000 Air p vs Input Input kW Air P mbar 10 Air P w c 10 Input kBtu h WX0300 0 5 10 15 20 25 30 0 10 20 30 40 50 60 70 80 0 1000 2000 3000 4000 5000 0 250 500 750 1000 1250 1500 Air p vs Input Input kW Air P mbar 10 Air P w c 10 Input kBtu h WX0400 0 5 10 15 20 25 30 0 10 20 30 40 50 60 70 80 0 1000 2000 3000 400...

Страница 14: ...150 180 50 600 Control and operation curve Excess air Input kW Typical Ratio Control Input kBtu h WX0050 0 0 200 400 600 800 1000 1200 0 60 120 180 240 300 360 10 20 30 40 50 NOX Emission On ratio NO X ppm 3 O 2 Input kW NOX Naturel gas NOX Propane Butane Input kBtu h WX0100 0 0 200 400 600 800 1000 1200 0 60 120 180 240 300 360 20 40 60 80 100 120 140 160 Control and operation curve Excess air In...

Страница 15: ...kBtu h WX0400 0 1000 2000 3000 4000 5000 6000 0 300 600 900 1200 1500 1800 0 10 20 30 40 50 NOX Emission On ratio NO X ppm 3 O 2 Input kW NOX Naturel gas NOX Propane Butane Input kBtu h WX0500 0 50 100 150 200 250 300 350 400 0 1000 2000 3000 4000 5000 6000 0 300 600 900 1200 1500 1800 Control and operation curve Excess air Input kW Input kBtu h Typical Ratio Control WX0500 0 10 20 30 40 50 0 1500...

Страница 16: ...60 70 80 90 7 9 NOX Emission On ratio NO X ppm 3 O 2 Input kW Input MMBtu h NOX Naturel gas NOX Propane Butane WX0850 2 4 6 8 1 3 5 0 0 100 200 300 400 500 600 700 800 500 1000 1500 2000 2500 0 900 7 9 Control and operation curve Excess air Input kW Input MMBtu h Typical Ratio Control WX0850 ...

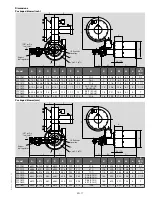
Страница 17: ...3 26 ø22 21 5 12 1 14 38 9 50 Hz 35 1 60 Hz 7 3 24 1 16 5 6 1 8 2 WX0850 ø33 3 ø30 1 35 6 ø32 24 4 23 4 20 4 40 8 7 8 39 9 27 5 9 3 8 3 Packaged blower mm B F E K D P 0 4 10 N C M G L A H n x ø0 5 ø12 NPT or Rc fuel Iinlet Bypass fuel regulator UV Scanner Location Model A B C D E F G H K L M N n P NPT Rc WX0050 ø340 ø245 381 ø300 298 229 217 518 178 528 209 156 4 3 4 WX0100 ø385 300 440 ø345 316 2...

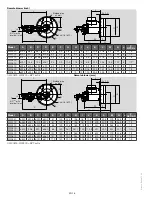
Страница 18: ...18 23 9 24 1 16 5 22 7 8 1 2 WX0850 ø33 3 ø29 4 ø29 1 ø32 4 7 5 9 11 4 19 12 12 9 39 3 39 9 27 5 36 8 8 1 2 1 WX0300 WX0400 BPT or Rc Remote blower mm H D n x ø0 5 ø12 A K L E I P J B C F M N G 0 4 10 Welded pipe air inlet NPT1 or Rc pilot fuel Iinlet Model A B C D E F G H I J K L M N n P NPT RC WX0050 ø340 ø226 ø220 ø300 81 149 245 138 76 105 528 528 209 365 4 1 2 WX0100 ø385 ø281 ø275 ø345 81 14...

Страница 19: ...the end of the product life number of operating cy cles reached dispose of the packaging and product in a corresponding recycling centre Do not dispose of the unit with the usual domestic refuse Do not burn the product On request old units may be returned carriage paid to the manufac turer in accordance with the relevant waste legislation requirements ...

Страница 20: ...ermal Solutions family of products includes Honeywell Combustion Safety Eclipse Exothermics Hauck Kromschröder and Maxon To learn more about our products visit ThermalSolutions honeywell com or contact your Honeywell Sales Engineer Eclipse Inc 1665 Elmwood Rd Rockford IL 61103 United States ThermalSolutions honeywell com FOR MORE INFORMATION ...

Отзывы: