Honeywell ControlEdge 900 platform Скачать руководство пользователя страница 160

Loops 
Loop Setup 

148 

900 Control Station User Guide 

Revision 9


May 2014 

Loop Setup 

Overview 

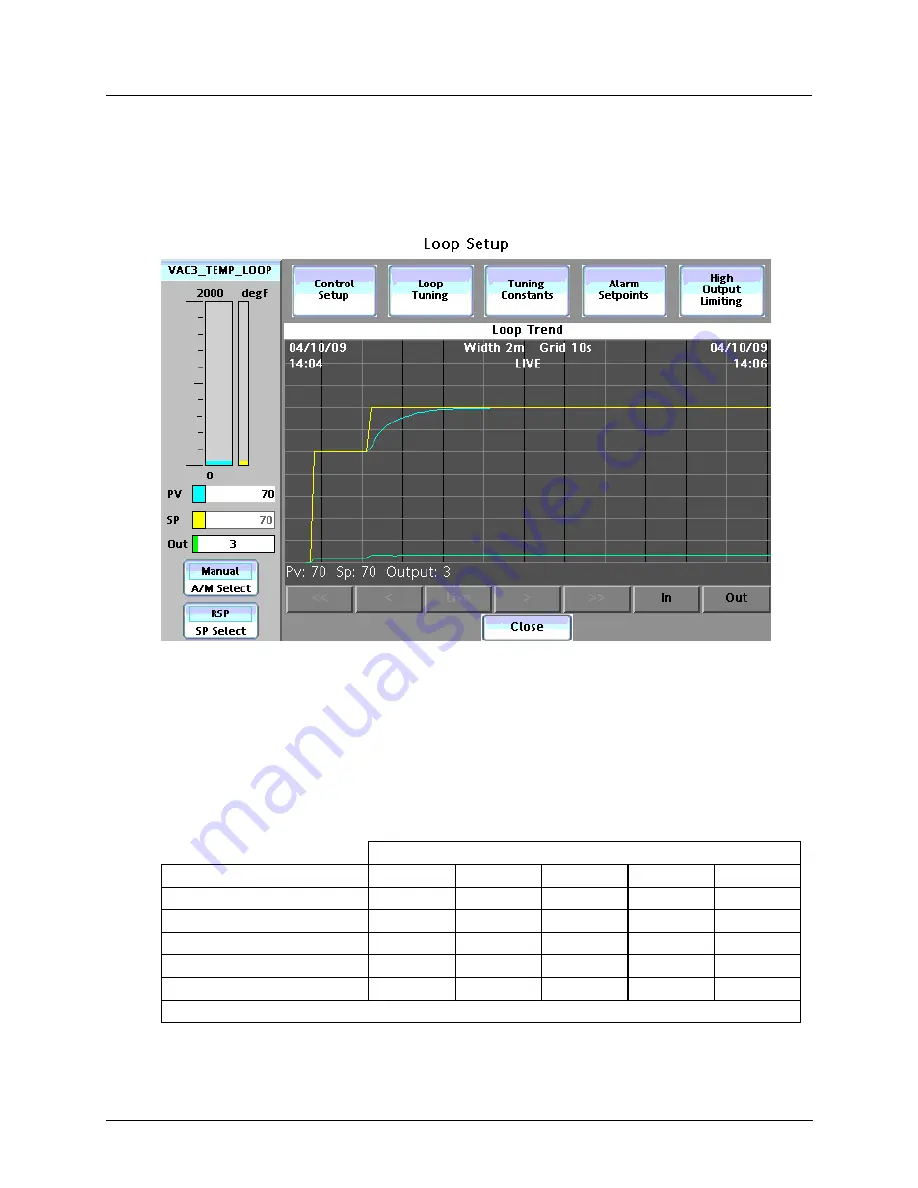
All the loop widgets let you jump to the Loop Setup display. See example below. 


Above is an example of the PID Loop Setup display. At left is the loop widget, with operable buttons and 
parameters. 

At bottom is a loop trend. The points on the trend typically correspond to PV, SP and Output, whose pen 
colors match the values on the left (aqua, yellow, green). Additional points of different colors may be 
visible, depending on configuration. Use the gray buttons at the bottom to navigate and zoom. 

At the top are buttons that take you to detailed popups for various loop parameters. Buttons are accessible 
depending on the loop type, shown below. 


Loop type 

Button 

PID 

ON/OFF 

3 POS 

CARBON 

A/M BIAS 

Control Setup (p. 150) 

Loop Tuning (p. 151) 


Tuning Constants (p. 155 


Alarm Setpoints (p. 156) 

High Output Limiting (p. 157) 


X indicates button is accessible 


Содержание ControlEdge 900 platform

Страница 1: ...Honeywell Process Solutions 900 Control Station For use with HC900 Controller User Guide Doc No 51 52 25 148 Revision 9 Date May 2014 ...

Страница 2: ...edy and is in lieu of all other warranties expressed or implied including those of merchantability and fitness for a particular purpose Specifications may change without notice The information we supply is believed to be accurate and reliable as of this printing However we assume no responsibility for its use While we provide application assistance personally through our literature and the Honeywe...

Страница 3: ...52 25 109 HC900 Controller Communications User Guide 51 52 25 111 HC900 Controller Redundancy Overview System Operation 51 52 25 133 Revision Information Document Name This manual 51 52 25 148 900 Control Station Revision Number Publication Date New Error Unknown document property name April 2009 Languages added IP address setup model specific notes Revision 2 October 2009 Summary Displays added A...

Страница 4: ... honeywell com Honeywell Process Solutions http www hpsweb honewell com ps HPS Technical tips http hpsweb honeywell com Cultures en US Products Instrumentation hybrid hc900 TechnicalTips documents htm Telephone and Email Contacts Area Organization Phone Number United States and Canada Honeywell Inc 1 800 343 0228 Customer Service 1 800 423 9883 Global Technical Support Global Email Support Honeywe...

Страница 5: ... potential shock hazard where HAZARDOUS LIVE voltages greater than 30 Vrms 42 4 Vpeak or 60 Vdc may be accessible Failure to comply with these instructions could result in death or serious injury ATTENTION Electrostatic Discharge ESD hazards Observe precautions for handling electrostatic sensitive devices Protective Earth PE terminal Provided for connection of the protective earth green or green y...

Страница 6: ... CE Conformity Europe 2 Components 3 Preparation and startup 4 Site Preparation 4 Control Station Mounting 4 Noise Protection 4 How to configure your Control Station 4 Startup 5 Features 7 Overview 7 Touch screen 8 Navigation and data entry 9 Status bar 10 Keys 11 CompactFlash 11 Status LEDs 12 Ports 13 900 Control Station 10 inch model 13 900 Control Station 15 inch model 13 USB Device 14 USB Hos...

Страница 7: ...ostics 36 Menu Overview 36 Controller Diagnostics 37 I O Module Diagnostics and I O Calibration 42 Communication Diagnostics 48 Redundant Overview 48 Lead Reserve CPU Diagnostics 56 Station Settings 61 View Data 61 Delete Data 61 Export Data to USB 61 Format Memory Device 62 Station Setup 62 Station Status 62 Station Comm Ports 62 Change Passwords 62 Language Menu Selection 62 Log On 63 Alarms and...

Страница 8: ...ty 84 Download Security Displays and Functionality 86 Using Barcode Reader 86 Process Displays 87 Overview 87 Access 87 Widget displays 87 How to edit a parameter 89 Pushbuttons signals and variables 90 AGA8DL AGA8GS 91 AGA Detail Gas Components 95 AGA8 Gross Setup 96 4 Selector Switch 97 Device Control 98 Device Control Setup 99 Hand Off Auto Switch 100 Stage 101 Stage setup display 102 Ramp 103 ...

Страница 9: ...ial cases and actions 124 Auxiliary SP and PV Pre plot 125 Setpoint programmer Operate 125 View Edit profile 129 View Edit Profile Segments 131 Edit Type and Value 131 Edit Events 132 Setpoint Scheduler 133 Overview 133 Setpoint Scheduler Operate 134 View Edit schedule 137 View Edit Schedule Segments 138 Edit Setpoints 138 Edit Auxiliary Setpoints 138 Edit Time Recycles 139 Edit guarantee hold 139...

Страница 10: ...ncel Calibration 165 Restore AO factory calibration 165 PPO Motor Calibration 166 Overview 166 Calibration Status Information 166 Cancel Calibration 167 Calibration Errors 167 Auto Calibration Procedure 168 Semi Auto Calibration Procedure 169 Hand Calibration Procedure 170 Motor Setup 172 Maintenance 173 Troubleshooting 173 What to do if the Control Station has difficulty starting up 173 Performin...

Страница 11: ...eer Connections 33 Table 18 Peer Connection Status 34 Table 19 Rack n diagnostics 37 Table 20 I O module diagnostics 42 Table 21 I O module Details 43 Table 22 I O Module Error Status 44 Table 23 Bad module details 46 Table 24 Bad Channel details 47 Table 25 Redundant Overview 48 Table 26 Details of Rack diagnostics error status messages 51 Table 27 Details of Lead or Reserve CPU diagnostics error...

Страница 12: ...n menu 1 Figure 2 Home display 5 Figure 3 Features 7 Figure 4 Examples of buttons and data entry fields 9 Figure 5 Status bar 10 Figure 6 Status LEDs 12 Figure 7 Main Menu 15 Figure 8 Variable Recipe Selection Display 118 Figure 9 Recipe Load 128 Figure 10 Recipe Save 128 Figure 11 IMAN loop mode 149 ...

Страница 13: ...ation User Guide 1 May 14 Introduction Overview What s in this guide This guide contains instructions on assembly installation wiring and operation of the 900 Control Station shown in Figure 1 Figure 1 900 Control Station menu ...

Страница 14: ... is in conformity with the protection requirements of the following European Council Directives 2006 95 EC the Low Voltage Directive and 2004 108 EC the EMC Directive Conformity of this product with any other CE Mark Directive s shall not be assumed ATTENTION The emission limits of EN 50081 2 are designed to provide reasonable protection against harmful interference when this equipment is operated...

Страница 15: ...pre configured objects called widgets for interfacing with principal function blocks such as loops and SPPs Configure data logs for storage and trend viewing Lets you monitor and adjust the HC900 s process through custom built displays and pre configured widgets Load store run recipes profiles data logs Monitor alarms diagnostics events Store data logs Integrate loops of control with digital I O S...

Страница 16: ... Station The Control Station is shipped from the factory unconfigured Use Honeywell s Station Designer application to configure your Control Station The overall steps for configuration are as follows Step Action 1 Using Station Designer application open sds file add device update IP address and create data tags from your HC900 s cde configuration file 2 In Station Designer build custom displays to...

Страница 17: ...900 Control Station User Guide 5 May 2014 Startup After connecting the Controller and Control Station and downloading your sds file to the Control Station the Home display appears with 16 buttons Actual button text may vary Figure 2 Home display ...

Страница 18: ...Preparation and startup Startup 6 900 Control Station User Guide Revision 9 May 2014 This page has been intentionally left blank ...

Страница 19: ...h screen shows menus and displays Optional protective film available See page 8 2 Keys Key functions are more generic than button functions See page 11 3 CompactFlash For data storage and booting up from an image file See page 11 4 Status LEDs Status of power CompactFlash and alarms See page 12 5 Ports Connections for data storage and communications See page 13 ...

Страница 20: ...ata entry A button is an onscreen object that when touched causes an action Shown here are the buttons on the Main Menu Buttons come in various shapes sizes and colors but a graduated blue background is the most common See page 9 2 Status bar Always visible Shows status of Logs Diagnostics Alarms Events Controller Language See page 10 1 2 ...

Страница 21: ... in the title bar of the object indicates a link to additional displays related to the object Touch light blue title bar of object to jump to detailed displays for that object Example Touch PID title bar to jump to loop tuning tuning constants etc Example Touch SPP title bar to jump to setpoint programmer events etc 3 Black value or text on white unlined box Read only Read only 4 Black value or te...

Страница 22: ... unacknowledged the white background turns red and the icon becomes colorful and the text becomes white When there are any unacknowledged alarms the button flashes When all alarms become acknowledged the flashing stops Touch to go to Alarms console or Alarm Group display depending on how the Control Station was configured see Station Designer manual section on Alarms Here all alarms are displayed ...

Страница 23: ...tFlash Log off current user Go to next display Works only after Back key was pressed Go to previous display Go to Home display This is the default display upon startup It contains links to displays for viewing your HC900 s process See page 87 Go to main menu See page 15 CompactFlash CompactFlash socket is on the left side Use CompactFlash card for storing data logs csv storing print screen images ...

Страница 24: ...y Unit is powered and running an application Yellow LED Indication Off No CompactFlash card present Steady CompactFlash card present Flashing rapidly CompactFlash being checked Flickering Unit is writing to the CompactFlash either because it is storing data or because the PC connected via the USB port has locked the drive Flashing slowly Incorrectly formatted CompactFlash card present Red LED Indi...

Страница 25: ...Features Ports Revision 9 900 Control Station User Guide 13 May 2014 Ports 900 Control Station 10 inch model 900 Control Station 15 inch model ...

Страница 26: ...onnector USB Host Port B is not used Ethernet The Ethernet port is for fastest communication with your HC900 Controller PC or other devices Use an Ethernet switch to link multiple devices RS485 The RS485 port is for communication with HC900 Controller if Ethernet is not desired or available RS232 The RS232 ports are not recommended due to reduced performance Port B may be used to connect to HC900 ...

Страница 27: ... the Home key Table 1 Main menu functions Menu Item Function Controller Controller status and setup Communications Controller communications Serial ports Ethernet ports I O Modbus Hosts Peers Diagnostics Diagnostic status of controller I O communications Station Settings File management of CompactFlash and USB device Adjust calibrate clean touch screen View status of communication ports Set passwo...

Страница 28: ... ModbusSlaveDevicen ModbusSlavenStatus Modbus TCPSlaveDevicen Modbus TCPSlavenStatus HostConnections HostConnectionn HostConnectionnStatus PeerConnections PeerConnectionsn PeerConnectionnStatus 36 Diagnostics ControllerDiagnostics Rackn I OModule ModuleDetails Details I OModuleDiagnostics RacknI OModules ModuleDetails I OCalibration MotorSetup Communication Diagnostics ControllerCommunications Red...

Страница 29: ...Groups BatchHeader ifthe batchgroupselectedis notrunningabatch BatchStatus fthebatch groupselectedisrunning abatch TheBatch Statusisforthisbatch grouponly ViewBatchStatus BatchStatus forallbatch groups DeleteDataLog Controller Controller Status This is a read only display giving the status of various controller parameters Table 3 Controller status details Item Description Controller Type 900C30 90...

Страница 30: ...ime and Fast Cycle Time increase slow down as the following increase CPU Used Fast CPU Used Dynamic Memory Config Memory Also extensive use of Free Form Logic blocks as opposed to equivalent gate logic can substantially increase Fast Cycle Time CPU Percent used Calculation of percentage of time the CPU is active during the analog cycle time Peak time sec Maximum time used to complete the analog cy...

Страница 31: ...et etc Changes to Recipes Profiles Schedules and Sequences If the write fails upload the controller s configuration to the PC using HC Designer and save the uploaded configuration to disk to make sure that you have captured all of the non volatile parameter changes Table 5 Controller modes defined Mode Function Blocks Executed Output status Effect upon return to RUN mode RUN Yes Outputs updated No...

Страница 32: ...gital Variable Summary The Analog Input and Output Summary Displays show the following fields 1 Physical Address of the Block RMC Rack Number Module Number Channel Number 2 Tag 3 Description 4 Value 5 Units 6 Error Status The following additional fields are displayed when an I O Safety Function block Analog Input Voting is configured 7 Channels A B and C 8 VFAIL 9 SFAIL The following additional fi...

Страница 33: ...Status The following additional fields are displayed when an I O Safety Function block Digital Input Voting is configured 6 Channels A B and C 7 VFAIL 8 SFAIL The following additional fields are displayed when an I O Safety Function Block Digital Output Validated is configured 6 VFAIL 7 FBFAIL The Digital Output Summary Display shows the same information as above plus the Type of the module The Di...

Страница 34: ...5 control station the 10 control station has not shown any problems with its USB ports Serial Port S1 S2 The Serial Port S1 and Serial Port S2 screens both show Statistics Table 6 and Settings Table 8 for those controller serial ports Table 9 shows the relationship between the setup parameters and each protocol The controller s Serial Port S1 can be set up as an ELN Configuration port a Modbus Mas...

Страница 35: ...roller is in Program Mode The controller does not scan the slave devices in this state ELN SLAVE the protocol is set to one of the Modbus Slave protocols but the controller is in Program Locked Mode The port automatically reverts to ELN protocol and the controller becomes a slave device whenever the mode selection switch is placed in the Program Locked position SCANNING SLAVES the protocol is set ...

Страница 36: ...determine whichmessageis causingthe exception code and fixit DATA LINK ERROR A large number of messages are resulting in data link errors 1 Rack 1monitor block s COMPORT DIAG is set to FAILED 2 Rack 1monitor block s RACK OK pin isturned off 3 SYSTEM MONITOR block s HW OK pin is turned off 4 If configured as Modbus Master port associated slave blocks havetheir read pin values frozen to thelast valu...

Страница 37: ...to access the controller via a modem Baud Rate Bps Select 9600 19200 38400 57600 or 115200 bits per second Modbus Parity Select None Odd or Even parity Modbus Stop Bits Select 1 or 2 Stop Bits Slave Address 1 247 or 255 This is the address of the controller on the Modbus link when one of the three Modbus Slave protocols is selected All devices on the link must have a unique Modbus address The addr...

Страница 38: ...odbus Master or Modbus Master Advanced Modbus Slave Multidrop Modbus Slave Point to Point PTP Modbus Slave Modem Baud Rate BPS X X X X X Modbus Parity X X X NONE Modbus Stop Bits X X X 1 BIT Slave Address X X X Slave Port Enable X X X Double Register Format X X X Note When Modbus Slave Modem protocol is selected the Modbus Parity and Modbus Stop Bits are fixed at None and 1 Bit respectively and ca...

Страница 39: ...he controller s Internet Protocol address Subnet Mask The controller s subnet mask address Gateway IP Address The Internet Protocol address for the controller s gateway device Double Register Format Each IEEE 32 bit floating point number requires two consecutive registers four bytes MSB 4 LSB 1 in byte order below starting with the register defined as the starting register for the information The ...

Страница 40: ...AG is set to FAILED Rack 1 monitor block s RACK OK pin is turned off ASYS SYSTEM MONITOR block s HW OK pin is turned off Correct the setup problem NO IP ADDRESS IP address is not configured Same as above If a DHCP server is present download a configuration that uses DHCP Enter an IP address HARDWARE FAILURE Ethernet port tests failed during power up Same as above Replace CPU module DHCP Failure DH...

Страница 41: ...O rack Table 12 Expansion Rack Communication details Item Description Diagnostics Status Status of the rack s communication port Message Count Number of message attempts to the rack Link Error Count Number of message attempts to the rack that resulted in failed response Total Count Total for all racks Clear Statistics Reset the messages and link error counters for all racks to zero ...

Страница 42: ...the configuration 2 Verify that the jumpers on the scanner are setup for the correct rack address 3 If a hub is used check that all cables are properly connected to the hub proper crossover cables are used and that hub is powered 4 Cycle power to the rack 5 Cycle power to the hub 6 Replace the expansion rack s power supply 7 Replace the expansion rack 8 Replace the expansion rack s scanner board 9...

Страница 43: ... is not defined in the controller configuration GOOD The slave device is being scanned at its optimum rate because its operation on the communications link is acceptable BAD The slave device is being scanned at a reduced rate because it has experienced an abnormal number of failed responses Refer to the section Troubleshooting a Comm Quality Problem below Messages Received The number of messages t...

Страница 44: ...ion Messages Received Number of messages received without errors Application Errors Number of message requests that resulted in an exception Clear Statistics Resets to zero the number of messages received and application errors Table 16 Host Connection Status Indicators Status Possible Cause Controller Action What to do GOOD N A N A N A APPLICATION ERROR At least one response to a host resulted in...

Страница 45: ...o the peer device Write Requests Number of write event messages sent to the peer device Write Request Failures Number of write event messages that have not been acknowledged by the peer device within the scan rate configured for the peer data exchange A non zero value means the network is congested and message transfer is being impeded Producer Failures Number of times the peer device has not resp...

Страница 46: ... to assure that they match that specific PDE block 2 Check that the IP addresses of the peer devices are all within the range of the IP mask 3 Check that the peer devices have the same IP subnet mask See Network parameters for IP mask setting PORT FAIL The peer data exchange IO subsystem could not be started due to internal resource problem N A 1 Reset the controller to restart the Ethernet IO har...

Страница 47: ...on of the link to the controller s RS 232 port If this connection is OK check the connection to each slave device on the link 13 If there is more than one slave device on the link verify that the RS 232 RS 485 converter box is working correctly 14 Verify controller is set to unterminated for RS 485 communications Troubleshooting Data Link Errors Data Link Errors can be caused by electrical noise p...

Страница 48: ...red if there is a diagnostic Touching the various buttons will direct you to the various detailed screens per the menu tree below Menu Overview Menu Submenu Controller Diagnostics p 37 Rack n Diagnostics I O Module Diagnostics p 42 Module Details p 43 Details This links to the main Communications menu See page 22 I O Module Diagnostics p 42 Rack n I O Modules p 42 Module Details p 43 I O Calibrati...

Страница 49: ...put INVALID CONFIG A configuration that exceeds theloop capacity of the controller was downloaded or an invalid configuration exists An empty databaseis created Download a valid configuration SWITCH FAULT A failureis detected in the switch reading 1 All control blocks stop running 2 All I O scanning ceases Thisforces themodules into failsafe Replace CPU NO MASTER PORT The controller configuration ...

Страница 50: ...ETCHERROR See PREFETCHERROR UNDEFINED INSTR ERROR Bad Instruction Detected See PREFETCHERROR See PREFETCHERROR DATA ABORT ERROR CPU failed when attempting to access data See PREFETCHERROR See PREFETCHERROR S W INTERRUPT ERR SoftwareInterrupt occurred which is not supported bythe software See PREFETCHERROR See PREFETCHERROR VECTOR ERROR Corrupted interrupt vectors in RAM Interrupt vectors were rest...

Страница 51: ...o any modules that are in its SPI backplane All associated module diagnostics are set to MISSING NO COMM See MISSING NO COMM in Table 22 I O Module Error Status on page 44 for further details 1 Removemodules and check for bent pins on connectors 2 Reinsert modules one at a timeand note which module the diagnostic reoccurs and replacethat module 3 Cycle powerto therack 4 Replacethe power supply 5 R...

Страница 52: ...load 2 Update Main CPU software either by replacing themodule or doing a code download RTC Status GOOD N A N A N A NOT PROGRAMMED RTC not programmed 1 Time and date is set to 00 00 00 January 1 1970 2 Associated rackmonitor block s RACK OK pinis turned off 3 SYSTEM MONITOR block s HW OK pin is turned off Program RTC BAD DATA Bad date and time See NOT PROGRAMMED 1 Program RTC 2 Cycle power 3 Replac...

Страница 53: ...Cycle powerto the hub 6 Replacethe HC900 C50 expansion rack s power supply 7 Replacethe HC900 C50 expansion rack 8 Replacethe HC900 C50 expansion rack s scanner board 9 Replacethemain CPU Hardware Failure The power up test of the expansion rack Ethernet controller failed 1 All rackmonitor block XIO PORT DIAG areset to HWFAIL 2 All rackmonitor block RACK OK pin areturned off 3 All modules inthe con...

Страница 54: ... Calibration Select a rack to see its I O module diagnostics For I O Calibration see page 159 Table 20 I O module diagnostics Item Description MODULE Slot number in the rack PHYSICAL TYPE NONE AI UNIVERSAL 8 CHAN AI LO LEVEL 16 CHAN AI HI LEVEL 8 CHAN AO CURRENT 4 CHAN AO VOLTAGE 4 CHAN DI DRY CONTACT 16 CHAN DI 120 240 VAC 16 CHAN DI 24 VDC 16 CHAN DO LO CURRENT RLY 8 CHAN DO HI CURRENT RLY 4 CHA...

Страница 55: ... AI HI LEVEL 8 CHAN AO CURRENT 4 CHAN AO VOLTAGE 4 CHAN DI DRY CONTACT 16 CHAN DI 120 240 VAC 16 CHAN DI 24 VDC 16 CHAN DO LO CURRENT RLY 8 CHAN DO HI CURRENT RLY 4 CHAN DO 120 240 VAC 8 CHAN DO 24 VDC 16 CHAN AI HI LEVEL 16 CHAN DI 24 VDC 32 CHAN DO 24 VDC 32 CHAN PULSE FREQ QUAD 4 CHAN HIGH LEVEL AO 8 CHANNEL HIGH LEVEL AO 16 CHANNEL PART NUMBER The re order part number of the module FIRMWARE RE...

Страница 56: ...o CJ High Temperature for reason 1 or CJ Failure for possible causes 2 and 3 3 Associated rackmonitor block smodule fail pinis turned on 4 Associated rackmonitor block s RACK OK pin is turned off 5 Associated rackmonitor block s HITEMP pin isturned on 6 SYSTEM MONITOR block s HITEMP pinis turned on 7 SYSTEM MONITOR block s HW OK pinis turned off 1 Improveventilationto rack 2 Replace AImodule MISMA...

Страница 57: ...TUSis not MODULE ERROR then follow the prescribed action defined forthe RACK STATUS diagnostic For MODULE ERROR dothe following 1 Verify configuration 2 Install module BAD MODULE Moduleisreporting a diagnostic condition See Table 23 See MISMATCH User should inspectthemodule s status LED to determinethe nature of the problem Table 23 describes theuser actionfor the various LED diagnostics BAD CHANN...

Страница 58: ...rs inHC900Process Controller manual 51 52 25 107 tosolve thatproblemfirst If it s flashing green the module probablyis notrequired in the configuration If it s not on or steady cycle power tothescanner 3 Makesurethemoduleis thecorrect onefor theconfiguration 4 Removethe module and checkfor abent pin then reinsertthemodule 5 Replacethemodule 6 Remove other modules and replace one at atimeuntilthepr...

Страница 59: ... T C RTD or mV source is failing burnout checks A BAD CHANNEL I O module diagnostic is posted Check terminal block connections Replace source element Replace module Convert Fail When attempting to take a reading the analog to digital ADC fails This can occur if the incoming signal is either too large or too small It also could result if the ADC circuit is failing If the problem is the ADC circuit ...

Страница 60: ...ed with thelead a b The lead controller will continue to control the process but failover is not possible Install reserve CPU Apply power to reserve CPU Download a configuration and cold start thecontroller Perform a firmware upgrade so both CPUs have the same version Replace the reserve CPU If this doesn t help replacethe lead CPU If this doesn t help replacethe backplane REDUNDANCY STATUS GOOD N...

Страница 61: ...r CPU has a valid configuration database An empty database is created Download thedesired configurationfile and perform a cold start FIRMWARE VERSION MISMATCH The reserve controller does not havethe same version of controller firmware installed The lead controller will continue to control the process but failover is not possible Upgrade the CPUfirmware so boththelead and reserve have the sameversi...

Страница 62: ...ill continue to operate with a bad RSM Automatic failover is still possible if required Replace RSM Force afailover andreplacethe CPU formerly thelead nowthe reserve BAD RSM SWITCH RESERVE Switch is indicating an invalid position The controller will continue to operate with a bad RSM Automatic failover is still possible if required Replace RSM Replace the reserve CPU Item Status Possible Cause CPU...

Страница 63: ...nterrupt occurred which is not supported by the software See PREFETCH ERROR See PREFETCHERROR UNDEFINED INSTR ERROR Bad Instruction Detected See PREFETCH ERROR See PREFETCHERROR WATCHDOG ERROR Watchdog reset resulting from software failure 1 Associated rack monitor block s RACK OK pin is turned off 2 SYSTEM MONITOR block s HW OK pinis turned off 1 Force a cold start 2 Upgrade controller module sof...

Страница 64: ...e rack backplane Requires unit shutdown replace Scanner2 Contact Honeywell Service POWER SUPPLY PS 2 FAILED A scanner has redundant power supplies installed and the oneidentified as PS 2 is not working Failed Power Supply Failed Redundant Power Backplane detection circuit Failed Rack backplane status signal Failed Scanner2 status input I O rack continues to function normally using theremaining pow...

Страница 65: ...equires unit shutdown replace rack backplane Requires unit shutdown replace Scanner2 Contact Honeywell Service POWER SUPPLY PS 2 FAILED A scanner has redundant power supplies installed and the oneidentified as PS 2 is not working Failed Power Supply Failed Redundant Power Backplane detection circuit Failed Rack backplane status signal Failed Scanner2 status input I O rack continues to function nor...

Страница 66: ...face has a hardwarefailure Controller continues to run butis not able to access any I O Replace the CPU PORT A B CABLE MISMATCH The I O cables from CPUA and CPUB are connected tothe wrong ports on the I O scanner CPU Controller continues to run butis not able to accessthe I O on the associated rack Swap the cables sothat I O Ais connected toI O on CPUA and I O B is connected to I O on CPUB PROTOCO...

Страница 67: ...ub is used it may be powered down The Scanner2is powered down The Scanner2is defective Controller continues to run butis not able to accessthe I O on the associated rack 1 If LEADI O COMM DIAG is also DATA LINK FAILURE follow the Fix defined for that diagnostic 2 If a hub is used check that all cables are properly connected to thehub proper crossover cables are used that the hub is powered and it ...

Страница 68: ...GINAL PORT I O B Rack communication with CPU B is experiencing a high errorrate Controller continues to run butis marginally accessing the I O onthe associated rack 1 Check cableshielding for proper grounding and noise immunity 2 Check connectors of all cables 3 If a HUB switch is being used verify thatitis onethat is recommended by Honeywell 4 Replace cables GOOD PORT I O A Normal operation N A N...

Страница 69: ...pplied to reserve CPU 3 Neither lead nor reserve CPU has a valid configuration database 4 Firmwaremismatch lead andreserve CPUs have different firmware revisions 5 Database not synchronized with thelead The lead controller will continue to control the process but failover is not possible Install reserve CPU Apply power to reserve CPU Download a configuration and cold startthe controller Perform a ...

Страница 70: ...NITOR block s HW OK pinis turned off 1 Force a cold start 2 Isolatesystem from noise and force a cold start 3 Replace CPU board DATA ABORT ERROR CPU failed when attempting to access data See PREFETCH ERROR See PREFETCHERROR S W INTERRUPT ERR SoftwareInterruptthat is not supported by the software occurred See PREFETCH ERROR See PREFETCHERROR UNDEFINED INSTR ERROR Bad Instruction Detected See PREFET...

Страница 71: ...k monitor block s RACK OK pin is turned off 2 SYSTEM MONITOR block s HW OK pinis turned off 1 Force a cold start 2 Replace CPU board RTC GOOD N A N A N A NOT PROGRAMMED RTC not programmed 1 Time and date is set to 00 00 00 January 1 1970 2 Associated rack monitor block s RACK OK pin is turned off 3 SYSTEM MONITOR block s HW OK pinis turned off Program RTC BAD DATA Bad date and time See NOT PROGRAM...

Страница 72: ...pansionrack s scannermodule 9 Replace the expansionrack s power supply 10 Replace the expansionrack 11 Replace the main CPU HARDWARE FAILURE h The I O interface has a hardwarefailure Controller continues to run butis not able to access any I O Replace the CPU PORT A B CABLE MISMATCH The I O cables from CPUA and CPUB are connected tothe wrong ports onthe I O scanner CPU Controller continues to run ...

Страница 73: ...3 0 support is only available on the 900CS10 Lets you export data from the CompactFlash to USB Insert USB memory device into Port A Export does not function without USB device inserted Total Memory and Free Memory are displayed for CompactFlash and USB memory device Touch the Get CF Status or Get USB Status buttons to update status Touch Export All Data button to export CompactFlash data to the US...

Страница 74: ...es the touch screen Use when cleaning the screen or when replacing the optional protective film that covers the screen Station Status Shows the status of the Control Station Versions of boot loader firmware application Path and name of HC900 configuration file being monitored by the Control Station Time and cause of last several Control Station restarts Station Comm Ports Shows status of the Contr...

Страница 75: ... On Revision 9 900 Control Station User Guide 63 May 2014 Select the required language Log On Enter name and password Once logged on your level of access to displays and functions depends on the security credentials you were configured for ...

Страница 76: ...rm Indicator When there are no alarms present alarm icon and text on status indicator are grayed out When an alarm is active the text is displayed in white color and the background turns red Status indicator flashes when an alarm is active and not acknowledged Acknowledge the alarm to stop the flashing If the alarm condition goes away clears before the operator acknowledges the alarm the indicator...

Страница 77: ...Station User Guide 65 May 2014 Alarm Groups The Alarm Groups screen shows the status of the alarm groups of the controller Touch an Alarm Group button to open its Alarm Group display There is a button at the bottom of the Alarm Groups screen to access Station alarms ...

Страница 78: ...n acknowledged alarms the background turns red text changes to Unacknowledged and flashes Once acknowledged the alarm background remains red until the alarm condition goes away the text changes to Acknowledged and the background stops flashing If the alarm condition goes away clears before the operator acknowledges the alarm the background will turn yellow the text will remain Unacknowledged and c...

Страница 79: ...anges to Acknowledged If the alarm condition goes away clears before the operator acknowledges the alarm the alarm indicator light will turn yellow and continue to flash until acknowledged The text will change to Cleared Alarm Point Detail Following details are displayed Tag name Alarm details text Last time the selected point was in alarm state Last time the selected point went out of alarm state...

Страница 80: ...be configured for a cde file tag present in the sds configuration An event can be defined in the Alarms tab of the desired tag properties In Controller configuration a desired tagged point present in the controller can be designated as an event point Event Indication When an Event exists the event text appears in black color and the background of Alarms and Event Status indicator turns yellow When...

Страница 81: ...trol Station User Guide 69 May 2014 Data Logging View Alarm Event Logs Lets you view the alarm and event logs Touch the and buttons to scroll through the folder and file names Touch Open button to open a folder or file Touch Back to go back to the top level folder ...

Страница 82: ... to open a folder or file Touch Back to go back to the top level folder View Audit Logs Lets you view the audit log The audit log is a record of actions performed by users Touch the and buttons to scroll through the folder and file names Touch Open button to open a folder or file Touch Back to go back to the top level folder Touch the Show Data Logs button to view the data logs and touch the Show ...

Страница 83: ... memory device data Press and to transfer data between the two devices File folders can t be copied from USB memory device to CompactFlash s LOG folder View Batch Groups View Batch Status Concurrent Batch for Control Station The operator at the 900 Control Station can simply touch the LOGS button on the master slide to access the Data Logging menu Alternately you can touch the soft key Menu Data L...

Страница 84: ...atch Touching a batch group button that does not have a batch running retrieves the batch header display so that the identification details of the next batch can be entered Note that in the picture which follows the values entered from the last batch were retained This is Data Logger property Retain Header in Station Designer under the Data Logger s Groups tab so the field values shown are not emp...

Страница 85: ... 1 and 8 characters in length and must contain only characters that are valid in a folder name The other header field values can be of any length although a maximum of 48 characters is recommended If you specify a very long value note that it can overflow its data box Just touch on a data box to the right of a field name to specify its value Touch the Confirm Header button when you are satisfied w...

Страница 86: ...s For each batch group it indicates whether a batch is running or not when the batch starts when the batch stops and the duration for each running and stopped batch By touching one of the small blue batch group buttons on the left hand side of the display you can view the batch header details for any batch group Touch the Close button to close the batch header details box Delete Data Logs Lets you...

Страница 87: ...r to the Control Station Download Configuration Files 1 Go to Station Settings Memory Device Utilities Download Controller Configuration Display The Download Controller Configuration dialog box appears 2 All the cde files and folders present in the Compact Flash and USB Drive are listed Select a drive to view the files present in that drive Press Open to open the file folder and to show its conten...

Страница 88: ...he process A progress bar indicates the percentage of completion 5 Once the download is complete the Controller Download Complete dialog box appears 6 Select one of the following options as required and continue Hot Start Updated the configuration settings Cold Start To re initialize the memory Stay in Program Mode Remains in program mode Abort To cancel the download operation ...

Страница 89: ...oad Controller Configuration 1 Go to Station Settings Memory Device Utilities Upload Controller Configuration Display The Upload Controller Configuration dialog box appears 2 All the cde files and folders present in the Compact Flash and USB Drive are listed Select a drive to view the files present in that drive Press Open to open a folder and to show its contents Press Open to select a file Press...

Страница 90: ...rol Station User Guide Revision 9 May 2014 3 Select a file and press Upload The Upload Controller Configuration dialog box appears 4 Press Start Upload to start the process A progress bar indicates the percentage of completion 5 Once the upload is complete the Controller Upload Complete dialog box appears ...

Страница 91: ...yed Select a location Depending on your device selection image sdi file is created on either compact flash or USB memory device On successful file upload Successfully Uploaded Database Image message is displayed In case the upload fails Error in uploading database image message is displayed 3 When the Control Station is powered on the image sdi file is automatically detected from the compact flash...

Страница 92: ...Variable Recipe rcp Profile Recipe prf Sequence Recipe seq Schedule Recipe sch Download Recipe Files 1 Go to Main Menu Station Settings Memory Device Utilities Download Recipe The Select Download Recipe Type dialog box appears 2 Select a file to download You can select Download Variable Recipe File Download Profile Recipe File Download Sequence Recipe File or Download Schedule Recipe File 3 Browse...

Страница 93: ...pages 6 The Edit Variable Recipe page is displayed Click Download to download the edited or selected recipe file onto the controller 7 Press Save to save the changes made in the recipe file The changes are saved to the file in the memory device On successful file download File Downloaded Successfully message is displayed In case the download fails an error message is displayed Similar method is us...

Страница 94: ...ry Device Utilities Upload Recipe The Select Upload Recipe Type dialog box appears 2 Select a file to upload You can select Upload Variable Recipe File Upload Profile Recipe File Upload Sequence Recipe File or Upload Schedule Recipe File 3 Select a location to save the file File can be saved in C or D drive By default file is saved as Upload1 However you can overwrite the file name ...

Страница 95: ...d press Start to proceed Use the Previous and Next buttons to toggle between the various recipe pages 6 The Edit Variable Recipe page is displayed Click Upload to upload the edited or selected recipe file 7 Press Save to save the changes made in the recipe file The changes are saved to the file in the memory device On successful file upload File Uploaded Successfully message is displayed In case t...

Страница 96: ...g database with the same GUID Upload Security Displays and Functionality 1 Go to Main Menu Station Settings Memory Device Utilities Upload Security The Upload Security Database dialog box appears 2 Select a location and type a file name to save the security settings The Upload button is enabled and dat extension is added to the file name 3 Press Upload to upload the file to the database The follow...

Страница 97: ...ity Uploading and Downloading Security Settings Revision 9 900 Control Station User Guide 85 May 2014 By default Security is used as the file name If you over write the file name you are prompted with the following message Press Yes or No as required ...

Страница 98: ...want to download 3 Press Download The selected file gets downloaded from the selected location A success message appears on successful completion of file download In case the download fails an error message is displayed Using Barcode Reader 1 Touch a data box on the Control Station A keypad appears 2 Scan a bar code Data appears in the entry area of keypad pop up If the bar code reader includes ca...

Страница 99: ...of objects such as figures symbols text boxes and widgets A widget is a graphical object designed to work with a specific function block type in your HC900 s process configuration For example some widgets like Digital Pushbutton perform a simple on off function for monitoring and controlling a digital signal Other widgets have many functions For example a loop PID widget lets you not only view and...

Страница 100: ...ur actual displays may vary Widget type See page Pushbuttons signals and variables 90 AGA8DL AGA8GS 91 4 Selector Switch 97 Device Control 98 Hand Off Auto Switch 100 Stage 101 Ramp 103 Alternator 105 Calendar Event 109 Wireless transmitters 113 Setpoint Programmers 119 Setpoint Schedulers 133 Sequencers 141 Loops A M Bias Carbon On Off PID 3 Position Step Control 147 ...

Страница 101: ...is editable A white box with no border is read only for example Profile Number When you touch the box a popup appears See popup types below Popup type Example Details Text entry Functions like typical keyboard Alphanumeric entry Functions like typical numeric keypad Menu Use to scroll through available choices Buttons common to all popups Cancel change or exit without saving changes Save changes T...

Страница 102: ...mplest in appearance and function Example Widget type Function Analog Pushbutton Push button to change displayed value Digital Pushbutton Push button to toggle displayed state Analog Signal Read only shows value of analog signal No actions Digital Signal Read only shows state of a digital signal No actions Analog Variable Touch value to edit Digital Variable Touch state to edit ...

Страница 103: ...und in natural gas If this information is available the Detail method is preferable as accurate results are obtainable over a wider range of conditions than the Gross method The Gross method AGA8GS is used to approximate natural gas by treating it as a mixture of three components equivalent hydrocarbon component Nitrogen and Carbon Dioxide It is typically used for dry sweet no H2S natural gas Ther...

Страница 104: ...in units selected by the UNITS configuration parameter ERR On when calculation status is indicating an error condition See Status WARN On when calculation status is indicating a warning condition See Status STATUS Use the Status number to cross reference the error or warning See Table 29 AGA Error Codes Table 29 AGA Error Codes Status number Block type Severity Description 0 ALL Good OK NO ERRORS ...

Страница 105: ... 800 26 AGA 8 GROSS Warning MOLE FRACTION FOR N2 0 0 OR 0 20 OR FOR CO2 0 0 OR 0 20 OR FOR H2 0 0 OR 0 0 OR FOR CO 0 0 OR 0 0 32 AGA 8 DETAIL Error FLOWING PRESSURE PF 0 0 OR 40 000 PSIA 33 AGA 8 DETAIL Error FLOWING TEMPERATURE TF 200 OR 760 DEG F 36 AGA 8 DETAIL Error MOLE FRACTION FOR METHANE 0 0 OR 1 0 FOR NITROGEN 0 0 OR 1 0 FOR CARBON DIOXIDE 0 0 OR 1 0 FOR ETHANE 0 0 OR 1 0 FOR PROPANE 0 0 ...

Страница 106: ... 3 ORIFICE Error ORIFICE DIAMETER WAS 100 0 INCHES 56 AGA 3 ORIFICE Error PIPE DIAMETER WAS 100 0 INCHES 57 AGA 3 ORIFICE Error FLOWING OR STANDARD DENSITY WAS 0 0 LBM FT 3 58 AGA 3 ORIFICE Error DIFFERENTIAL PRESSURE WAS 0 0 INCHES H2O 65 AGA 3 ORIFICE Error SUPERCOMPRESSIBILITY FACTOR WAS 0 0 66 AGA 3 ORIFICE Error RELATIVE DENSITY AT STANDARD CONDITIONS WAS 0 07 OR 1 52 68 AGA 3 ORIFICE Error C...

Страница 107: ...will be calculated It should be noted that calculated flow rates for conditions where the expanded range is exceeded are outside of the recommended uncertainty values for AGA 8 calculations Sum of New Local Values When you edit the New Local Values this shows the sum of all 21 values Values must total 1 0 100 Gas Component This column lists the 21 gas components Local Values This column lists the ...

Страница 108: ...mpressibility and gas density from knowledge of the relative density heating value and carbon dioxide hydrogen and carbon monoxide components Method 2 calculates the super compressibility and gas density from knowledge of the relative density Nitrogen carbon dioxide hydrogen and carbon monoxide components Setup for Method 1 2 Relative Density Gas Relative Density Relative Density Ref Temperature R...

Страница 109: ...ets you enter new local values Values must total 1 0 100 After entering new values Apply New Local Values Sum of New Local Values When you edit the New Local Values this shows the sum of all 4 values Values must total 1 0 100 Apply New Local Values Select to transfer the New Local Values to the Local Values These values do not take effect unless Active Gas Component Values is set to Local Values a...

Страница 110: ...The Start Delay Timer is active in the Prestart state The Stop Delay Timer is active in the Stopping state The Feedback timer is active in the Starting state while the Feedback input pin is OFF The Feedback timer is active in the Running state if the Feedback input turned on in the starting state Run Request Green when device is requested to be put in the Starting or Running state Active Green whe...

Страница 111: ...a device fails while in the state of READY or DISABLE the device failure is not recognized until the control goes into the PRESTART state Note 2 There are restrictions when the control goes into the Disable state from the Running State The device is immediately turned OFF without a Stop Delay When the disable turns OFF the control changes to the Ready state Note 3 ERR Off device fail is monitored ...

Страница 112: ...n block to comprise a Pump Control algorithm which is used to manipulate the state of a controlled device pump Item Description Feedback state State of the feedback signal If connected to a Device Control block this shows the status of the device See Table 31 Device states on page 99 When the HOA block is used in conjunction with a Device Control block the feedback is typically referenced to the S...

Страница 113: ...onfigurable comparator and provides On Off control outputs for the four stages based on configurable setpoints for each stage Each stage can be individually enabled and forced ON or OFF Item Description PV1 PV1 input pin of the function block pressure PV2 PV2 input pin of the function block flow Status Enabled stage is enabled Disabled stage output is off This condition overrides the Override stat...

Страница 114: ... latching the output ON OFF delay time Delay prior to latching the output OFF ON Compare Setpoint Setpoint used with ON comparator No range limit OFF Compare Setpoint Setpoint used with OFF comparator No range limit Interlock with Prev Stage Set to YES to prevent a stage s output from turning ON until the previous stage has turned ON Interlock with Next Stage Set to YES to prevent a stage s output...

Страница 115: ...ng at 100 and a second pump is enabled the output value may be re scaled to 50 by the pump 2 enable signal The ramp block references an analog signal and using four separate scales multiplexed together provides a single analog output over a programmed range Table 33 Ramp operator display details Item Description INPUT PV input pin of function block OUTPUT Output pin of function block STATUS Enable...

Страница 116: ...s Item Description OUT SCALE HIGH High output limit after rescale Range Full scale within PV range limits OUT SCALE LOW Low output limit after rescale Range Full scale within PV range limits IN HIGH LIMIT Input high limit value applied to the PV after signal lag Range Full scale within PV range limits IN LOW LIMIT Input low limit value applied to the PV after signal lag Range Full scale within PV ...

Страница 117: ...vice will be used in order to meet the requested demand You may specify the alternators active outputs and the order in which the outputs are manipulated Item Description Status OK DISABLED or HIGH State OFF or RUN Style ROTARY FOFO FIXED or DIRECT NOTE If the current style is DIRECT the OUT number corresponds to the Input sequence that requests the OUT to turn ON With any other style the OUT numb...

Страница 118: ...mple Output Sequence Integer between 0 and 16 0 indicates the output is not in the Output sequence Advance Advances the output sequence Not available for style DIRECT Edit Select to edit the sequence See Alternator Edit Setup Alternator Edit Setup display Item Description Make Break MAKE Make before Break Next output in the sequence is activated before deactivating an output BREAK Break before Mak...

Страница 119: ...tput in the mapping order is turned ON If the previously bypassed output later becomes enabled then it will not be used until the demand increases FOFO Uses the sum of the 16 inputs that are set to ON to determine the required demand for outputs The output order is managed in a First ON First OFF basis FOFO If 3 Inputs are ON no mapping the Alternator sequence changes first one in the list moves t...

Страница 120: ...s of reasons to change it include If you are having trouble with a motor or pump e g a bearing is going bad and you want to limit the amount of time it is used If you have 3 motors and one uses more electricity than another you may want to use two small motors first before you use the one large motor This could be handled by changing the sequence Taking a pump out of service for maintenance After ...

Страница 121: ...u can select which Setpoint Group is in effect the values in each column will change according to the Setpoint Group you select Each Setpoint Group is editable The block also allows you to configure up to 16 Special Days On these Special Days the Calendar Event Block will override its normal Event processing for a 24 hour period For example you can configure selected Event outputs to remain off on...

Страница 122: ...e active Setpoint Group and view or edit Special Days Item Description Edit Event Setpoints Select the Setpoint Group you wish to edit See Edit Event Setpoints Set Active Setpoint This shows the five Setpoint Group buttons The currently active Setpoint Group is highlighted in yellow Touch any button to activate a different Setpoint Group Edit Special Days Select this to edit one of the 16 Special ...

Страница 123: ...he Year This menu item will only appear when the configured Event Type is MONTHLY Day This menu item will only appear when the configured Event Type is MONTHLY YEARLY or DAY OF WEEK When Event Type YEARLY or MONTHLY Select a value between 1 and 31 When Event Type DAY OF WEEK select a value between Sunday and Saturday When Event Type MONTHLY entering a value of 31 means the last day of the month ev...

Страница 124: ...ption Event Name Name of Events 1 through 8 Setpoint Handling This title is displayed when the Special Day Mode is configured as Use Alternate Event Times Alternate Setpoint Displays the Alternate Setpoint Times Hours Minutes This information will only appear if the Special Day Mode is configured as Use Alternate Event Times Special Day Mode Event output behavior Disable Output The Event output is...

Страница 125: ...with XYR5000 base radios via the serial port of the controller For attached transmitters there is a separate XYR5000 transmitter widget which is connected to the base radio block via the address output Item Description Status Last read value of base radio Offline or Online Transmitters expected Number of Expected Transmitters communicating to the base station Transmitters communicating Number of T...

Страница 126: ... Good Sensor 1 Data Primary Sensor Value Sensor 2 Data Secondary Sensor Value Sensor 3 Data Tertiary Sensor Value Battery Status Low or Good Alarm Status On or Off Overrange Status Sensor over range condition Over range or OK Sensor Status Error or Good Switch Input 1 On or Off Switch Input 2 On or Off Touch the blue title bar to open the XYR5000 Transmitter Setup display This shows the Square roo...

Страница 127: ...line Diagnostic status System error condition Error or Good When status is Error press the blue title bar to see the details of diagnostics Battery Low or Good External power Error or Good Electrical Error or Good Mechanical Error or Good Configuration Error or Good Calibration Error or Good Memory Error or Good Firmware Error or Good Watchdog Timer Error or Good Radio status Error or Good PV1 PV2...

Страница 128: ...116 900 Control Station User Guide Revision 9 May 2014 This page is intentionally left blank ...

Страница 129: ...ription Additional text used to identify the recipe up to 16 characters Recipe Variables A list of Variables and their values for each recipe up to 50 variables each Variable Recipe Load vs Variable Recipe Upload Download Recipes are stored in the memory of the HC900 controller in a recipe pool Variable recipes may be read uploaded from the pool into the displays of the operator interface where th...

Страница 130: ...ler configuration touch the desired recipe on the display a yellow highlight will verify your selection then press the LOAD RECIPE button on the display widget Hint When making variable recipes users may wish to include a variable that will be used to identify the recipe number The value of this variable may then be added to the Variable Recipe Load display to receive verification that the desired...

Страница 131: ...put to another function or to provide a setpoint value for a secondary control loop in the process A Setpoint guarantee function known as guaranteed hold is provided that holds the program if a process variable exceeds a predefined deviation from setpoint Selections allow setpoint guarantee to be active for the entire program for soak segments only or for user specified segments Up to 3 Process Va...

Страница 132: ...ump to SPP Operate display Table 36 Setpoint Progammer Overview widget features Item Description Title Name of the selected programmer block Touch the blue title bar if available to jump to the SPP Operate display See page 122 Profile number Location of this profile in controller RAM Profile name Name of the selected profile State READY Profile is at the beginning of segment and is ready to run Al...

Страница 133: ...t segment When the program is already in the last segment the advance request is ignored Programs cannot be advanced to the first segment Current state must either READY or HOLD PV Value of Process Variable SP Value of setpoint Units Engineering units of the setpoint Run Touch to start a program that is in HOLD or READY state Hold Touch to put program in HOLD Reset Touch to reset a HOLD or STOP pr...

Страница 134: ...iated function block is plotted against the pre plot of the Setpoint Profile To supplement the Setpoint profile pre plot the display contains the following buttons and information Setpoint Programmer Function Block tag Name and Description Setpoint Profile recipe name and Description Current Segment number Current segment Type Ramp Soak Segment Time Remaining Program Elapsed Time Buttons used to R...

Страница 135: ... below a second pre plot indicates the profile of the SPP Auxiliary Setpoint output profile soaks only The SPP Process Variable 4 input PV4 is plotted against the Auxiliary Setpoint output pre plot graph Setpoint Programmer Pre Plot Graph attributes 1 The content of the pre plot graph is determined by reading the profile content of the Setpoint Programmer function block Time is presented on the X ...

Страница 136: ...plot remains on the graph until the Setpoint Programmer is Reset 7 Once started the Process Variable plotting continues in the background if another display is accessed Allows the user to periodically check the program progress while viewing and operating his process from other displays of the interface 8 The color of the PV trend line is user selectable The default color shall be Aqua Special cas...

Страница 137: ...Process Variable plot starts plotting from the beginning of the segment determined by the Advance action Auxiliary SP and PV Pre plot 1 The actions and responses of the Auxiliary PV4 and the Auxiliary SP pre plot graph will be the same as the PV1 value on the SPP profile pre plot graph for the special cases above 2 The default colors of the Auxiliary SP Pre plot and PV are the same as the Setpoint...

Страница 138: ...y GHOLD Profile is paused because of excessive deviation STOP Profile has reached the end of the last segment DISABLE Profile is prevented from starting until the programmer disable control is ON Segment Information Segment number Current segment Elapsed Time Time elapsed in the segment Run time only Time Remaining Time remaining in the segment Segment Type Text shows type of current segment ramp ...

Страница 139: ...rogrammer The loaded profile overwrites the current profile from the programmer To erase the currently loaded profile from the Setpoint Programmer select Clear Profile and load it Any profile edits are lost unless you save them first with Save To Profile Number Start at segment After loading the program will start at this segment Subsequent runs will start at Segment 1 If the segment number is wit...

Страница 140: ...Load From Profile List 4 Selected recipe is loaded and ready to run 2 Select a recipe you want to run 3 Touch Load Profile Figure 9 Recipe Load 1 Select Save To Profile Number 2 Select a position to save recipe to 4 Current recipe with edits is saved to Controller memory 3 Touch Save Profile Figure 10 Recipe Save ...

Страница 141: ...ed to the profile s output to reach the next soak segment s value in hours or minutes OR RATE Each ramp segment s time specifies the RATE at which that profile s output will reach the next soak segment where the rate is specified in EU hour or EU minute Make this selection before entering any Ramp during Profile Edit NOTE When Ramp unit is configured for TIME entering 0 will imply an immediate ste...

Страница 142: ...eans the segments will be repeated forever Jog Segment Segment to which the program will jump to when the JOG discrete input is pulsed Restart Rate This recovery ramp rate is provided in the event of a power loss while a program is running The Restart Rate value is used to return the process to the last operating setpoint prior to power loss Auxiliary Output Label A second analog value is availabl...

Страница 143: ...soak setpoint will result in a step change Changes to the time will cause recalculation of the segment time remaining If the result is less than or equal to 0 the program will advance to the next segment upon returning to RUN state If the current segment is a ramp and the starting value of the following segment is changed then the time remaining in the ramp segment will be adjusted accordingly but...

Страница 144: ...nt events to turn ON or OFF at the beginning of each segment Segment events are digital switches that provide ON OFF outputs When a segment event is turned ON it remains ON until the end of the segment at which time it is turned OFF unless it is configured to turn ON in the next segment Note that segment events are not interrupted by soak time delays when the process variable is outside the guaran...

Страница 145: ...per segment basis and can be set for high deviation low deviation high and low deviation or none The schedule may be changed with some exceptions from the current state to a new state by the operator as well as by inputs to the Scheduler function block in the controller configuration Table 37 lists the resulting states Table 37 SPS inputs and current state Input Current State READY HOLD RUN GHOLD ...

Страница 146: ...e Information Schedule number Memory location of the schedule that is being run by the Setpoint Scheduler Schedule name Name of the selected schedule Schedule Description Description of the schedule Total Elapsed Time Total time the schedule has been in Run Hold and Ghold states State READY Schedule is at the beginning of segment and is ready to run All events are OFF HOLD Schedule is paused at th...

Страница 147: ...will recycle repeat Segments 5 through 30 ten times During the first recycling it will display 10 during the second recycling it will display 9 etc Operation Buttons Run Start a schedule that is in HOLD or READY state Hold Put schedule in HOLD Advance Jump to the next segment When the schedule is already in the last segment the advance request is ignored Schedules cannot be advanced to the first s...

Страница 148: ... Figure 9 Recipe Load on page 128 All recipe types profiles sequences schedules are saved the same way Start at segment After loading the schedule will start at this segment Subsequent runs will start at Segment 1 If the segment number is within a recycle loop the schedule cycles through the looped segment according to the recycle count Save To Schedule List Saves the currently running schedule an...

Страница 149: ...at is being run by the Setpoint Programmer Schedule Name Name of the selected schedule Schedule Description Description of the schedule Time Units This selection assigns the time units hours or minutes that applies to all segments Jog Segment Segment to which the schedule will jump to when the JOG discrete input is pulsed Guaranteed Hold Limits This lets you specify the amount of deviation needed ...

Страница 150: ...segment Changes to the setpoint will result in a step change Changes to the time will cause recalculation of the segment time remaining If the result is less than or equal to 0 the schedule will advance to the next segment If the starting value of the following segment is changed then the ramp rate in the current segment will be adjusted accordingly but the time remaining will remain unchanged Edi...

Страница 151: ...ers GHOLD state all setpoints auxiliary setpoints and segment events freeze on their current value or state until none of the limits are exceeded whereupon the schedule will resume RUN state Item Description Guar Hold 1 through Guar Hold 8 OFF Segment will not GHOLD when the PV deviates from SP by its guarantee hold limit HIGH Segment will GHOLD if PV deviates above SP by more than the SP guarante...

Страница 152: ...Setpoint Scheduler View Edit Schedule Segments 140 900 Control Station User Guide Revision 9 May 2014 This page is intentionally left blank ...

Страница 153: ...Steps each Step activates one of the 50 States supported by the function block Note that the same State can be used by more than one Step within a Sequence Each Step within a Sequence may be configured to advance to any other Step based on time hours or minutes digital event 2 per Step or manual advance A separate jog function is also provided The controller maintains a pool of 20 user configurabl...

Страница 154: ...mory Item Description Title Name of the selected Sequencer block Sequence Information Sequence Number Memory location of the sequence that is being run by the Sequencer Sequence Name Name of the selected sequence Sequence Description Description of the sequence Total Elapsed Time Total time the sequence has been in Run and Hold states State Description of the current step s state Mode READY Sequen...

Страница 155: ...he desired sequence and touch to highlight it Touch Load Sequence to load it into the Sequencer Loading a sequence overwrites the current sequence from the Sequencer To erase the currently loaded sequence from the Sequencer select Clear Sequence and load it When the sequence is cleared any edits are lost unless you saved them first with Save To Sequence Number See Figure 9 Recipe Load on page 128 ...

Страница 156: ... in READY state to edit the values on this display Item Description View Edit Steps button Accesses View Edit Sequence Steps page 145 where you can edit each step Sequence Information Sequence number Memory location of the sequence that is being run by the Sequencer Sequence name Name of the selected sequence Sequence Desc Description of the sequence Jog to Step When the sequencer s JOG input is t...

Страница 157: ...r Duration expires the sequence will jump to Timer Next Step If you specify a next step of zero the Sequence will STOP when its next step trigger is received For example if Step 1 has a Timer Duration of one minute and a Timer Next Step of zero the Sequence will stay in Step 1 for one minute and then STOP If you specify a Timer Duration value of zero the Sequence will remain at that Step until Eve...

Страница 158: ...on 9 May 2014 Edit Auxiliary Item Description Advance Next Step When manually advanced the sequence will jump to this step Aux Output Value of auxiliary analog output View Outputs 1 8 9 16 These buttons take you to displays that show the state of each step s 16 outputs Read only ...

Страница 159: ...ion Step Control Each widget displays the PV aqua SP or Bias yellow and Output green Use the A M button to switch between Auto and Manual Use the SP Select button to change between LSP local set point and RSP remote set point You can change the SP Bias and Output values states when LSP and Manual modes are selected Touch the blue title bar at the top of the widget to jump to the Loop Setup display...

Страница 160: ... whose pen colors match the values on the left aqua yellow green Additional points of different colors may be visible depending on configuration Use the gray buttons at the bottom to navigate and zoom At the top are buttons that take you to detailed popups for various loop parameters Buttons are accessible depending on the loop type shown below Loop type Button PID ON OFF 3 POS CARBON A M BIAS Con...

Страница 161: ...put is tracking the loop s Output Tracking value Remote Setpoint is selected or High Limit Override Status Is ON AUTO LSP Loop is controlling the process and Local Setpoint is selected MAN LSP Loop output can only be changed manually Local Setpoint is selected IMAN LSP IMAN Initialization Manual occurs with Cascade loops only Figure 11 Secondary Cascade is in MAN or LSP therefore Primary Cascade o...

Страница 162: ...output beyond which the motor no longer affects the process Ratio Gain Gain value for a ratio loop Ratio Bias Local bias value in engineering units Enterable only if it is configured for local bias It is read only if it is configured for remote bias Motor Deadband Value of adjustable deadband in Motor Traverse Time Sec Motor travel time in seconds Hysteresis Loop alarm s hysteresis 0 to 10 of PV r...

Страница 163: ...controlling to the setpoint while it identifies the process calculates the tuning constants and begins loop control with the correct tuning parameters Item Description Tuning Status Inactive The Accutune III tuning process is not active Tuning The Accutune III tuning progress is active Fuzzy Overshoot Select ON to activate Fuzzy Overshoot Suppression to minimize overshoot after a setpoint change o...

Страница 164: ... learns the process as PV deviations are observed and adapts the tuning parameters to the process response DISABLE Disables PV Adaptive tune ENABLE This method adapts a tuned process to changing system characteristics over time when the PV deviates from the Setpoint by a certain amount for any reason This method adapts a tuned process to changing system characteristics over time It operates by obs...

Страница 165: ...une making sure that the process is stable and not moving in any direction SP ERROR For Cycle Tuning this occurs for Duplex Manual Tuning when the SP value is not in the proper range For cool side tuning the SP must be less than 48 and for heat side tuning the SP must be greater then 52 of the PV range For SP Tune this error condition occurs if the deviation between the PV and SP is greater than 3...

Страница 166: ...he mid point between the high output limit and 50 percent for the heat side and the low output limit and 50 percent for the cool side During tuning for each side the cycling of the output results in the PV oscillating around the target SP value From the data gathered during the oscillations tuning values are calculated and stored for each side After tuning on both sides is completed the process SP...

Страница 167: ...te affects the controller s output whenever the deviation is changing and affects it more when the deviation is changing faster Reset 1 Or 2 Reset or integral time adjusts the controller s output according to the size of the deviation SP PV and the time it lasts The amount of corrective action depends on the value of Gain Reset is measured as how many times proportional action is repeated per minu...

Страница 168: ... Alarm 1 Type 1 Alarm Hysteresis Affects the point at which an alarm clears For Out High and Out Low alarms hysteresis is of the loop s output span For all other alarm types it is of PV span PV High Alarm clears when PV is less than the alarm setpoint by the amount of hysteresis PV Low Alarm clears when PV is greater than the alarm setpoint by the amount of hysteresis SP High Alarm clears when SP ...

Страница 169: ... track value to output limit enable and output limit value NO Normal output high limit is used High Output Limit Override Status ON Digital input controlling output limiting is ON OFF Digital input controlling output limiting is OFF Current High Output Limit Current output high limit When in override status this changes according to loop s tracking value and ramp rate It will never exceed the loop...

Страница 170: ...Loops Loop Setup 158 900 Control Station User Guide Revision 9 May 2014 This page is intentionally left blank ...

Страница 171: ...bration CJ Calibration p Error Bookmark not defined Cancel Calibration Restore CJ factory calibration AO Calibration p Error Bookmark not defined Cancel Calibration Restore AO factory calibration PPO Motor Calibration p Error Bookmark not defined Overview Calibration Status Information Cancel Calibration Calibration Errors Auto Calibration Procedure Semi Auto Calibration Procedure Hand Calibration...

Страница 172: ...I O Calibration Overview 160 900 Control Station User Guide Revision 9 May 2014 Overview This display lets you select the type of calibration You must change the controller mode before calibrating ...

Страница 173: ...r all of the channels on the affected module Note that you must configure a channel s input type and range before you try to calibrate it The calibration will be performed against the gain setting associated with the input type and range If you change the input type after calibrating the module will automatically restore the Factory calibration settings for that channel If necessary you can use th...

Страница 174: ...mber module number and channel number of the AI to be calibrated then press Select Input Select Input Select this to verify that the selected rack module channel is installed in the controller Calibrate 0 Input Set the calibration source to the value shown next to Reference then select this to calibrate Calibration takes 30 seconds Status will indicate when calibration is complete Calibrate 100 In...

Страница 175: ...e number and channel number of the CJ sensor to be calibrated Channel 1 is the top CJ sensor Channel 2 is the bottom sensor Select CJ Input Select this to verify that the displayed module and channel are correct User Measured CJ Temperature Deg C Place your temperature measuring device at the terminal that is closest to the selected CJ sensor Allow the environment around the terminal block to stab...

Страница 176: ...or any rack without being recalibrated Item Description Instrument Status And Instructions This shows the status of the calibration In order of appearance statuses are Ready Measure AO 0 Output Enter 0 AO Output Measure AO 100 Output Enter 100 AO Output AO Cal Failed red or Done green Save AO Calibration Reference Indicates output reference value and engineering units Also indicates an invalid mod...

Страница 177: ...r 4 mA dc the value entered must be between 3 3 and 4 7 mA dc For 20 mA dc the value entered must be between 19 3 and 20 7 mA dc Cancel Calibration You can stop the calibration process at any time by pressing the Cancel Calibration button The status goes to ready and the previous calibration is restored Restore AO factory calibration This restores the selected AO channel to its factory calibration...

Страница 178: ...and wait until the feedback signal has stabilized capture the 100 feedback value measure the true motor speed by d moving the motor for a fixed period of time e measuring the position feedback delta f computing a motor speed from this data This value will override any previously configured value save the calibration values as part of the PPO block s configuration data After calibration return the ...

Страница 179: ...ive Action Calibration Failed The calibration was not performed in the correct sequence Go back to Step 1 and repeat the calibration process The selected motor position has not been configured Go back to the SELECT MOTOR TO CALIBRATE display and reselect the desired motor Calibration Failed Bad AI The AI channel being used for the position feedback signal has failed in some way Check for correct w...

Страница 180: ...eedback Value Feedback Value indicates the current position of the motor Percent Complete indicates the progress of this step 0 to 100 Status Wait Motor Moving To 100 Position Feedback Value indicates movement and direction of the motor 0 0 to 1 0 This value should increase until the 100 position is reached Percent Complete indicates the progress of this step 0 to 100 Status Wait Calculating 100 F...

Страница 181: ...ates the current position of the motor 0 0 to 1 0 Percent Complete indicates the progress of this step 0 to 100 Status 0 Feedback Value Captured Status Wait Motor Moving To 100 Position Feedback Value indicates movement and direction of the motor 0 0 to 1 0 This value should increase until the 100 position is reached Percent Complete indicates the progress of this step 0 to 100 Status Motor Is At ...

Страница 182: ...d below You must wait for each step to complete before selecting and activating the next step Table 42 Hand Calibration Procedure Step Action 1 Select block for calibration Select Hand Status Ready 2 Select Start Status Please Move Motor To 0 Position Feedback Value indicates movement and direction of the motor 0 0 to 1 0 This value should increase when the motor is moved in the forward direction ...

Страница 183: ...Value indicates movement and direction of the motor 0 0 to 1 0 Percent Complete indicates the progress of this step 0 to 100 Status Motor Speed Calibration Complete 8 Select Save Cal The following information will appear Feedback At 0 a value corresponding to the motor s 0 position 0 0 to 1 0 Feedback At 100 a value corresponding to the motor s 100 position 0 0 to 1 0 Motor Speed In Seconds This i...

Страница 184: ...ion Select PPO Block Select a motor Dead Band Deadband is an adjustable gap between forward and reverse motor operation the range over which the output can change before a relay is energized Travel Time Travel time is the time it takes the motor to travel from its calibrated 0 position to its calibrated 100 position Output Low Limit Low limit for the motor position Output High Limit High limit for...

Страница 185: ...ion for details on Downloading to a device Performing a cold start Step Action 1 Disconnect power from the unit 2 Press and hold the F1 and F2 keys then power up the unit while continuing to hold the F1 and F2 keys 3 Wait until the display says Soft Key 1 to clear database then release the F1 and F2 keys 4 Press the F1 key to clear the database The following message will appear with the default IP...

Страница 186: ...ing IP Address Step Action 1 Disconnect power from the unit 2 Press and hold the F1 and the fourth Soft Key Logoff for 900CS10 and F4 for 900CS15 simultaneously and hold them down while applying power 3 Keep the keys pressed until a pop up keypad appears Enter an IP Address that has the same subnet as your PC and the HC900 Controller and a unique fourth number Press the green arrow to enter the IP...

Страница 187: ...r board may result in injury to personnel CAUTION The circuit board contains static sensitive components Before handling the operator interface without the rear cover attached discharge static charges from your body by touching a grounded bare metal object Ideally handle the operator interface at a static controlled clean workstation Also do not touch the surface areas of the circuit board Dirt oi...

Страница 188: ... parts below see the contact information in the front of this manual Table 43 Parts Description Order part number Clear protective film for touch screen 50038816 501 for 900CS10 00 and 50038816 502 for 900CS15 00 Replacement backlight 50038818 501 for 900CS10 00 only Replacement touch screen 50038820 501 for 900CS10 00 only CompactFlash card for data logging 50040636 002 Adapter plate for replacin...

Страница 189: ...r mode 10 Controller setup 10 Controller status 17 D Data entry how to 9 Data Log 10 Device control 98 Diagnostics 10 Redundant Overview 48 E Events 10 Setpoint schedule See Setpoint schedule F Floating Point Big Endian 27 Floating Point Little Endian 27 Four Selector Switch 97 H Hand Off Auto Switch 100 High output limiting See Loop HOA display 100 How to change a value 9 enter data or change set...

Страница 190: ... 141 Setpoint program edit 129 edit segments 131 fast forward 130 overview 119 states 120 126 134 142 Setpoint schedule clear from scheduler 110 111 defined 133 edit 137 edit guarantee hold 139 edit segment events 139 edit segments 138 edit setpoints 138 operate menu 110 111 112 overview 133 popup menu 110 111 112 save 110 setup 134 signals analog and digital 90 Site preparation 4 Stage 101 Startu...

Страница 191: ...Revision 9 900 Control Station User Guide 179 May 2014 ...

Страница 192: ... below ASIA PACIFIC Honeywell Process Solutions TAC hfs tac support honeywell com Australia Honeywell Limited Phone 61 7 3846 1255 FAX 61 7 3840 6481 Toll Free 1300 36 39 36 Toll Free Fax 1300 36 04 70 China PRC Shanghai Honeywell China Inc Phone 86 21 5257 4568 Fax 86 21 6237 2826 Singapore Honeywell Pte Ltd Phone 65 6580 3278 Fax 65 6445 3033 South Korea Honeywell Korea Co Ltd Phone 822 799 6114...

Отзывы: