Getting Started
3
STEP 4: Opening your Security
Box using the pre-set factory
code
THE PRE-SET FACTORY CODE IS
3
*
Using the keypad, enter the factory pre-set
code. The LED will flash a green light and
stay green for 10 seconds after the
button is pressed. You will hear the
Security Box unlock.
NOTE: You have 10 seconds to open the
Security Box. If the green light goes out,
you will have to re-enter the code.
To open, turn the knob from the locked
position to the unlocked position, one
quarter turn counter-clockwise. To open, lift
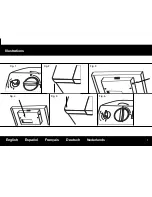
from the outer edge of the lid. (fig.2)
If the LED light flashes red after you enter
the code, this means the code was entered
incorrectly and the Security Box will not
open.
NOTE: If an incorrect code is entered 3
times in a row, the Security Box will
automatically shut down for 4 minutes
before it can be opened again using the
correct code. During this delay, the
Override Key can be used to open the
Security Box.
English
NOTE: For your security, immediately
re-program the digital lock to your
Personal Passcode.
Open your Security Box with the Override
Key or with the pre-set factory Passcode.
On the inside of the lid, find and press
the red button located to the side of the
battery compartment (Fig.3). The LED light
above the keypad will flash orange.
Enter your personal Passcode, up to 5
digits, followed by the button and then
repeat a second time. You must enter
the number twice.
For example: 1 2 3 4 5 - 1 2 3 4 5
After the first entry, the LED will flash orange.
After the second entry, the LED will flash
green and then go out.
Your Personal Passcode is now saved.
Write it down and store it in a secure place
away from the Security Box.
Close the lid of your Security Box and
return the knob to the locked position (Fig. 6).
If the override key was used, turn to the
locked position, remove and replace the
lock cover.
NOTE: The factory pre-set code is no longer active and cannot
be used to open the Security Box.
Programming your
Personal Code
STEP 1: Locate Override Keys
Keys and batteries are stored in the packing
material. Remove them before discarding
the box.
STEP 2: Opening your Security
Box using your override key
Remove cover from key lock.
Insert Override Key into key lock and turn
the key counter clockwise one quarter turn
to the unlocked position.
Turn the knob counter-clockwise one
quarter turn to the unlocked position. (fig.1)
To open, lift from the outer edge of the lid.
(fig.2)
STEP 3: Installing Batteries
Locate the battery cover on the back side
of the lid. (fig.4)
Slide the cover off the battery
compartment.
Properly insert batteries, noting correct
direction, replace cover and close the
Security Box lid.
Return the Override Key and the knob to
the locked position.
Zorg dat u de veiligheidskluis niet te ver
vult, zodat de deur volledig dicht kan.
Zorg dat de knop in de onvergrendeld-
stand staat.
Zorg dat het deksel volledig gesloten is
(zie fig. 5)
Draai de knop vanuit de onvergrendeld-
stand een kwartslag met de klok mee naar
de vergrendeld-stand. Uw veiligheidskluis is
nu vergrendeld.
LET OP: Als de noodsleutel in de
onvergrendeld-stand staat
kunt u de
veiligheidskluis openen en sluiten door de
knop van de vergrendelde naar de
onvergrendelde stand en weer terug te
draaien zonder uw persoonlijke code in te
voeren.
Zorg dat u voor het vergrendelen van
uw veiligheidskluis de noodsleutel naar de
vergrendel-stand hebt gedraaid en hem uit de
buurt van de veiligheidskluis op een veilige
plek hebt opgeborgen.
20
Zo sluit en vergrendelt u
uw veiligheidskluis
Storingzoeken
Geen licht uit het LED: Dit betekent dat de
batterijen op zijn en vervangen moeten
worden. Raadpleeg voor het vervangen van
batterijen Aan de Slag, STAP 2 en 3.
Let op: Het vervangen van batterijen zal
de persoonlijke code niet uitwissen.
Het LED-controlelampje gaat rood
knipperen.
Dit betekent dat uw batterijen bijna leeg zijn.
Raadpleeg voor het vervangen van batterijen
(Aan de slag, Stap 2 en 3)
Waarschuwing: FORCEER DE KNOP NIET
De knop zal breken als deze geforceerd
wordt en uw veiligheidskluis zal beschadigd
worden. Als de knop juist gebruikt wordt zult
u deze gemakkelijk naar de onvergrendelde
stand kunnen draaien.
Als u vragen hebt over het gebruik van de
veiligheidskluis, belt u dan de klantenservice
van SISCO op 1-800-223-8566. Belt u eerst de
klantenservice alvorens u de veiligheidskluis
terug naar de detailhandel brengt.
Nederlands
Veiligheidskabel
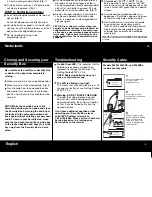
Verwijder de plug van het
bevestigingsgat van de
veiligheidskabel.
Wikkel de kabel rond het
gewenste voorwerp en
dan door zichzelf heen.
Druk op de ontspanknop
van de kabel en terwijl u
deze knop ingedrukt
houdt steekt u de
veiligheidskabel in het
gat zoals getoond op het
diagram, waarna u de
knop loslaat.
Modellen 3040D, 3040DE, en 3040DBJ
bevatten een veiligheidskabel.
1
2
3


