background image

18

Quick Setup

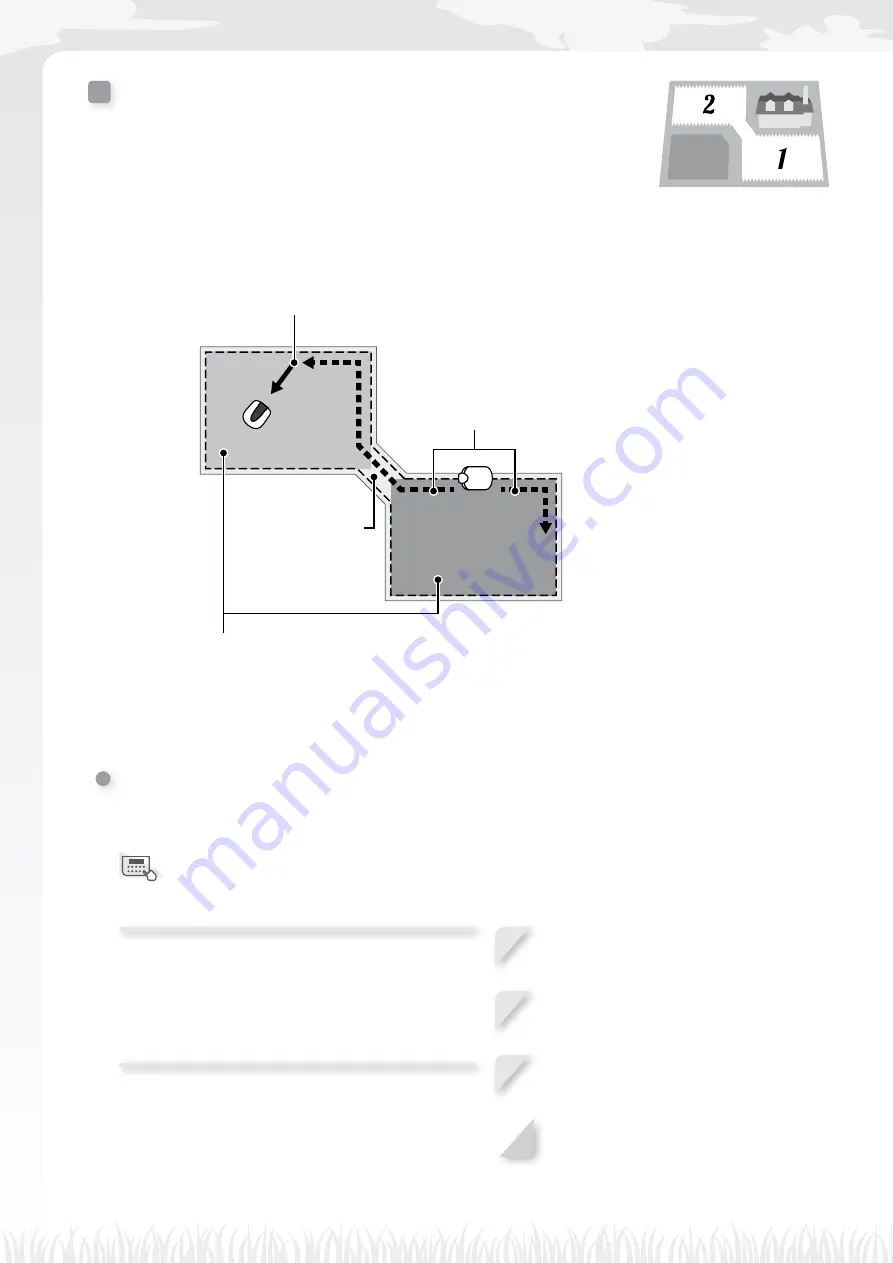
 Configuring zone settings

In addition to the default Quick Setup mode Zone 1 (for which zone settings 

cannot be changed), a configurable Zone 2 is available. The zone-specific 

settings are as follows.

Until the lawnmower reaches a set point in a zone, it will 

run without mowing.

L

  [1.Wire Exit Location] (

M

 page 18)

- Sets the distance from the docking station to start cutting.

Set whether the lawnmower should travel clockwise or 

anticlockwise along the boundary wire to reach a zone.

L

  [1.CW] or [2.ACW] in [1.Wire Exit Location] (

M

 page 18)

Set a zone operation ratio if you want to mow more frequently in a certain zone.

For example, if you set the ratio to 30%, the lawnmower will operate 3 times out of 10 in 

Zone 2 and 7 times out of 10 in Zone 1.

L

  [2.Zone Proportion (%)] (

M

 page 19)

Narrow Path

Zone 1

Zone 2

 Setting the boundary wire location at which the lawnmower 

starts mowing

 Home screen 

J


[2.Quick Setup]


J


[2.Zone]


J


[1.Wire Exit Location]

The lawnmower travels to this location along the 

boundary wire, and then turns away from the 

boundary wire to begin mowing.

This lets you focus mowing on a specific area of your 

lawn.

1

Enter a value from 0 to 250 for [0-250m].

2

Enter a number to select [1.CW] or 

[2.ACW] for [1.CW/2.ACW].

3

Press the 

H

 button.

The message “Activated” is displayed.

4

Press the 

H

 button to return to the 

previous screen.

Содержание HRM300/500

Страница 1: ...Honda Robotic Lawnmower HRM300 500 Owner s Manual Original Instructions EN...

Страница 2: ......

Страница 3: ...attention to statements preceded by the following words N WARNING Indicates a strong possibility of severe personal injury or death if instructions are not followed CAUTION Indicates a possibility of...

Страница 4: ...rk Auto According to settings the lawnmower works automatically Storage M page 56 Maintenance Periodic inspection and maintenance M page 49 Cleaning and checking M page 49 Safety Instructions Weekly c...

Страница 5: ...Viewing history 31 Viewing operation history 31 Viewing fault history 33 Other system settings 34 Basic docking station settings 34 Manual Mode Setup settings 36 Setting the display language 37 Setti...

Страница 6: ...king station Features Mowing zones You can designate which areas of your lawn the Honda Robotic Lawnmower should focus on mowing Up to 5 mowing zones can be set by laying a boundary wire increasing ef...

Страница 7: ...is area may consist of multiple zones in which the lawnmower can operate For mowing zone setup and detailed information please see 4 MENU SETTINGS M page 14 Safety Blades on the lawnmower automaticall...

Страница 8: ...other medical device should consult a doctor Do not ride on the lawnmower push the lawnmower or use it for anything other than its intended purpose An accident may occur or the lawnmower may be damag...

Страница 9: ...by the blades Before operation always check the work area and remove any branches rocks and other objects that can damage the blades and cause the lawnmower to stop If you do not you may be injured f...

Страница 10: ...that the contents of SAFETY INSTRUCTIONS are absolutely clear to persons who may come in contact with the robotic lawnmower If you do not an accident may occur When connecting the plug hold the plug b...

Страница 11: ...Year of manufacturing Rated voltage Rated power Mass Weight CE mark The Honda Robotic Lawnmower is designed to give safe and dependable service if operated according to instructions Read and understa...

Страница 12: ...Lay boundary wire around the area in which you want the lawnmower to operate Length for HRM300 200 m Length for HRM500 300 m Charging plug Screw The lawnmower recharges at the docking station and retu...

Страница 13: ...the lawnmower is inactive MAN Neither Quick Setup nor Custom Setup have been set HOME The lawnmower is returning to the docking station Name of the second level menu Name of the first level menu Disp...

Страница 14: ...with local laws and regulations Conditions for installing the docking station Image Condition 5 8 7 5 8 7 5 8 7 5 8 7 The docking station must be installed at an inclination of no more than 5 8 7 The...

Страница 15: ...ts This space can be reduced to as low as 30 cm if you set Wire Overlap to a low value For details consult your dealer More than 10 17 Less than 10 17 Do not lay boundary wire so that it intersects on...

Страница 16: ...installation The menu consists of multiple levels of submenus The uppermost levels are as follows Menu name Usage See this page for information 1 Auto Mode For selecting or disabling work modes M page...

Страница 17: ...larm Create a PIN Immobilizer Date and Time Security Sound Language Menu History System Setup Custom Setup Mower Inactive Timer Zone Summary Reset Timer Input PIN Monday Tuesday Wednesday Thursday Fri...

Страница 18: ...M page 22 1 Select 1 Quick Setup or 2 Custom Setup 2 Press the H button The message Activated is displayed 3 Press the H button to return to the previous screen Suspending work modes You can suspend...

Страница 19: ...check to the box by pressing the H button 3 Select 0 OK 4 Press the H button to proceed to the timer setting screen 5 Enter a start time and an end time in 24 hour format for Timer 1 using the number...

Страница 20: ...atio if you want to mow more frequently in a certain zone For example if you set the ratio to 30 the lawnmower will operate 3 times out of 10 in Zone 2 and 7 times out of 10 in Zone 1 L 2 Zone Proport...

Страница 21: ...direction specific settings are as follows With the 2 Directional setting when the lawnmower detects the boundary wire it turns at a narrow angle This is used for mowing narrow areas With the 1 Random...

Страница 22: ...for this mode You can use a summary screen to quickly check settings for this mode Home screen J 2 Quick Setup J 3 Summary The Quick Setup settings are listed You can check each configured setting 1 C...

Страница 23: ...s mode Home screen J 2 Quick Setup J 4 Reset Execute this command to revert all settings to their factory defaults NOTE Consult your dealer before executing this command 1 Select 1 Yes 2 Press the H b...

Страница 24: ...etting the boundary wire location at which the lawnmower starts mowing M page 24 1 Select the day on which you want the lawnmower to operate 2 Add a check to the box by pressing the H button 3 Select...

Страница 25: ...sage located between zones run the lawnmower just above the boundary wire L 2 Passage Width Out in 4 Area M page 26 Specify the distance of the lawnmower from the boundary wire Set the distance that t...

Страница 26: ...W for 1 CW 2 ACW 3 Press the H button The message Activated is displayed 4 Press the H button to return to the previous screen Setting the angle range at which the lawnmower deviates from the boundary...

Страница 27: ...rvals 1 Select 1 Random 2 Directional or 3 Mixed 2 Press the H button The message Activated is displayed 3 Press the H button to return to the previous screen Setting how far the lawnmower can overlap...

Страница 28: ...Setting Distance 0 The lawnmower closely follows the boundary wire This is effective for narrow pathways 10 The lawnmower moves at random by the maximum amount possible between the boundary wire and...

Страница 29: ...11 45 Zone 2 Timer 2 00 00 00 00 Zone 1 Sun 13 27 Confirming the settings for zones 1 to 5 Home screen J 3 Custom Setup J 3 Summary J 2 Zone The Custom Setup settings for each zone are listed You can...

Страница 30: ...ess the H button to return to the previous screen Deleting the work time settings Home screen J 3 Custom Setup J 4 Reset J 1 Reset All Timers You can reset all timer related settings for this mode 1 S...

Страница 31: ...lect 1 Yes 2 Press the H button The message Activated is displayed 3 Press the H button to return to the previous screen Testing settings Confirming the boundary wire signal You can check if the bound...

Страница 32: ...awnmower returns to the docking station When the test is finished a complete message is displayed 4 Press the H button to return to the previous screen Checking lawnmower operation in the set zone Hom...

Страница 33: ...tting time and charging time Home screen J 5 History J 1 Operating History J 1 Operating Time You can view how long the lawnmower has mowed and how long the lawnmower has charged 1 Check the history 2...

Страница 34: ...ress the G button to return to the previous screen Each time the lawnmower leaves the docking station after recharging a new entry is created in the history list The most recent entry is 01 and the ol...

Страница 35: ...on faults see 6 TROUBLESHOOTING M page 47 3 Press the G button to return to the previous screen History Fault History 1 3A051 01 10 12 11 13 2 3A024 01 10 12 11 38 3 3A013 01 10 12 11 38 4 3A052 01 10...

Страница 36: ...rference with other lawnmowers 1 Select a different type of signal if you are experiencing interference 2 Press the H button The message Activated is displayed 3 Press the H button to return to the pr...

Страница 37: ...or any zone Setting Distance 0 The lawnmower closely follows the boundary wire This is effective for narrow pathways 10 The lawnmower moves at random by the maximum amount possible between the boundar...

Страница 38: ...ow the lawnmower moves while mowing The 3 Mixed setting is also available With this setting the lawnmower alternates between the Random mowing pattern and the Directional mowing pattern at regular int...

Страница 39: ...te and time You can set the internal date and time for the lawnmower Home screen J 6 System Setup J 4 Date and Time Set the date and time for the lawnmower The timer operates based on this date and ti...

Страница 40: ...is entered 3 times in a row 1 Select 1 ON 2 Press the H button The message Activated is displayed NOTE To disable this function select 2 OFF 3 Press the H button to return to the previous screen Chan...

Страница 41: ...d proceed to step 4 2 Press the H button 3 Enter the number of days up to 30 after which the lawnmower will be suspended The message Activated is displayed 4 Press the H button to return to the previo...

Страница 42: ...ps in reverse when disconnecting from a power source For details on moving the transformer or changing to a different power outlet contact your dealer 1 Remove the connector cover from the station 2 C...

Страница 43: ...ured Turning on off the power Turning on the power After the battery is charged press the A On button to turn on the lawnmower The A On button is located on the control panel at the rear side of the l...

Страница 44: ...he control panel is locked for 5 minutes during which time you cannot perform operations If you forget the PIN consult your dealer If an error message is displayed see 6 TROUBLESHOOTING M page 47 Syst...

Страница 45: ...the home screen Auto Mode Quick Setup Activated Sun 13 27 5 Press the D button repeatedly until the Quick Setup icon is displayed The Quick Setup icon is a clock with a Q For details on the different...

Страница 46: ...ure CAUTION Avoid cutting too much at once Mow gradually step by step from level 5 to 1 1 Press the manual STOP button The control panel cover pops up 2 Open the height adjustment dial cover with your...

Страница 47: ...amaged and verify that there are no other problems Cleaning the lawnmower and docking station Dirt and grass may accumulate on the top and bottom of the lawnmower docking station and charging plug dur...

Страница 48: ...ss the B Off button 2 Close the control panel cover 3 Pick up the lawnmower by the carrying area Lift the lawnmower with one hand from the rear side with the blades pointed away from you Always hold t...

Страница 49: ...r If you forgot the PIN contact your dealer Clock Reset The backup battery power has drained during long term storage The clock has been reset Set the current date and time The time must be in 24 hour...

Страница 50: ...been lifted by something e g a stone Enter the PIN so that the message disappears If the cover is heavily damaged or the message does not disappear contact your dealer Upside down The lawnmower is ups...

Страница 51: ...ge 50 Check 2 Docking station Clean M page 51 Check M page 54 Docking station screws Check adjust 3 M page 54 Rear drive wheels 1 Clean M page 50 Check 2 Front caster wheels 1 Clean M page 50 Check 2...

Страница 52: ...blades with your hands Only use a brush to clean behind the blade disc Do not lift the lawnmower off of the ground while checking or cleaning it Do not clean the lawnmower with solvent a high pressure...

Страница 53: ...g the transformer s plug from the power outlet House before cleaning it Clean dirt and grass off of the docking station using a brush Brush off dirt and grass from docking station particularly around...

Страница 54: ...control panel cover Normal operation of the manual STOP button and the control panel cover While performing a test operation of the lawnmower press the manual STOP button If the lawnmower does not sto...

Страница 55: ...es Damage to the blades Visually inspect the blades If they are damaged replace the blades M page 55 Loosened bases of the blades Rotate the bolts with your finger to check that they are not loose If...

Страница 56: ...tion If it is damaged consult your dealer Connectors Loosened connectors of the docking station Visually inspect the connectors If they are loose consult your dealer Charging plug Screw Checking the d...

Страница 57: ...r Removal 1 Check that the power is turned off and then turn the lawnmower upside down 2 Hold the base of the blade disc with a 24 mm spanner so that the blade disc does not rotate when you rotate the...

Страница 58: ...power cables over winter leaving only the boundary wire in the ground Spray electrical contact cleaner on boundary wire terminals before encasing them in a waterproof box e g electrical junction box t...

Страница 59: ...attery Li ion 22 2 V 1800 mAh Li ion 22 2 V 3600 mAh Transformer Input AC 230 V AC 240 V AC 230 V AC 230 V AC 240 V AC 230 V Output 26 0 V 2 3 A Mowing Blade motor speed 2200 rpm Cutting height 2 6 cm...

Страница 60: ...ry Custom Mode Zone 1 Zone 2 Area 600 m2 Custom Mode Zone 1 Timer 9 00 12 00 Wire Exit Location 50 m CW Exit Angle 90 160 Mowing Pattern Random Zone 2 Timer 14 00 17 00 Wire Exit Location 50 m ACW Exi...

Страница 61: ...ion 0 m CW Exit Angle 30 120 Mowing Pattern Random Zone 3 Timer 14 00 17 00 Tuesday Thursday Saturday Wire Exit Location 80 m CW Exit Angle 80 90 Mowing Pattern Directional Sensitivity setting Middle...

Страница 62: ...TENANCE M page 49 4 Press the A On button on the control panel The power turns on and the startup screen on the control panel is displayed 5 Press the D Auto Manual button repeatedly until the MAN ico...

Страница 63: ...Cruz de Tenerife Tel 34 922 620 617 Fax 34 922 618 042 http www aucasa com e mail ventas aucasa com e mail taller aucasa com Honda Motor Europe Ltd 470 London Road Slough Berkshire SL3 8QY Tel 44 0 8...

Страница 64: ...het hieronder beschreven machine voldoet aan alle toepasselijke bepalingen van Richtlijn 2006 42 EG betreffende machines Richtlijn 2004 108 EG betreffende elektromagnetische overeenstemming Richtlijn...

Страница 65: ...Robotick kosa ka b Funkcia Kosenie tr vy c Obchodn n zov d Typ e V robn slo 3 V robca 4 Referencia k harmonizovan m tandardom 5 a ie tandardy alebo pecifik cie 6 Miesto 7 D tum Eesti Estonian E vasta...

Страница 66: ...Operating History P 31 P Passage Return Width System Setup Station Setup P 35 Passage Width Out Custom Setup Zone Zone1 5 Area P 26 Q Quick Setup Quick Setup P 17 Quick Setup Auto Mode P 16 R Reset C...

Страница 67: ...65 LAWN DIAGRAM...

Страница 68: ...sch Fran ais Italiano Svenska Nederlands Espa ol Dansk System Setup Station Passage Return Width Station Signal Loop Direction CW ACW Quick Setup For details on each setting see 4 MENU SETTINGS M page...

Страница 69: ...irectional Mixed Wire overlap cm Passage width Out Zone 2 Wire exit location m Direction Clockwise Anticlockwise Exit angle start Exit angle end Mowing pattern Random Directional Mixed Wire overlap cm...

Страница 70: ...xxxx xxxx xx xxxx xxxx xx 32VP7601 00X32 VP7 6010 Honda Motor Co Ltd 2013...

Отзывы: