background image

Page 5 

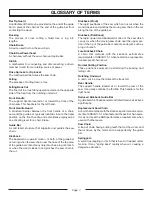
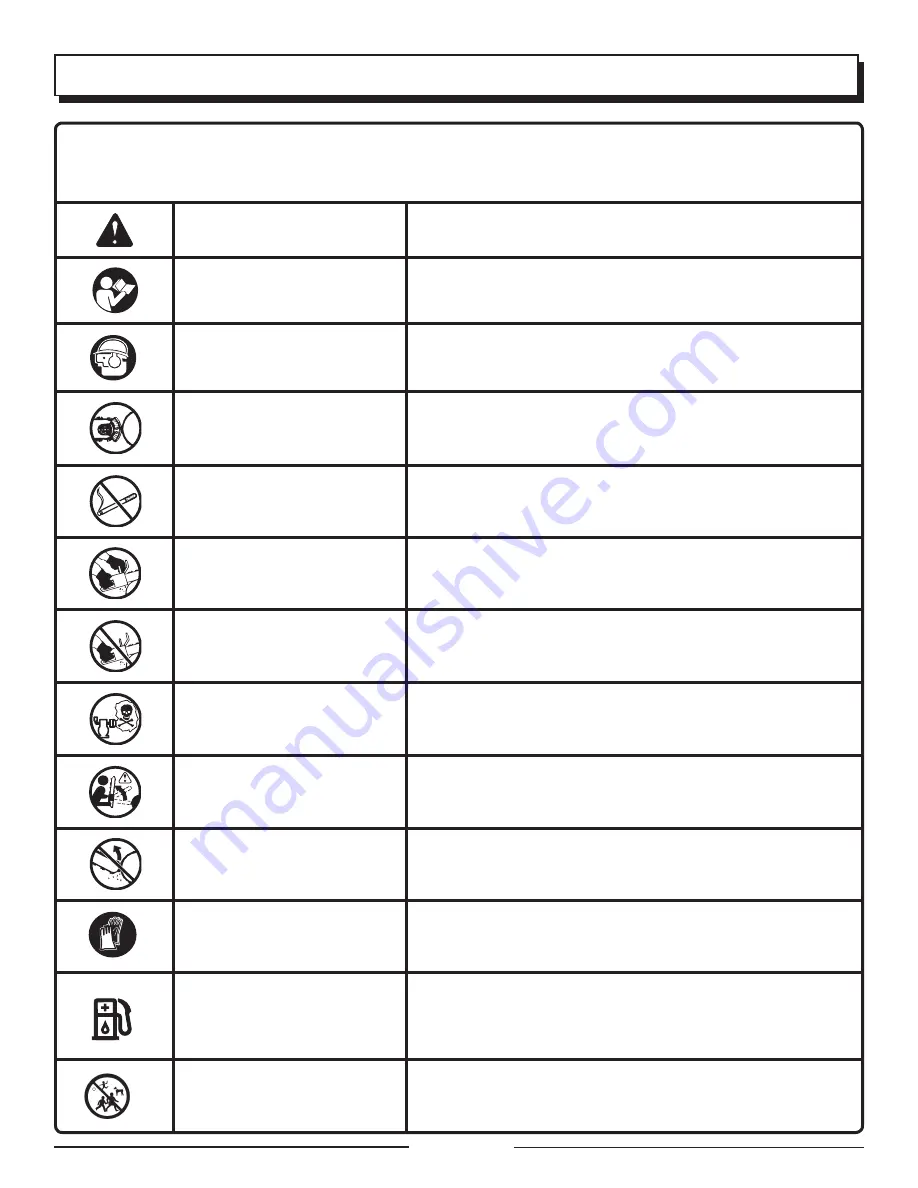
Some of the following symbols may be used on this tool. Please study them and learn their meaning. Proper interpretation 
of these symbols will allow you to operate the tool better and safer.

Read The Operator’s Manual

Safety Alert 

SYMBOL 

NAME 

DESIGNATION/EXPLANATION

To  reduce  the  risk  of  injury,  user  must  read  and  understand 
operator’s manual before using this product.

Precautions that involve your safety.

SYMBOLS

Wear Eye, Hearing, and Head 
Protection

Wear eye protection which is marked to comply with ANSI Z87.1 
as  well  as  hearing  and  head  protection  when  operating  this 
equipment.

Gasoline and Oil

Use  unleaded  gasoline  intended  for  motor  vehicle  use  with  an 
octane rating of 87 [(R + M)/2] or higher. This product is powered 
by a 2-cycle engine and requires pre-mixing gasoline and 2-cycle 
oil.

Wear non-slip, heavy-duty protective gloves when handling the 
chain saw.

Avoid bar nose contact.

DANGER! Beware of kickback.

Engines produce carbon monoxide which is an odorless, deadly 
poison. Do not operate in an enclosed area. 

Do not operate the saw using only one hand.

Hold and operate the saw properly with both hands.

No smoking, sparks, or open flame.

Wear Gloves

Bar Nose Contact

Kickback

Carbon Monoxide

One Handed

Operate With Two Hands

No Smoking

The  SAFE-T-TIP  nose  guard  on  the  guide  bar  helps  prevent 
kickback.

SAFE-T-TIP Nose Guard

Keep Bystanders Away

Keep all bystanders and animals at least 50 ft. away.

Содержание UT10532 - OPERATORS

Страница 1: ...ctured to Homelite s high standard for dependability ease of operation and operator safety When properly cared for it will give you years of rugged trouble free performance WARNING To reduce the risk of injury the user must read and understand the operator s manual before using this product Thank you for buying a Homelite product ...

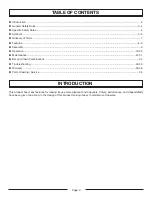
Страница 2: ...enance 21 31 Bar and Chain Combinations 32 Troubleshooting 32 33 Warranty 34 36 Parts Ordering Service 38 This product has many features for making its use more pleasant and enjoyable Safety performance and dependability have been given top priority in the design of this product making it easy to maintain and operate TABLE OF CONTENTS INTRODUCTION ...

Страница 3: ...d towards the end of your shift Never operate a chain saw when you are tired or under the influence of medication drugs or alcohol Use safety footwear Wear snug fitting clothing protective gloves and eye hearing and head protection devices Do not stand on any unstable surface while using the chain saw that includes ladders scaffolds trees etc Use caution when handling fuel Move the chain saw at le...

Страница 4: ...s damaged improp erly adjusted or is not completely and securely assembled Be sure that the saw chain stops moving when the throttle control trigger is released If the saw chain moves at idle speed the carburetor may need adjusting Refer to Adjusting the Carburetor in the Maintenance section of this manual If the saw chain still moves at idle speed after adjustment has been made contact an authori...

Страница 5: ... Oil Use unleaded gasoline intended for motor vehicle use with an octane rating of 87 R M 2 or higher This product is powered by a 2 cycle engine and requires pre mixing gasoline and 2 cycle oil Wear non slip heavy duty protective gloves when handling the chain saw Avoid bar nose contact DANGER Beware of kickback Engines produce carbon monoxide which is an odorless deadly poison Do not operate in ...

Страница 6: ... hazardous situation which if not avoided may result in minor or moderate injury CAUTION Without Safety Alert Symbol Indicates a situation that may result in property damage WARNING To avoid serious personal injury do not attempt to use this product until you read thoroughly and understand completely the operator s manual Save this operator s manual and review frequently for continuing safe operat...

Страница 7: ...t such as a log or branch or when the wood closes in and pinches the saw chain in the cut Kickback Pinch The rapid pushback of the saw which can occur when the wood closes in and pinches the moving saw chain in the cut along the top of the guide bar Kickback Rotational The rapid upward and backward motion of the saw which can occur when the moving saw chain near the upper por tion of the tip of th...

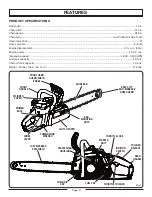
Страница 8: ...d 2 800 3 400 RPM Fuel tank capacity 20 5 oz Chain oil tank capacity 12 8 oz Weight No bar chain fuel or oil 12 5 lbs Fig 1 PRIMER BULB FRONT HAND GUARD CHAIN BRAKE FRONT HANDLE CYLINDER COVER SAFE T TIP ANTI KICKBACK NOSE GUARD CHOKE LEVER BAR MOUNTING NUTS CLUTCH COVER GUIDE BAR REAR HANDLE THROTTLE TRIGGER IGNITION SWITCH FUEL CAP STARTER FAN HOUSING STARTER GRIP THROTTLE LOCK TRIGGER RELEASE C...

Страница 9: ...y The chain brake does not prevent kickback GUIDE BAR The factory equipped guide bar has a small radius tip that offers a somewhat lower kickback potential LOW KICKBACK SAW CHAIN The low kickback saw chain helps minimize the force of a kickback reaction by preventing the cutters from digging in too deeply at the kickback zone PRIMER BULB The primer bulb pumps fuel from the fuel tank to the carbure...

Страница 10: ...y 2 cycle self mixing oil for air cooled engines Do not use automotive oil or 2 cycle outboard oil Mix 2 oil into the gasoline This is a 50 1 ratio Mix the fuel thoroughly and each time before fueling Mix in small quantities Do not mix quantities larger than usable in a 30 day period A 2 cycle oil containing a fuel stabilizer is recommended WARNING Do not allow familiarity with tools to make you c...

Страница 11: ... use dirty used or otherwise contaminated oils Damage may occur to the oil pump bar or chain Carefully pour the bar and chain oil into the oil tank Fill the oil tank every time you fuel the engine OPERATING THE CHAIN BRAKE See Figures 4 5 Check the operating condition of the chain brake prior to each use Using the back of your left hand engage the chain brake by pushing the chain brake lever hand ...

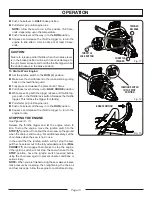
Страница 12: ...o the RUN I position Make sure the chain brake is in the run position by pulling back on the lever hand guard Fully press and release the primer bulb 7 times Pull choke lever all the way out to FULL position While squeezing both the trigger release and throttle trig ger push in the throttle lock button Release the throttle trigger This latches the trigger for starting When the temperature is above...

Страница 13: ...his latches the trigger for starting Pull starter grip until engine runs Push choke lever all the way in to the RUN position Squeeze and release the throttle trigger to return the engine to idle STOPPING THE ENGINE See Figures 12 13 Release the throttle trigger and let the engine return to idle To stop the engine move the ignition switch to the STOP position Do not put the chain saw on the ground ...

Страница 14: ... the PULL when cutting on the bottom edge of the bar and the PUSH when cutting along the top edge NOTE The chain saw has been fully factory tested It is normal to find some slight oil residue on the saw WARNING KICKBACK occurs when the moving chain contacts an object at the upper portion of the tip of the guide bar or when the wood closes in and pinches the saw chain in the cut Contact at the uppe...

Страница 15: ... is to the left of the chain line WARNING Never use a left handed cross handed grip or any stance that would place your body or arm across the chain line Maintain a proper grip on the saw whenever the engine is running The fingers should encircle the handle and the thumb is wrapped under the handlebar This grip is least likely to be broken by a kickback or other sudden reaction of the saw Any grip...

Страница 16: ...een workers Always cut with both feet on solid ground to prevent being pulled off balance Do not cut above chest height as a saw held higher is difficult to control against kickback forces Do not fell trees near electrical wires or buildings Leave this operation for professionals Cut only when visibility and light are adequate for you to see clearly BASIC OPERATING CUTTING PROCEDURES Practicecutti...

Страница 17: ...nned path of retreat Clear the path of safe retreat approximately 135 from the planned line of fall Consider the force and direction of the wind the lean and balance of the tree and the location of large limbs These things influence the direction in which the tree will fall Do not try to fell a tree along a line different from its natural line of fall Cut a notch about 1 3 the diameter of the trun...

Страница 18: ... large root extending from the trunk of the tree above the ground Remove large buttress roots prior to felling Makethehorizontalcutintothebuttressfirst followed by the vertical cut Remove the resulting loose section from the work area Follow the correct tree felling procedure as stated in Proper Procedure For Tree Felling after you have removed the large buttress roots BUCKING See Figure 26 Buckin...

Страница 19: ...cking cut 1 3 of the way through the log and finish with a 2 3 cut on the opposite side As you cut the log it will tend to bend The saw can become pinched or hung in the log if you make the first cut deeper than 1 3 of the diameter of the log Give special attention to logs under stress to prevent the bar and chain from pinching OVERBUCKING See Figure 29 Begin on the top side of the log with the bo...

Страница 20: ...rther out to reduce the weight This prevents stripping the bark from the main member Underbuck the branch 1 3 through for your first cut Overbuck the branch to drop it Finish by cutting smoothly and neatly against the main member so the bark will grow back to seal the wound WARNING If the limbs to be pruned are above chest height hire a professional to perform the pruning CUTTING SPRINGPOLES See F...

Страница 21: ...ngine before installing the guide bar chain drivecase cover and clutch drum Without all these parts in place the clutch can fly off or explode exposing the user to possible serious injury WARNING To avoid serious personal injury read and understand all the safety instructions in this section Always place the switch in the STOP position before you work on the saw Make sure the chain brake is not se...

Страница 22: ... bar and chain from the mounting surface Remove the old chain from the bar Lay out the new saw chain in a loop and straighten any kinks The cutters should face in the direction of chain rotation If they face backwards turn the loop over Place the chain drive links into the bar groove as shown Position the chain so there is a loop at the back of the bar Hold the chain in position on the bar and pla...

Страница 23: ...e chain is correctly tensioned when there is no sag on the underside of the guide bar the chain is snug but it can be turned by hand without binding Ensure that the chain brake is not set NOTE If chain is too tight it will not rotate Loosen the bar nuts slightly and turn the tension adjuster 1 4 turn counter clockwise Lift the tip of the guide bar up and retighten the bar nuts securely Ensure that...

Страница 24: ...ckback reduction when properly maintained For smooth and fast cutting maintain the chain properly The chain requires sharpening when the wood chips are small and powdery the chain must be forced through the wood during cutting or the chain cuts to one side During maintenance of the chain consider the following Improper filing angle of the side plate can increase the risk of severe kickback Raker d...

Страница 25: ...file dip or rock Using light but firm pressure Stroke towards the front corner of the tooth Lift the file away from the steel on each return stroke Put a few firm strokes on every tooth File all left hand cutters in one direction Then move to the other side and file the right hand cutters in the opposite direction Remove filings from the file with a wire brush CAUTION A dull or improperly sharpene...

Страница 26: ...all or a file held too low BACKWARD SLOPE Needs too much feed pressure causes excessive wear to the bar and chain Results from using a file with a diameter too large or file held too high Fig 55 RAKER DEPTH GAUGE CLEARANCE 025 in MAINTAINING DEPTH GAUGE CLEARANCE See Figure 55 57 Maintain the depth gauge at a clearance of 025 in Use a depth gauge tool for checking the depth gauge clear ances Every...

Страница 27: ...INING THE SAFE T TIP NOSE GUARD See Figures 59 60 CAUTION Make sure the chain has stopped before you do any work on the saw WARNING Although the guide bar comes with a SAFE T TIP anti kickback device already installed check the tightness of the mounting screw before each use Use the following instructions to tighten the mounting screw of the nose guard These are specially hardened screws If you ca...

Страница 28: ...e to dislodge most saw dust and dirt particles After every 5 hours of operation clean in warm soapy water rinse and let dry completely Replace with a new filter after every 25 hours of use NOTE An alternate method is to clean the filter with compressed air Always wear eye protection to avoid eye injury Reinstall the air filter making sure that the tabs on the air filter are located in channels on ...

Страница 29: ...n saw while adjusting the carburetor IdleSpeedAdjustment Theidlespeedadjustmentcontrols how much the throttle valve stays open when the throttle trigger is released To adjust Turn idle speed screw T clockwise to increase idle speed Turn idle speed screw T counterclockwise to decrease idle speed WARNING THE SAW CHAIN SHOULD NEVER TURN AT IDLE Serious personal injury may result from the saw chain tu...

Страница 30: ...ese deposits may need to be removed to restore performance We highly recommend that only qualified service technicians perform this service CHECKING THE FUEL FILTER See Figure 69 Check the fuel filter periodically Replace it if contaminated or damaged REPLACING THE SPARK PLUG See Figure 70 This engine uses a Champion RCJ 4 with 025 in electrode gap Use an exact replacement and replace every 50 hou...

Страница 31: ...ean and lightly lubricate the linkage Always test the chain brake performance after servicing or cleaning Refer to Operating Chain Brake for additional information Check the chain catcher and replace if damaged WARNING Even with daily cleaning of the mechanism the depend ability of a chain brake to perform under field conditions cannot be certified Keep the SAFE T TIP nose guard on the saw s guide...

Страница 32: ...d service center for carburetor adjustment Engine starts but will not run properly at high speed Carburetor requires H High Jet adjustment Contact an authorized service center for carburetor adjustment Engine does not reach full speed and or emits excessive smoke Oil fuel mixture incorrect Air filter is dirty Spark arrestor screen is dirty Carburetor requires H High Jet adjustment Use fresh fuel a...

Страница 33: ...ean oil passages with a stiff bristle brush Engine starts and runs but chain is not rotating Chain brake is engaged Chain tension is too tight Guide bar and chain assembled incorrectly Guide bar and or chain are damaged Drive sprocket teeth damaged Release chain brake Refer to Operating the Chain Brake in the Operation section of this manual Tension chain per instructions in Adjusting the Chain Te...

Страница 34: ...ITE product that has been altered or modified The warranty does not extend to repairs made necessary by normal wear or by the use of parts or accessories which are either INCOMPATIBLE WITH THE HOMELITE product or adversely affect its operation performance or durability In addition this warranty does not cover A Tune ups Spark Plugs Carburetor Carburetor Adjustments Ignition Filters B Wearitems Bum...

Страница 35: ...ime not to exceed 30 days If you have any questions regarding your warranty rights and responsibilities you should contact a Homelite Consumer Products Inc Customer Representative at 1 800 242 4672 COVERAGE Homelite Consumer Products Inc warrants to the ultimate purchaser and each subsequent purchaser that your nonroad or small off road engine will be designed built and equipped at the time of sal...

Страница 36: ...s or Yearly or Yearly 50 Hours AIR FILTER ASSY includes Filter X X SPARK ARRESTOR X CARBURETOR ASSY includes Heat Dam Gaskets FUEL TANK ASSY includes Fuel Lines X Fuel Cap X Fuel Filter IGNITION ASSY includes Spark Plug X ALL EMISSIONS RELATED PARTS ARE WARRANTED FOR TWO YEARS OR FOR THE PERIOD OF TIME PRIOR TO THE PARTS FIRST SCHEDULED REPLACEMENT WHICH EVER COMES FIRST WARRANTY ...

Страница 37: ...Page 37 NOTES ...

Страница 38: ... service contact your nearest Homelite authorized service dealer Be sure to provide all relevant information when you call or visit For the location of the authorized service dealer nearest you please call 1 800 242 4672 or visit us online at www homelite com REPAIR PARTS The model number of this product is found on a plate or label attached to the housing Please record the serial number in the sp...

Отзывы: