Page
2
of
16
Contents
Important Safety Precautions ............................................................................................................................. 3
Product Breakdown and Parts Catalogue .......................................................................................................... 4
Parts List 1: ..................................................................................................................................................... 5
Parts List 2: ..................................................................................................................................................... 6
Assembly Instructions ........................................................................................................................................ 7
1. Notice: ......................................................................................................................................................... 7
2. Assembly instructions ................................................................................................................................. 7
The Warm Up Phase ........................................................................................................................................ 15
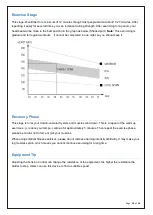
Exercise Stage ................................................................................................................................................. 16
Recovery Phase ............................................................................................................................................... 16
Equipment Tip .................................................................................................................................................. 16
Страница 1: ...ASSEMBLY INSTRUCTION INaob001_UK A90 245 IMPORTANT RETAIN FOR FUTURE REFERENCE READ CAREFULLY...
Страница 2: ...nt Safety Precautions 3 Product Breakdown and Parts Catalogue 4 Parts List 1 5 Parts List 2 6 Assembly Instructions 7 1 Notice 7 2 Assembly instructions 7 The Warm Up Phase 15 Exercise Stage 16 Recove...
Страница 3: ...ing when exercising DO NOT wear robes or other clothing that could become caught in the machine Running or aerobic shoes are also required when using the machine 7 Use the machine only for its intende...
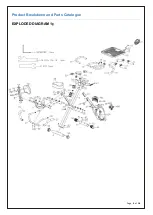
Страница 4: ...Page 4 of 16 Product Breakdown and Parts Catalogue EXPLODED DIAGRAM 1...
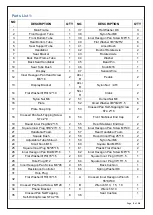
Страница 5: ...2 18 Crossed Pan Self Tapping Screw ST4 2 9 8 54 Front Stabiliser End Cap 2 19 Round Inner Plug 22 1 5 2 55 Rear Stabilizer End Cap 2 20 Square Inner Plug 53 23 1 5 1 56 Inner Hexagon Pan Screw M8 40...
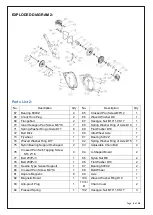
Страница 6: ...l Axle 1 73 Flywheel 1 91 Bearing 6202Z 1 74 Waved Washer Ring D17 1 92 Spring Washer Ring of Axle D15 1 75 Nylon Bearing Support D shaped 2 93 Adjustable Chain Bolt 2 76 Crossed Pan Self Tapping Scre...
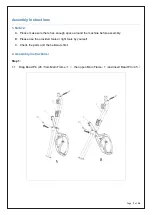
Страница 7: ...has enough space around the machine before assembly B Please use the provided tools or right tools by yourself C Check the parts and the hardware first 2 Assembly instructions Step 1 1 1 Drag Bead Pi...
Страница 8: ...Page 8 of 16 Step 2 2 1 Lock Rear Stabilizer 4 and Front Stabilizer 3 into Main Frame 1 using the Waved Washer 52 and Domed Nut 51...
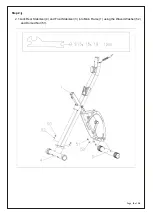
Страница 9: ...he Flat Washer 37 Nylon Nut 38 from Seat Cushion 36 3 2 lock Seat Cushion 36 into Seat Tube 5 by using the Flat Washer 37 and Nylon Nut 38 3 3 insert Seat Tube 5 into Main Frame 1 then align the hole...
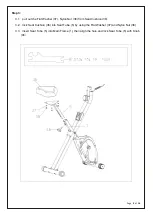
Страница 10: ...rame Tube 80 then lock the Back Cushion 65 into Back Rest Frame Tube 8 by using Inner Hexagon Pan Screw 29 and Spring Washer 66 4 2 Pull out Square Bolt 60 Flat Washer 40 and Nylon Nut 59 from Seat Br...
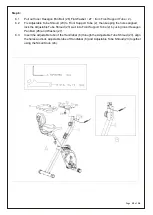
Страница 11: ...agon Pan Screw 56 5 2 Lock Pedal 48L and Pedal 48R into Crank 50L and Crank 50R respectively 5 3 Lock Nylon Nut 49L and Nylon Nut 49R well Note The right pedal 48R should be turned clockwise when lock...
Страница 12: ...2 then keeping the holes aligned lock the Adjustable Tube Shroud 23 well into Front Support Tube 2 by using Inner Hexagon Pan Bolt 26 and Washer 27 6 3 Insert the adjustable tube of the Handlebar 6 t...
Страница 13: ...lip 17 into Plate 16 and lock them together by using Crossed Pan Self Tapping Screw 18 7 2 Align the holes on the Display Bracket 13 with the Plate Snap Clip 17 then lock them together by using Inner...
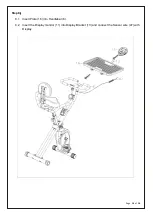
Страница 14: ...Page 14 of 16 Step 8 8 1 Insert Plate 16 into Handlebar 6 8 2 Insert the Display monitor 11 into Display Bracket 13 and connect the Sensor wire 47 with Display...
Страница 15: ...our left foot and place it against the inner thigh of your right foot Try to touch your toes Hold for 10 15 seconds repeat 3 times on each foot 3 Calf and Foot Stretching Stand and place both hands on...
Страница 16: ...covery Phase This stage is to let your Cardio vascular System and muscles wind down This is a repeat of the warm up exercise e g reduce your tempo continue for approximately 5 minutes Then repeat the...
Страница 17: ......