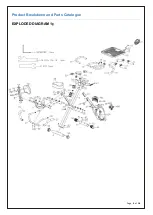
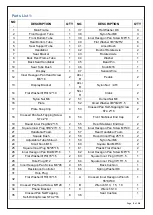
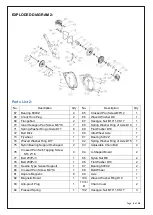
HOMCOM A90-245 Скачать руководство пользователя страница 5


Page 

5

  of 

16


Parts List 1: 

NO

.


DESCRIPTION


Q’TY


NO.


DESCRIPTION


Q’TY


Main Frame 

37 

Flat Washer D8 

Front Support Tube 

38 

Nylon Nut M8 

Front Bottom Tube 

39 

Inner Hexagon Pan Screw M8*15 

Rear Bottom Tube 

40 

Flat Washer Φ8*Φ25*2 

Seat Support Tube 

41 

Arced Bush 

Handlebar 

42 

Bush of Rotate Axle 

Seat Bracket 

43 

Rotated Axle 

Back Rest Frame Tube 

44 

Washer 

Back Seat Handlebar 

45 

Bead Pin 

10 

Seat Tube Bush 

46 

Knob M16 

11 

Display 

47 

Sensor Wire 

12 

Inner Hexagon Pan Head Screw 

M6*16 

48L\

Pedals 

13 

Display Bracket 

49L\

Nylon Nut

L/R


14 

Flat Washer 

Φ6*Φ12*1.0 

50L\

Crank 

15 

Nylon Nut M6 

51 

Domed Nut M8 

16 

Plate 

52 

Arced Washer Φ8*Φ20*1.5 

17 

Plate Snap Clip 

53 

Crossed Pan Self-Tapping Screw 

ST4.2*18 

18 

Crossed Pan Self-Tapping Screw 

ST4.2*9 

54 

Front Stabiliser End Cap 

19 

Round Inner Plug 

Φ22*1.5 

55 

Rear Stabilizer End Cap 

20 

Square Inner Plug 

Φ53*23*1.5 

56 

Inner Hexagon Pan Screw M8*40 

21 

Handlebar Foam 

57 

Rear Handlebar Foam 

22 

Square Bush 

58 

Round Inner Plug 25*1.5 

23 

Adjustable Tube Shroud 

59 

Nylon Nut M8 

24 

Small Knob M16 

60 

Square Bolt M8*50 

25 

Square Inner Plug 50*25*1.5 

61 

Plastic Flat Washer 

26 

Inner Hexagon Pan Bolt M8*16 

62 

Inner Hexagon Pan Screw M8*75 

27 

Flat Washer Φ8*Φ16*1.5 

63 

Square Inner Plug 30*30*1.5 

28 

Hole Plug Φ12 

64 

Square Inner Plug 30*15*1.5 

29 

Inner Hexagon Pan Screw M8*45 

65 

Back Cushion 

30 

Resistance Controller 

66 

Spring Washer D8 

31 

Hole Plug 


32 

Flat Washer Φ5*Φ18*1.5 

Crossed Inner Hexagon Wrench 

S5*80*80 

33 

Crossed Pan Head Screw M5*20 

Wrench S13

15

19 

34 

Phone Bracket 

Wrench S10 

35 

Crossed Pan Self-Tapping 

Self-Drilling Screw ST4.2*16 

36 

Seat Cushion 

Содержание A90-245

Страница 1: ...ASSEMBLY INSTRUCTION INaob001_UK A90 245 IMPORTANT RETAIN FOR FUTURE REFERENCE READ CAREFULLY...

Страница 2: ...nt Safety Precautions 3 Product Breakdown and Parts Catalogue 4 Parts List 1 5 Parts List 2 6 Assembly Instructions 7 1 Notice 7 2 Assembly instructions 7 The Warm Up Phase 15 Exercise Stage 16 Recove...

Страница 3: ...ing when exercising DO NOT wear robes or other clothing that could become caught in the machine Running or aerobic shoes are also required when using the machine 7 Use the machine only for its intende...

Страница 4: ...Page 4 of 16 Product Breakdown and Parts Catalogue EXPLODED DIAGRAM 1...

Страница 5: ...2 18 Crossed Pan Self Tapping Screw ST4 2 9 8 54 Front Stabiliser End Cap 2 19 Round Inner Plug 22 1 5 2 55 Rear Stabilizer End Cap 2 20 Square Inner Plug 53 23 1 5 1 56 Inner Hexagon Pan Screw M8 40...

Страница 6: ...l Axle 1 73 Flywheel 1 91 Bearing 6202Z 1 74 Waved Washer Ring D17 1 92 Spring Washer Ring of Axle D15 1 75 Nylon Bearing Support D shaped 2 93 Adjustable Chain Bolt 2 76 Crossed Pan Self Tapping Scre...

Страница 7: ...has enough space around the machine before assembly B Please use the provided tools or right tools by yourself C Check the parts and the hardware first 2 Assembly instructions Step 1 1 1 Drag Bead Pi...

Страница 8: ...Page 8 of 16 Step 2 2 1 Lock Rear Stabilizer 4 and Front Stabilizer 3 into Main Frame 1 using the Waved Washer 52 and Domed Nut 51...

Страница 9: ...he Flat Washer 37 Nylon Nut 38 from Seat Cushion 36 3 2 lock Seat Cushion 36 into Seat Tube 5 by using the Flat Washer 37 and Nylon Nut 38 3 3 insert Seat Tube 5 into Main Frame 1 then align the hole...

Страница 10: ...rame Tube 80 then lock the Back Cushion 65 into Back Rest Frame Tube 8 by using Inner Hexagon Pan Screw 29 and Spring Washer 66 4 2 Pull out Square Bolt 60 Flat Washer 40 and Nylon Nut 59 from Seat Br...

Страница 11: ...agon Pan Screw 56 5 2 Lock Pedal 48L and Pedal 48R into Crank 50L and Crank 50R respectively 5 3 Lock Nylon Nut 49L and Nylon Nut 49R well Note The right pedal 48R should be turned clockwise when lock...

Страница 12: ...2 then keeping the holes aligned lock the Adjustable Tube Shroud 23 well into Front Support Tube 2 by using Inner Hexagon Pan Bolt 26 and Washer 27 6 3 Insert the adjustable tube of the Handlebar 6 t...

Страница 13: ...lip 17 into Plate 16 and lock them together by using Crossed Pan Self Tapping Screw 18 7 2 Align the holes on the Display Bracket 13 with the Plate Snap Clip 17 then lock them together by using Inner...

Страница 14: ...Page 14 of 16 Step 8 8 1 Insert Plate 16 into Handlebar 6 8 2 Insert the Display monitor 11 into Display Bracket 13 and connect the Sensor wire 47 with Display...

Страница 15: ...our left foot and place it against the inner thigh of your right foot Try to touch your toes Hold for 10 15 seconds repeat 3 times on each foot 3 Calf and Foot Stretching Stand and place both hands on...

Страница 16: ...covery Phase This stage is to let your Cardio vascular System and muscles wind down This is a repeat of the warm up exercise e g reduce your tempo continue for approximately 5 minutes Then repeat the...

Страница 17: ......

Отзывы: