background image

Infotainment System

55

To change the route name, add a
Voice-Tag or delete a favourite
route:

1. Press the DEST button.

2. Select Favourite Route.

3. Select the route.

4. Select the Edit screen button.

5. Select from: Change route

name, Add Voice-Tag or Delete
Favourite route.

To change the route name:

1. Select the Change route name

option.

2. Using the keypad, enter

the name.

3. Press OK. The new name will be

in the Favourite Route menu.

To add a Voice-Tag:

1. Select the Add Voice-Tag option.

2. Follow the prompts.

3. The Voice-Tag is stored.

To delete a favourite route:

1. Select the Delete Favourite route

option. The confirmation screen
displays.

2. Press Yes to delete the route

and No to cancel deleting the
route.

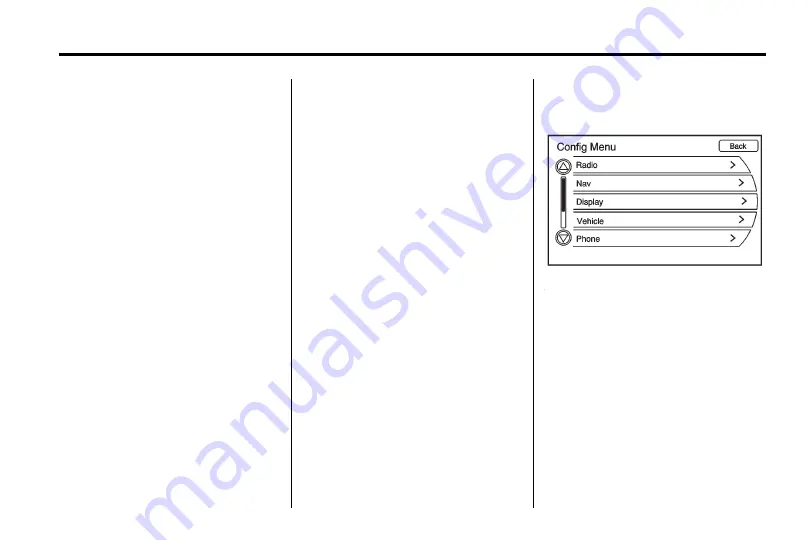
Configure Menu

Adjust features and preferences
such as Radio, Nav (Navigation),
Display, Phone or Time through the
Configure Menu.

Radio

See "Radio Settings" under

AM-FM

Radio on page 11

for more

information.

Nav (Navigation)

See "Navigation Settings" under

Using the Navigation System on
page 34

for more information.

Display

1. Press CONFIG to enter the

Config Menu options.

2. Select Display, then select

Display options to show
dimming mode:

Automatic:

Automatically adjust

the screen background depending
on exterior lighting conditions.

Day:

The map background

brightens.

Night:

The map background

darkens.

Содержание JH CRUZE

Страница 1: ...holden com au JH Cruze Infotainment System Handbook JH CRUZE MY13_JH Cruze_NAV_Cover_Red pdf 1 18 04 2012 2 13 54 PM...

Страница 2: ...the forms at the beginning of the Service warranty booklet For information about GM Holden s privacy policy or to update owner details online please visit Holden s website at www holden com au Note P...

Страница 3: ...tion 34 Using the Navigation System 34 Maps 37 Navigation Symbols 39 Destination 44 Configure Menu 55 Global Positioning System GPS 56 Vehicle Positioning 57 Problems with Route Guidance 57 If the Sys...

Страница 4: ......

Страница 5: ...NSW instead of ACT as the State Province Overview Read this manual thoroughly to become familiar with how the navigation system operates All functions are available when the vehicle is parked Before...

Страница 6: ...r the current conditions When the navigation system is turned on a screen may appear with information that must be read and acknowledged before accessing some navigation features After acknowledging t...

Страница 7: ...Way Selector Arrows C Radio Preset Buttons 1 6 D NAV Navigation E REC Record F CONFIG Configuration G CLOCK H TONE I INFO Information J AS Autostore K BACK L FAV Favourite M O Power Volume N g Seek Re...

Страница 8: ...ard V X Eject W MENU NAV Navigation Menu The Navigation menu screen accesses the navigation system settings 1 Press the NAV button to view the navigation map screen The map and current vehicle locatio...

Страница 9: ...e navigation system can record and store destinations and personal information such as names and addresses At times such as when selling or disposing of your vehicle you may want to delete this inform...

Страница 10: ...o delete an incorrect character A list displays if four or fewer names are available If there are more than four there is a match counter with a number of available streets Press the List button to vi...

Страница 11: ...Preset Destinations 1 Press O to turn the system on 2 A Caution could appear Select OK to proceed 3 Press the DEST button 4 Enter a destination See Destination on page 44 for information on how to en...

Страница 12: ...dance 3 Press Yes to confirm cancellation Voice Guidance To adjust the volume of voice guidance prompts 1 Press the CONFIG button to enter the menu options Turn MENU until Nav displays Press MENU knob...

Страница 13: ...VD HDD AUX Press this button until the desired source is selected If the audio system is on and a map screen is being viewed a touch sensitive source indicator tab appears at the top of the map screen...

Страница 14: ...To adjust the speaker balance using the Sound menu Press and hold the left arrow for more sound from the left speakers or the right arrow for more sound from the right speakers The middle position bal...

Страница 15: ...s feature works best at lower volume settings where background noise is typically louder than the sound system volume Number of Radio Favourite Pages Change the number of mixed band preset pages when...

Страница 16: ...list display on the touch sensitive preset buttons at the bottom of the screen The number of preset FAV lists can be changed To store a radio station to a mixed band preset list 1 Press the BAND butt...

Страница 17: ...e buffer when the vehicle is turned off or the station or source is changed Before turning the vehicle off press the k button to keep timeshift recording for 20 minutes If the vehicle is still off aft...

Страница 18: ...se scratched or damaged discs Do not apply labels to discs The labels could get caught in the player Insert only one disc at a time Keep the loading slot free of foreign materials liquids and debris I...

Страница 19: ...g Seek Reverse Seeks to the beginning of the current or previous track If the track has been playing for less than five seconds it seeks the previous track If longer than five seconds the current trac...

Страница 20: ...ox After the DVD is loaded the menu options display on the DVD screen The menu options time out and a full screen appears after about 10 seconds Press the FAV DVD HDD AUX or BACK button to view the me...

Страница 21: ...s played longer than five seconds the current chapter is restarted More than one press continues moving back through the disc 2 Press and hold to fast reverse through a disc When fast reverse is activ...

Страница 22: ...1 Press while a DVD is playing to view with subtitles on or off or to change the language of the subtitles 2 Continue pressing to cycle through the available subtitle languages and to turn subtitles...

Страница 23: ...20 kbps Maximum number of folders is 255 with a maximum hierarchy of eight folders Maximum of 1024 files on a disc Recorded on a CD R or CD RW with a maximum capacity of 700 MB DVD Dual Layer discs sh...

Страница 24: ...sed time displays MENU Turn the knob to display the track list for the current mode folder Press to select the track from the list The system plays the selected track and returns to the CD screen Disc...

Страница 25: ...d it begins to play Songs are displayed in alphabetical order based on the Song Title ID3 tag if available Root Directory The root directory is treated as a folder All files contained directly under t...

Страница 26: ...e otherwise the system might partially record the track To select the hard drive audio source Press DVD HDD AUX cycle through the available audio source until the HDD source displays or DVD HDD AUX on...

Страница 27: ...een displays 2 Press the USB Menu button or press MENU while on the USB audio screen to display the USB Menu Select a song for recording 3 Press REC 4 A confirmation displays 5 Select the song name to...

Страница 28: ...track If the track has been playing for less than five seconds the previous track plays If longer than five seconds the current track restarts 2 Press and hold this button to reverse quickly through...

Страница 29: ...ht be delays to build the list until all the files are compressed Playlists 1 Press to view the playlists on the hard drive 2 Select a playlist to view a list of all songs in the playlist 3 Select a s...

Страница 30: ...um or Genre to a FAV category preset Press FAV until the correct FAV category appears Press and hold a preset button Playing HDD Favourites Favourites can be played two different ways Press FAV until...

Страница 31: ...resume play of the current media source l Seek Forward 1 Press to seek to the next track 2 Press and hold to advance quickly through playback Release the button to return to playing speed Elapsed tim...

Страница 32: ...Select an artist to view a list of all songs by the artist 3 Select a song from the list Once selected Artist Mode displays Album 1 Press to view the albums stored on the USB 2 Select an album to vie...

Страница 33: ...ed using the latest iTunes application For more information visit www apple com itunes Recording from the iPod to the HDD is not supported Media must be recorded using a USB mass storage device To con...

Страница 34: ...w a list of all songs in the playlist 3 Select a song from the list Once selected Playlist Mode displays Artist 1 Press to view the artists that have been stored on the iPod 2 Select an artist to view...

Страница 35: ...iary audio sources include Laptop computer MP3 player Tape player This jack is not an audio output Do not plug headphones into the auxiliary input jack Drivers are encouraged to set up any auxiliary d...

Страница 36: ...ows to navigate through the menus Preset Button 1 6 The preset buttons numbered one to 6 can be used to select the screen buttons on the display DEST Destination Press to plan a route through the Sele...

Страница 37: ...on the screen Press to select Accent Alphabet To select letters with accent symbols A Z Alphabet To select letters from the alphabet Symbols To select symbols U Space To enter a space between characte...

Страница 38: ...route guidance Enable or disable voice route guidance A checkmark indicates on Voice recognition Feedback Turn the voice recognition feedback on or off A checkmark indicates on Route Criteria Press Ro...

Страница 39: ...cons on the map or lists the five nearest petrol stations Off Road Mode When selected the off road feature is on See Tracking earlier in this section Show 3D Landmark When selected 3D landmarks displa...

Страница 40: ...f the map screen to change the zoom level The map scale bar times out if the zoom level is not changed within a few seconds The scale ranges from 50 m 50 yd to 400 km 250 mi To change from English to...

Страница 41: ...edge of the screen Press NAV to exit map scrolling and return to the current vehicle location on the map While scrolling the map this symbol can display the distance to the crosshair area For example...

Страница 42: ...map view is North up North up displays North at the top of the map screen regardless of the direction the vehicle is travelling Select this symbol to change the view to Heading up or 3 D This symbol i...

Страница 43: ...t hand side of the screen Press this symbol or MENU to access the screen menu Driving on a Route While driving on a route the next manoeuvre the map screen displays is either as an urgent manoeuvre or...

Страница 44: ...en driving on a residential road or is greater than 1 5 km 2 mi when driving on a highway Options Available on the Map Screen While on route several options are available while viewing the map screen...

Страница 45: ...he Address Book Show POI Select to view POI information nearby and on route 1 When the screen displays the full map press the MENU knob or select the Menu symbol The map menu on the left side will sho...

Страница 46: ...o enter New South Wales NSW instead of ACT as the State Province City Enter a city name Street name Enter a street name House number Enter a valid address number Crossroad Enter a street name that int...

Страница 47: ...started Entering the street name first 1 Press the DEST button 2 If necessary enter the state province name The last state province name is automatically recalled 3 Select the street name field Enter...

Страница 48: ...with a number of available POI names Select the List screen button to view the list 4 Select the POI name from the list 5 Press Start on the confirmation screen if the information is correct 6 Select...

Страница 49: ...The route is calculated 7 Select the route preference for Fastest Shortest or Easiest The chosen route preference highlights 8 Select the Start screen button and the route is ready to be started Last...

Страница 50: ...siest The chosen route preference highlights 6 Select the Start screen button and the route is ready to be started Pick From Map Select a destination by scrolling on the map 1 Press the DEST button 2...

Страница 51: ...Select the Start screen button and the route is ready to be started Preset Destination Set a destination by selecting from one of six previously stored destinations If a destination is not set for on...

Страница 52: ...e to change the volume of voice prompts and voice recognition Select Voice route guidance to turn voice prompts on or off Select Voice recognition feedback to turn confirmation feedback on or off See...

Страница 53: ...re waypoints press the DEST button Select Add waypoint Add the waypoint in the order desired on the route The route calculates 5 Select the route preference for Fastest Shortest or Easiest The chosen...

Страница 54: ...destination These buttons display once the reverse forward scroll button has been selected j Pause Pauses the route preview while in reverse fast reverse forward or fast forward scroll Suspend Resume...

Страница 55: ...e Last Destination menu select the destination to save Select the Save screen button to save this location to the Address book Change Icon To change the map icon of an address book entry 1 Press the D...

Страница 56: ...ess Book A list displays the address book entries 3 Select the address book entry to be deleted 4 Press Delete A confirmation message displays Add Preset Destination To add a preset destination to the...

Страница 57: ...te route 1 Select the Delete Favourite route option The confirmation screen displays 2 Press Yes to delete the route and No to cancel deleting the route Configure Menu Adjust features and preferences...

Страница 58: ...te signals various vehicle signals and map data At times other interference such as the satellite condition road configuration condition of the vehicle and or other circumstances can interfere with th...

Страница 59: ...parking garage The GPS signal is not received Tyre chains have been installed The tyres are replaced or worn The tyre pressure is incorrect The first navigation use after the map data is updated The...

Страница 60: ...vehicle is the most up to date information available when the vehicle was produced The map data is updated periodically provided that the map information has changed For questions about the operation...

Страница 61: ...ive the system displays a g symbol 2 Clearly speak one of the commands listed later in this section Cancelling Voice Recognition 1 Press and release the i steering wheel button to cancel a command or...

Страница 62: ...elp Navigation Help for the user to choose from Radio help The system plays back helpful advice about radio commands and some common radio commands which are available Use this command to learn about...

Страница 63: ...and AM radio FM radio band FM These commands instruct the system to go to either the AM or FM radio bands Radio select frequency AM radio select frequency FM These commands instruct the system to go t...

Страница 64: ...re Navigation show petrol station s navigation hide petrol station s These commands instruct the system to display and hide petrol station POIs on the map screen Navigation show restaurant s navigatio...

Страница 65: ...Navigation go to voice tag This command allows selection of a destination saved under the stored voice tag The system plays back the voice tag and asks to confirm by saying yes or no If a destination...

Страница 66: ...nother command No used in conjunction with another command Destination used for Destination VR entry available in English language only Voice Tag Commands Navigation go to Voice Tag Phone Bluetooth Ge...

Страница 67: ...mobile phone system can be operated optionally via voice control Telephone Connection The mobile phone system switches itself on and off via the ignition When the ignition is turned off you can turn t...

Страница 68: ...ogged on to the mobile phone system are in the device list A maximum of 5 mobile phones can be logged on to the mobile phone system at the same time Add Device Handsfree If a mobile phone is being con...

Страница 69: ...uction As soon as a connection via Bluetooth has been set up between your mobile phone and the Infotainment system you can also operate many functions of your mobile phone via the Infotainment system...

Страница 70: ...reloaded This process can take several minutes depending on the telephone model Selecting a Telephone Number from the Telephone Book Select Phone book In the displayed menu select the desired first l...

Страница 71: ...er the desired command Apart from this the voice control acknowledges important commands and will enquire if necessary In order that calls are made inside the vehicle do not lead to unintentional trig...

Страница 72: ...ailable in the current context are enumerated Cancel the voice control is deactivated Yes a suitable action is triggered depending on the context No a suitable action is triggered depending on the con...

Страница 73: ...one nine nine Voice output One one nine nine User Dial Voice output The number is being dialled Entering a Name By means of the command Call a telephone number is entered that has been stored in the t...

Страница 74: ...can be stored in the telephone book Voice tags are speaker dependent i e only the person who recorded a voice tag can open it To avoid the start of the recording of a saved name from being cut off a s...

Страница 75: ...ist of the mobile phone system Commands available Add Delete Help Cancel Example of a dialogue User Pair Voice output Do you want to add or delete a device User Add Voice output Using the pair functio...

Страница 76: ...are owned by the Bluetooth SIG Inc iPod is a registered trademark of Apple Inc DivX DivX Certified and associated logos are trademarks of DivX Inc and are used under license About DivX video DivX is...

Страница 77: ...Whereis Data contained in this software application or device on the terms and conditions contained in this Licence 1 2 The Licence commences when you click on the I Agree button at the end of these...

Страница 78: ...s information sourced from the Department of Treasury and Finance Geographic Data Victoria 4 ACCURACY OF DATA Sensis will use reasonable care and skill in providing the Whereis Data and will provide t...

Страница 79: ...ions applying to the Whereis Data where that failure is caused by events outside Sensis reasonable control such as abuse or misuse of the Whereis Data damage to the Whereis Data caused by faults in eq...

Страница 80: ...se If that is not reasonably practical you will need to either return the software application or device to your place of purchase or delete or destroy the Whereis Data Sensis may give you directions...

Страница 81: ...6 C Cancelling Guidance 10 Cancelling Voice Recognition 59 CD Eject 25 CD Menu 17 CD DVD Player 15 CD DVD Disc Commands 61 Cleaning the Display 10 Config Setup Menu 7 Configure Menu 55 Control Element...

Страница 82: ...ion Commands 62 Getting Started on the Route 50 Global Positioning System GPS 56 H Hard Drive Device HDD 24 Helpful Hints for Speaking Commands 59 I Installing the DVD Map Disc 37 Introduction 3 L Lan...

Страница 83: ...CD DVD 16 Playing an Audio and Video DVD 18 Playing an Audio CD 17 Playing an MP3 CD and DVD 21 Playing from an iPod 31 Playing from USB 29 Playing Hard Disc Drive Content 26 Playing HDD Favourites 28...

Страница 84: ...65 Telephone Operation 67 Timeshift 15 Touch Screen Buttons 35 U Updates Map Data 58 USB Host Support 28 USB Menu 30 USB Supported Devices 28 Using the Stored Preset Destinations 10 Using Voice Recog...

Отзывы: