HOBO MX CO
2
Data Logger (MX1102A) Manual
Logger Components and Operation
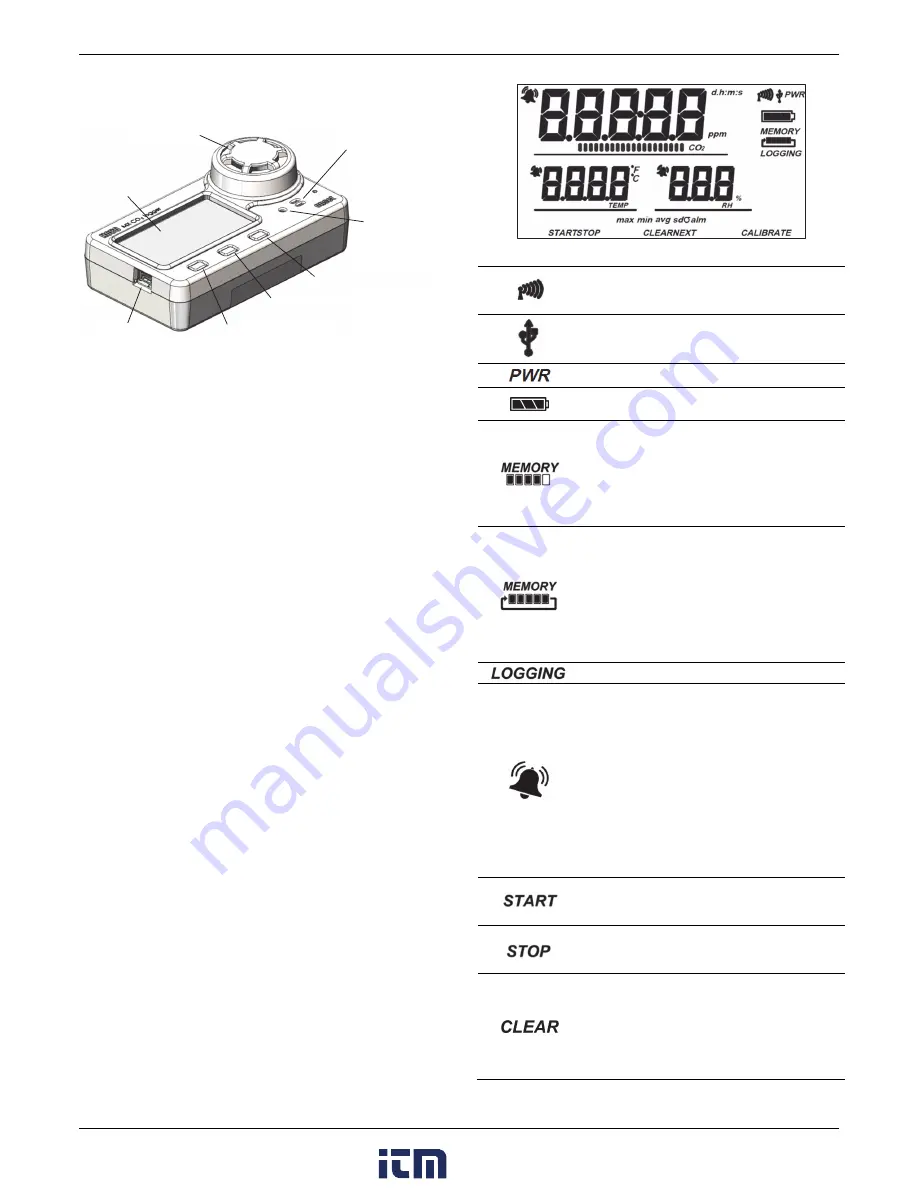
USB Port:
Use this port to connect the logger to a computer for
use with HOBOware or to power the logger for longer
deployments or if faster logging intervals are required.
Start/Stop Button:
Press this button for 3 seconds to start or
stop logging data, or to resume logging on the next even
logging interval. This requires configuring the logger with a
push button start or stop (see
Choosing Logger Settings
). You
can also press this button for 1 second to record an internal
event (see
Logger Events
), to silence a beeping alarm (see
Setting up Alarms
),
or to turn the LCD screen on if the option to
turn off the LCD has been enabled (see
Choosing Logger
Settings
).
Press both the Start/Stop button and the Clear/Next button
simultaneously for 3 seconds to reset a logger password.
Clear/Next Button
: Press this button for 1 second to switch
between statistics, alarm readings, and the current sensor
readings as applicable or to silence a beeping alarm. Press this
button for 3 seconds to clear a visual alarm if the logger was
configured to maintain the alarm until the button is pressed
(see
Setting up Alarms
).
Calibrate Button:
Press this button to start a five-minute
manual calibration process of the CO
2
sensor. This requires
configuring the logger with the manual calibration CO
2
sensor
setting enabled in the app or HOBOware and bringing the
logger into a fresh air environment (see
Calibrating the Logger
).
Temperature Sensor:
This sensor is located to the right of the
LCD screen below the large CO
2
sensor.
RH Sensor:
This sensor is located behind the vented panel in
the logger case to the right of the temperature sensor.
CO
2
Sensor:
This sensor is located below the large vented
circular panel to the right of the LCD screen.
LCD Screen:
This logger is equipped with an LCD screen that
displays details about the current status. The example shows all
symbols illuminated on the LCD screen followed by definitions
of each symbol in the table.
LCD Symbol
Description
The logger Is currently communicating with the
app via Bluetooth. The more bars there are, the
stronger the Bluetooth signal.
The logger is currently communicating with
HOBOware via USB cable.
The logger is currently being powered by USB cable.
The battery indicator shows the approximate
battery power remaining.
The logger has been configured to stop logging
when memory fills. The memory bar indicates the
approximate space remaining in the logger to
record data. When first started, all five segments
in the bar will be empty. In this example, the
logger memory is almost full (only one segment in
the memory bar is empty).
The logger has been configured to never stop
logging (wrapping). The logger will continue
recording data indefinitely, with newest data
overwriting the oldest data until the batteries die
or the logger is reconfigured. When first launched,
all five segments in the memory bar will be empty.
In this example, the memory is full (all five
segments are filled in) and new data is now
overwriting the oldest data.
The logger is currently logging.
A sensor reading is above or below the high or low
alarm limit that you configured. Press and release
the Clear/Next button until the “alm” symbol
(described later in this table) is displayed on the
screen. This symbol at left will clear depending on
how alarms were configured to be cleared in the
software. If the alarm was set to clear when the
logger is reconfigured or relaunched, this symbol
will remain on the LCD until the next time the
logger is configured (see
Setting up Alarms
).
Otherwise, it will clear when the sensor reading is
back within the alarm limits or by pressing the
Clear/Next button for 3 seconds.
The logger is waiting to be started. Press and hold
the Start/Stop button for 3 seconds to start the
logger.
The logger has been started with push button stop
enabled; press and hold the Start/Stop button for
3 seconds to stop the logger.
An alarm displayed on the LCD is ready to be
cleared. This will only appear if the logger was
configured to maintain the alarm until the
Clear/Next button is pressed (for 3 seconds). Note
that an audible alarm can be silenced by pressing
the Start/Stop button or Clear/Next button for 1
second.
Clear/Next Button
Start/Stop Button
CO
2
Sensor
LCD Screen
RH Sensor
Temperature
Sensor
Calibrate Button
USB Port
www.
.com
1.800.561.8187


