


HOBO MicroRX Station for HOBOnet (RX2105 and RX2106) Manual
1-800-LOGGERS
7
www.onsetcomp.com
b.
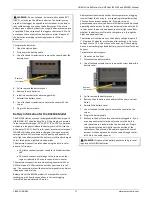
Install the batteries in the mote and press the button
on the mote for 3 seconds.
c.
Watch the mote LCD during the process of joining the
network.
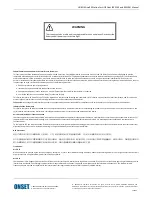
Note:
If the mote cannot find the network or has
trouble remaining connected during this process, make
sure the mote is in a vertical, upright position and
within range of the station.
d.
Repeat these steps to add other motes. Press the
Search button on the station when finished adding
motes.
6.
Configure the station in HOBOlink.
In HOBOlink, click Devices, then RX Devices and click the
icon next to your station. Use the configuration screens
in HOBOlink to finish setting up the station, starting with
General Configuration (the nickname, time zone, and
image for the station). Use the Next button to move from
one configuration screen to the next or use the left menu
to select a specific item to configure. Follow the steps in
the next subsections to configure the readout settings,
smart sensors (if applicable), and wireless sensors.
Note:
Click Save or Next in any screen to save your changes. You
will lose any changes made if you click Back without
clicking Next or Save first.
Readout Configuration
a.
Click Readout from the Configuration menu.
b.
Set the connection interval, which is how often the station
will connect to HOBOlink. The minimum connection
interval depends on your communication plan.
c.
If you wish to set up a second connection interval, select
the “Night mode” checkbox. Select when night mode
should begin and end and then enter the connection
interval you want to use during that part of the day.
(The night mode schedule can take effect any time
during the day; it does not have to be at night.) Use this
option to save data in your communications plan (if
applicable) or to conserve battery power at night when
solar charging is unavailable. You can view current plan
usage in the Device Information section on your
station’s page in HOBOlink.
d.
Click Save or click Next.
Smart Sensors Logging and Configuration
You can configure both the global settings that affect all
smart sensors (logging interval and sampling interval) and
the settings for each smart sensor (labels, graphs, and
scaling).
a.
Click Smart Sensors Logging from the Configuration
menu.
b.
Select the logging interval. This will be used by all
configured smart sensors.
c.
Enable the sampling interval and enter the rate to use in
minutes and seconds.
Or, you can choose a
specific item to configure
from this menu
Use the Next button to save
changes and move through each
configuration screen
This signal strength icon
blinks while searching for
a network.
Once a network is found,
the icon will stop flashing
and the bars will cycle from
left to right.
iii.
iv.
This network connection “x”
icon blinks while the mote
completes the registration
process, which may take up
to five minutes.
Once the mote has finished
joining the network, the “x”
icon is removed and the
channel count on the station
LCD increases by the number
of measurement channels
for the mote plus the
b
i.
ii.
Press this button
on the mote for
3 seconds