


IMPORTANT! The f o l l o w i n g t w o steps are critical in the assembly
of this kit. If they a r e not done correctly, wing failure could result Be
sure to use plenty of slow cure (30 min) epoxy
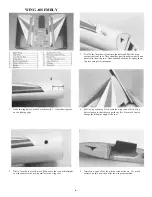
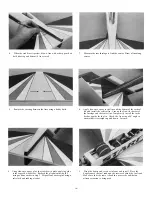
6 Check the w i n g j o i n e r to find the angled sides Place the joiner on
a flat surface and rock until you have identified the two angled
sides The angled face side should point forward and the angled
narrow side should face d o w n for proper dihedral Using one of
the wing panels trial fit the wing joiner and check for proper
alignment Position the joiner so it w i l l be centered when the two
wing halves a r e joined together Once satisfied with the fit, glue
the joiner in place using slow cure epoxy Let cure
7 Trial fit the two halves together and line up the leading and
trailing edges Check for a good gap-free fit Sand if needed
Once satisfied, glue the two wing halves together using slow cure
epoxy You can tape the wing halves together to hold them tight
while the glue cures
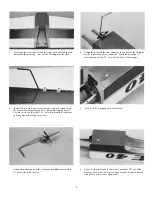
9 Install the wing center cover using Plastizap CA Glue Wipe
off any excess glue immediately Next on the f r o n t o f t h e
cover glue the wing pad on as shown using Plaslizap CA Glue
10 Install the six aileron hinges into the slots at the trailing edge of
the wing using epoxy Only a small amount of glue is needed
here Use too much and it will seep into the hinge causing it to
lock up You may wish to apply a small a m o u n t of vasiline to the
hinge joint to pr otect it against epoxy If any glue does set up into
the joint, remove it immediately using a soft cloth and r u b b i n g
alcohol.
8 Line up the reinforcement blocks as shown so that the sides angle
in Remove the wing covering underneath the blocks Next, glue
the blocks to the wing using epoxy
11 Apply epoxy to the contiol rods and in the control rod slots of the
ailerons Next put a small amount of epoxy onto the the hinges
and install both ailerons
5.


