Hobbico Sky Zap Скачать руководство пользователя страница 5

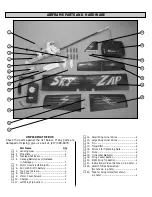
Note: There are three pieces to the main wing itself; the
center-section, the right wing tip panel, and the left
wing tip panel.

❏ 

1. Using the phillips screwdriver, supplied with the

airplane, remove the two 20mm phillips head screws
from the top wing cover located on the top of the fuselage.

❏ 

2. Turn the fuse over and remove the two motor covers

by removing the two small screws on the bottom of the
motor pod. Do not remove the motors. 

❏ ❏ 

3. Locate the right wing tip, the wing center-section,

a large wing joiner wire, and a small joiner wire as
shown in the above photo.

❏ ❏ 

4. Insert the large wing joiner wire into the front plastic

joiner insert and the small wing joiner wire in the
rearward plastic joiner insert. Make sure that the bends
in the two wires are inserted so that the ends point upwards.

❏ ❏ 

5. Carefully slide the outer wing panel onto both

the joiner wires, making sure that the wires remain in
the proper position and allowing the outer wing panel
to point upward.

❏ ❏ 

6. Using the clear tape included, apply it to the joint

of the wing tip, making sure that the joint remains
butted tightly in place against the center-section. Tape
both the top and bottom of the joint.

INSTALL THE MAIN WING

5

Содержание Sky Zap

Страница 1: ...modification In no case shall Hobbico s liability exceed the original cost of the purchased kit Further Hobbico reserves the right to change or modify this warranty without notice In that Hobbico has...

Страница 2: ...tions you will void your warranty 2 Test the operation of the model before each flight to insure that all equipment is operating properly and that the model remains structurally sound 3 Fly only on ca...

Страница 3: ...Fuselage 1 5 Motor Covers Left Right 2 6 600 mAh NiMH Battery 1 7 Top Cover Screws 2 8 Top Cover 1 9 Motor Cover Screws 2 10 Charger 1 11 Left Wing Tip Section 1 12 Small Wing Joiner Wires 2 13 Large...

Страница 4: ...horizontal stabilizer is the side with the decals applied 3 Place the mounting bolts of the assembly through the holes from the top of the tail of the fuselage as shown in the photo Make sure that th...

Страница 5: ...g joiner wire and a small joiner wire as shown in the above photo 4 Insert the large wing joiner wire into the front plastic joiner insert and the small wing joiner wire in the rearward plastic joiner...

Страница 6: ...r being sure not to overtighten them which could crush the wing 11 Note that the motor covers are marked Left and Right Make sure that they are installed correctly Place one of the motor covers into p...

Страница 7: ...easy access to the battery in order to remove it for recharging 1 The transmitter that controls your airplane requires power in the form of eight AA batteries To install the batteries just turn over...

Страница 8: ...ck you may have to disconnect the battery early 6 Always disconnect the charger from the 12 volt power outlet in your vehicle when finished charging 7 After each flight remove the battery pack from th...

Страница 9: ...lanced will be unstable and possibly unflyable 1 After the battery pack is charged remove the battery hatch cover canopy Insert the battery pack inside the fuselage Do not plug the battery pack into t...

Страница 10: ...tors will run When flying with the motors running the plane should climb at a 20 to 30 degree angle Release the left stick and both motors will stop In flight the SKY ZAP will start to glide and slowl...

Страница 11: ...your airplane into the air 1 Have an assistant help with the launch Move the throttle stick forward so that the motors are running Have your assistant launch the plane into the wind It is not necessa...

Страница 12: ...arts are available only as listed Replacement parts are not available from Product Support but can be purchased from hobby shops or mail order Internet order firms If you need assistance locating a de...

Отзывы: