


❏
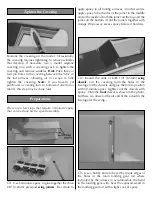
8. Peel the covering from the stab. Remove any
ink left on the stab with one of the small paper towel
squares you cut earlier, moistened with denatured
alcohol. Also remove any ink around the slot for the
stab that may be on the fuselage.
❏
9. Mount the wing to the fuselage with a couple
of #64 rubber bands. Slide the stab back into the
fuselage. Stand eight to ten feet behind the model
and observe the alignment between the stab and
wing. If the stab does not align with the wing, place
a small weight on the “high side” of the stab to bring
it into alignment. If weight is not enough to tilt the
stab to one side, remove the stab from the fuselage.
Carefully
sand the slot in the fuselage as necessary
to get the stab to align with the wing.
❏
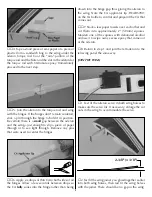
10.
Thoroughly
coat the slot in the fuselage for the
stab and the stab where it contacts the fuselage with
30-minute epoxy. Working quickly, slide the stab
into position. Wipe off any epoxy deposited on the
stab. Use the pin and string to be certain the stab is
in alignment. Use a small clamp to hold the stab in
position until the epoxy hardens.
❏
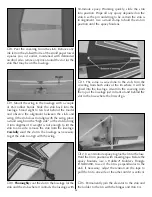
11. The same as was done to the stab, trim the
covering from both sides of the fin where it will be
glued into the fuselage. Also trim the covering from
the top of the fuselage just in front of and behind the
slot in the fuse where the fin will go.
❏
12. Use 30-minute epoxy to glue the fin to the fuse.
Hold the fin in position with masking tape. Before the
epoxy hardens, use a Hobbico
®
Builder's Triangle
(HCAR0480) to see if the fin is perpendicular to the
stab. If necessary, adjust the tension on the tape to
pull the fin to one side or the other until it is vertical.
❏
13. Permanently join the elevator to the stab and
the rudder to the fin with the hinges and thin CA.
12


