


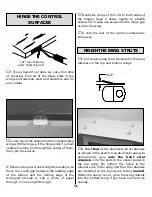


pushrod so the elevator is centered when the
servo arm is centered.
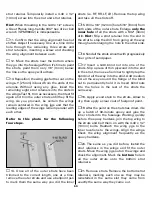
Refer to this photo for the following
three steps.
❏
6. Cut the other elevator pushrod about 1"
short of the servo arm. Slip two 5/32" [4mm]
wheel collars with two 6-32 x 1/4" [6.4mm]
screws over the pushrods. Connect the pushrod
already bent to the servo arm with a FasLink.
Drill 1/16" [1.6mm] holes into the servo tray for
the servo mounting screws, run the screws in
and out a few times and add a few drops of thin
CA to the holes. Allow the CA to fully harden,
then mount the elevator servo with the screws.
❏
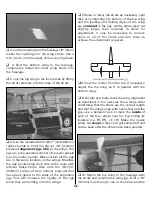
7. With the servo arm and the elevator that is
connected to the servo arm centered, center the
other elevator, then tighten the screw on one of
the wheel collars to lock the pushrods together.
Remove the screw from the other wheel collar,
add a drop of threadlocker to the threads, then
insert the screw into the wheel collar and
tighten. Remove the other screw, add threadlocker,
reinsert and tighten.
❏
8. Connect the rudder pushrod to the rudder
servo by making a 90° bend in the pushrod and
fastening it to the servo arm with a FasLink.
Mount the rudder servo to the servo tray the
same as was done for the elevator servo.
❏
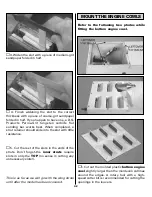
9. Cut a small hole in the bottom of the top
wing near one of the
aft
strut retainers. Use a
small piece of wire with a hook bent on the end
to “fish out” the end of the “Y” connector
previously installed in the wing.
❏
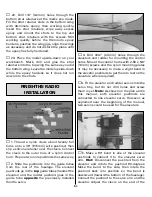
10. Cut a small hole through the fuselage
near the bottom of the aft wing strut that is on
the same side as the hole just cut in the wing.
Route the end of a “Y” connector that connects
to a servo out of the hole for connecting to the
servo wire coming from the wing.
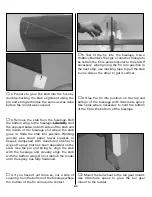
Suggestion:
Roughen one side of the plug so glue will
adhere, then use epoxy to glue the plug to the
inside of the strut. Secure the servo wire to the
strut with tape. This will make it easy to connect
the servo wire coming out of the wing.
52
Содержание Dynaflite S.E.5a
Страница 9: ...9 Die Drawing...
Страница 10: ...10 Die Drawing...


