background image

19

REMO

TE CONTR

OL

How to Use the Remote to Control your TV

Closed Captioning will display automatically when MUTE is on 

and Closed Caption is set to With Mute (see page 36).

When the TV power is turned off at a volume level 21 or greater, 

the volume level will default to 20 when the TV is turned on. 

However, if it is set to a level 20 or less, the volume level will 

be at the level it was set when the TV is turned off.

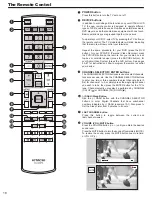
MENU button

The MENU button will start the On-Screen Display.

EXIT button

This button will exit all On-Screen Displays.

CURSOR Pad /SELECT button

All  the  On-Screen  Display  features  can  be  set  or  adjusted 

by using the CURSOR Pad and the SELECT button, except 

for numeric entries. Press the CURSOR Pad toward desired 

direction and press the SELECT button to select.

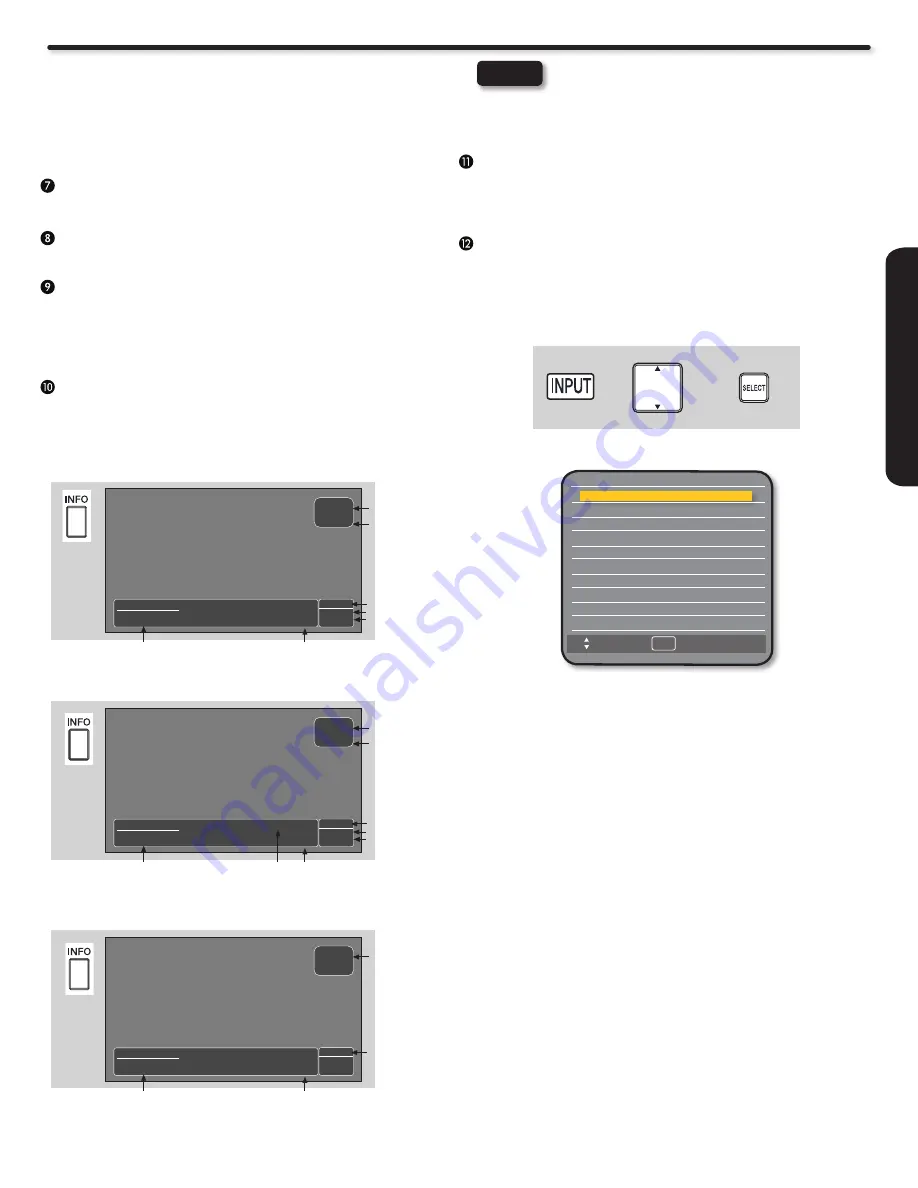
INFO button

Press this button when you want to check the channel being 

received, the picture source, if the channel has stereo (ST) or 

second audio program (SAP), the time, and CHANNEL ID.

Press the INFO button again or the EXIT button to 

• 

return to normal viewing.

The Aspect INFO will not be shown when the INFO 

• 

key is pressed.

NOTES

GUIDE button

Press  this  button  to  access  the  Channel  Guide  of  your  Satellte 

receiver, Set Top Box or Cable Box while in SAT/CBL mode.

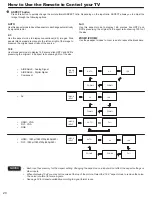
INPUT button

Press this button to access the INPUTS menu. Use the CURSOR 

and SELECT buttons to scroll and select the inputs that are being 

used. Pressing the INPUT button repeatedly will also cycle through 

the Inputs menu items. Then press the SELECT button  or wait 4 

seconds to automatically select the highlighted input.

0. TV                  Watch TV from an Air or Cable signal.

1. AV1                Select to choose AV1 Input

2. AV2                Select to choose AV2 Input.

3. Component1  Select to choose Component Input 1.

4. Component2  Select to choose Component Input 2.

5. RGB               Select to choose PC input.

6. HDMI 1           Select to choose HDMI 1 Input.

7. HDMI 2           Select to choose HDMI 2 Input.

8. HDMI 3           Select to choose Side HDMI 3 Input.

9. HDMI 4           Select to choose Side HDMI 4 Input.

ANALOG CHANNELS

Analog Channel

Main Picture Source

& Channel Indication

Broadcast Channel

Indication

Broadcast Rating

Audio Broadcast 

ATV 

Program Information

39-0

NBC

3:17PM

SAP

TV-G

Analog

Clock

No Program Title.

No Program Description.

INFO

DIGITAL CHANNELS

Picture Format

Main Picture Source

& Channel Indication

Broadcast Channel

Indication

Broadcast Rating

Audio Broadcast 

DTV 

Program Information

15-1

KPBS-HD

3:17PM

Multi

TV-G

1080i

Clock

Sesame Street

Program Description.

3:00PM-   3:30PM

Program 

Run Time

INFO

VIDEO INPUTS

Picture Format

Main Picture Source

Program Information

HDMI

3:17PM

1080i

Clock

No Program Title.

No Program Description.

INFO

Input List

Move             Select

SEL

0. TV 

1. AV1

2. AV2

3. Component1

4. Component2

5. RGB

6. HDMI 1

7. HDMI 2

8. HDMI 3

9. HDMI 4

0. TV

Input List

+

+

Содержание UltraVision L42S503

Страница 1: ...evision for future reference MODEL NAME ____________________ SERIAL NO ________________________ This information is located on the back and right side of the television IMPORTANT SAFETY INSTRUCTIONS 2 5 FIRST TIME USE 6 17 THE REMOTE CONTROL 18 27 ON SCREEN DISPLAY 28 40 USEFUL INFORMATION 41 46 LIMITED WARRANTY 47 END USER LICENSE AGREEMENT FOR HITACHI DTV SOFTWARE 48 52 APPENDIXES 53 INDEX 54 Ul...

Страница 2: ...2 by the manufacturer or sold with the apparatus When a cart is used use caution when moving the cart apparatus combination to avoid injury from tip over Unplug this apparatus during lightning storms 13 or when unused for long periods of time Refer all servicing to qualified service personnel Servicing 14 is required when the apparatus has been damaged in any way such as power supply cord or plug ...

Страница 3: ... user is encouraged to try to correct the interference by one or more of the following measures Reorient or relocate the receiving antenna Increase the separation between the equipment and the receiver Connect the equipment into an outlet on a circuit different from that to which the receiver is connected Consult the dealer or an experienced radio television technician for help This device complie...

Страница 4: ...on furniture that can easily be used as steps such as a chest of drawers Remember that children can become excited while watching a program especially on a larger than life flat panel display Care should be taken to place or install the display where it cannot be pushed pulled over or knocked down Care should be taken to route all cords and cables connected to the flat panel display so that they c...

Страница 5: ...moke and bad odor coming from the TV Do not open the TV cabinet Avoid direct sunlight dusty high humidity and smokey locations Don t throw any objects inside the TV like metals coins or any other flammable materials Remember to unplug the AC cord from the AC outlet before cleaning Do not use liquid cleaners or aerosol cleaners to clean the display Don t place the TV in confined spaces or inside a ...

Страница 6: ...artment Close the battery cover m 5 aking sure the tabs rest in the corresponding holes and push down the cover until it clicks shut AAA Size Batteries 2 Power Cord Remote Control Unit CLU 4997S Part No HL02567 Do not insert batteries with and polarities reversed as this may cause the batteries to swell or rupture resulting in leakage Never mix used and new batteries in the device Replace all the ...

Страница 7: ...unit face down on a soft and flat surface 1 covered by a blanket foam cloth etc to prevent any damage or scratches to the LCD TV Carefully align and insert the Base to the TV stand post 2 Insert the screws included with the accessories to the 3 bottom of the base and tighten the base to the stand Caution when moving the main unit As this product is heavy whenever it is moved at least two people ar...

Страница 8: ...crews A that were in the TV for the Table Top Stand The original screws are not long enough to properly secure the TV to the wall bracket Wall Mount Brackets The screw type Thread ISO M6 Metric type do not use Standard type For Wall Mount assembly please refer to the Installation Manual of the Wall Mount Unit Insertion length B of the screws must be within 8 5 10 5 mm If the length is less than 8 ...

Страница 9: ...V features to your preference without using the remote This button also serves as the Return button when in the MENU system INPUT button Press this button to access the INPUT menu VOLUME level Press these buttons to adjust the sound level The volume level will be displayed on the TV screen These buttons also serve as the cursor left and right buttons when in the Menu system CHANNEL selector Press ...

Страница 10: ...V signals remain in digital format HDMI assures that pristine high definition images retain the highest video quality from the source all the way to your television screen Use the HDMI input for your AV equipment such as Set Top Boxes or DVD players equipped with an HDMI output connection NOTE NOTES RGB RGB 7 6 HDMI the HDMI logo and High Definition Multimedia Interface are trademarks or registere...

Страница 11: ...the OSD menu Cursor PAD Select Buttons TV DVD PVR VCR SAT CBL AVR The Cursor PAD is used to navigate through the OSD and INPUT menu system The Select button is used to Set Activate highlighted menu items Input TV AVR Press this button to change input Energy Save Button TV Press this button to set Power Consumption reduction based on three levels Min Med Max CONTROL BUTTONS SAT CBL DVD PVR VCR AVR ...

Страница 12: ...Antenna To Antenna Terminal When both VHF and UHF antennas are connected c Connecting a 300 Ohm twin lead connector may cause interference Using a 75 Ohm coaxial cable is recommended NOTE Rear Panel Jack Connect the power cord to your TV set and a secure it with the AC Wire Clamp see page 7 Connect the power cord to the AC wall outlet b Attach an optional antenna cable mixer to the TV antenna term...

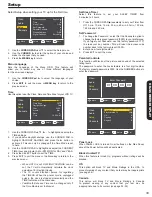
Страница 13: ...nnels available in your area Please follow the instructions below The First time you turn on your Hitachi LCD TV the setup wizard screen will appear The first step is to set the language of your TV On Screen Menu Select the language that you prefer Use the p and q CURSOR to select language and press the SELECT button on the remote control The second and third steps are to set the date and time The...

Страница 14: ...or monaural devices please connect Audio signal cable into L Mono input jack Move Select SEL 0 TV 1 AV1 2 AV2 3 Component1 4 Component2 5 RGB 6 HDMI 1 7 HDMI 2 8 HDMI 3 9 HDMI 4 0 TV Input List OR COMPOSITE VIDEO or S VIDEO OUTPUT CAPABILITY R Red L White VIDEO Yellow R Red L White VIDEO Yellow OUTPUT VIDEO L R SIDE INPUT PANEL DVD player VCR Home video game system Camcorder L White R Red L White ...

Страница 15: ...uld be less than 5 meters Completely insert all connection cord plugs when connecting to rear panel jacks The picture and sound that is played back will be abnormal if the connection is loose Cable plugs are often color coded Match colors of plugs and terminals i e connect red to red white to white etc NOTES RGB RGB RGB Outside antenna or Cable TV coaxial cable 2 Way signal splitter HDMI to HDMI H...

Страница 16: ...r license from Dolby Laboratories Dolby and the double D symbol are trademarks of Dolby Laboratories Fabriqué sous licence de Dolby Laboratories Le terme Dolby et le sigle double D sont des marques commerciales de Dolby Laboratories TruSurround HD SRS and symbol are trademarks of SRS Labs Inc CONNECTING A VIDEO AND MONAURAL AUDIO SOURCE TO AV1 Connect the VIDEO and AUDIO cable from the VIDEO and 1...

Страница 17: ...e audio level of the LCD TV to an external audio amplifier connect the system as shown on the right The OPTICAL OUT and AUDIO OUT from the Rear Panel is a fixed output The Volume of the amplifier is controlled by the amplifier not by the LCD Television The OPTICAL OUT terminal outputs all audio sources to equipment with Optical IN capability Connect an optical cable from the OPTICAL OUT to the 1 O...

Страница 18: ...See pages 22 27 for instructions on how to program the remote to control your device CHANNEL SELECTOR ENTER buttons TheCHANNELSELECTORbuttonsareusedtoselectchannels lock access code etc Use the CHANNEL SELECTOR buttons to enter one two or three numbers to select channels Enter 0 first for channels 1 to 9 or simply press the single digit channel you wish to tune then press the ENTER button for the ...

Страница 19: ...cess the INPUTS menu Use the CURSOR and SELECT buttons to scroll and select the inputs that are being used Pressing the INPUT button repeatedly will also cycle through the Inputs menu items Then press the SELECT button or wait 4 seconds to automatically select the highlighted input 0 TV Watch TV from an Air or Cable signal 1 AV1 Select to choose AV1 Input 2 AV2 Select to choose AV2 Input 3 Compone...

Страница 20: ... the black bars ASPECT button Press this button to quickly change the picture format ASPECT ratio Depending on the input ratio ASPECT allows you to adjust the image through the following options Each input has memory for the Aspect setting Changing the aspect on one input will not affect the aspect settings on other inputs When displaying Full you may notice noise at the top of the picture Select ...

Страница 21: ...nd contrast adjustment Select Standard for day time viewing with more brightness and contrast to compete with room light Select Movie for viewing with less brightness and contrast for a more detailed picture Select Custom for viewing with your own brightness and contrast picture settings Game for automatic brightness and contrast adjustment when playing video games see page 30 for settings changes...

Страница 22: ...AT CBL or AVR 222 by pressing the corresponding button Hold down the device button DVD PVR VCR SAT CBL or 333 AVR on the remote and enter the four digit preset code that matches your device as shown on pages 26 27 Release the device button 444 If done correctly the device LED indicator will blink 3 times to 555 confirm proper setup The remote will now control the desired device 666 SETUP EXAMPLE H...

Страница 23: ...ons These buttons are for operating the TV P Mode CC Input Aspect Vol Up Down Mute E Save NOTE PRECODED CABLE BOX buttons These buttons transmit the chosen precoded cable codes Power Cursor Select Number PAD Menu Info Enter Exit Channel Up Down Dash Guide Last CH Fav CH Play Stop Pause RWD FWD Skip FWD Skip RWD Record Color Buttons EXCLUSIVE TV buttons These buttons are for operating the TV P Mode...

Страница 24: ...des Power Number PAD Play Stop Pause RWD FWD Skip FWD Skip FWD Menu Info Cursor Select Channel Up Down Exit Record Dash Enter Guide EXCLUSIVE TV buttons These buttons are for operating the TV P Mode CC Input Aspect Vol Up Down Mute E Save PRECODED VCR PVR buttons These buttons transmit the chosen precoded VCR PVR codes Power Cursor Select Enter Menu Channel Up Down Dash Exit Number PAD Play Pause ...

Страница 25: ...manual of the AVR for operation of the buttons exclusively for the AVR PRECODED AVR buttons These buttons transmit the chosen precoded AVR codes Power Cursor Select Vol Up Down Menu Channel Up Down Mute Exit Number PAD Play Pause Stop RWD Skip RWD FWD Skip FWD Input Record Enter EXCLUSIVE TV buttons These buttons are for operating the TV P Mode CC Aspect E Save Info NOTE ...

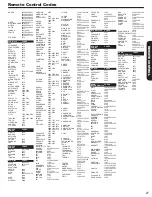
Страница 26: ...0032 EMERSON 0037 0184 0240 0000 0121 0043 0209 0002 0278 0479 1593 FISHER 0039 0047 0000 0104 0046 FUJI 0035 0033 FUJITSU 0000 FUNAI 0037 0000 0072 0278 1593 GARRARD 0000 GATEWAY 1972 GE 0060 0035 0048 0240 0000 0065 GEMINI 0060 GENEXXA 0037 0000 0278 GO VIDEO 0240 0432 0526 0614 GOLDSTAR 0035 0037 0039 0000 0278 0038 GOODMANS 0037 0081 0000 0072 0278 GRADIENTE 0000 GRANADA 0081 0042 GRUNDIG 0081...

Страница 27: ... 0872 1107 1265 ONKYO 0503 0627 1769 OPPO 0575 1224 1525 2185 OPTIMUS 0571 PALSONIC 0672 0852 PANASONIC 0503 0490 0571 0703 1641 1762 PHILCO 0675 PHILIPS 0503 0539 0646 0675 1267 1340 1354 2056 2084 PIANODISC 1024 PIONEER 0525 0571 0142 0631 1571 POLAROID 1020 1061 1086 POLK AUDIO 0539 PORTLAND 0770 PRESIDIAN 0675 PRIMA 2126 2127 PROCEED 0672 PROSCAN 0522 PROVISION 0778 RADIONETTE 0741 RADIOSHACK ...

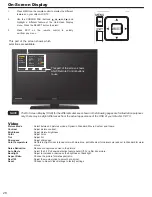
Страница 28: ...Adjust sharpness Set this to High for less intense color with more blue set to Medium for natural color and set to Standard for warm colors Reduces conspicuous noise in the picture Select the 3 2 Pull down detection feature Auto Off For a film like picture Adjust to increase or decrease the brightness of backlight Choose the picture format aspect ratio Adjust the movie motion to smooth or original...

Страница 29: ...appearance of the DIGITAL CAPTIONS Feature to display ANALOG dialogue text Select Power Consumption Savings options Feature to change the OSD Menu transparency Set to ON this feature will enable simplified operation of compatible HDMI CEC components Label Video Inputs VCR DVD etc Adjust the Phase and applies Reset to any adjustments made Adjust Horizontal Position Vertical Position Clock Phase and...

Страница 30: ...e dark areas of the picture Color Use this function to adjust the level of color in the picture Tint Use this function to adjust flesh tones so they appear natural Sharpness Use this function to adjust the amount of fine detail in the picture Color Temp Set this to High for cooler color with more blue set to Medium for a more natural color or set to Standard for accurate color Noise Reduction The ...

Страница 31: ...smooth motion effect Off Use this setting if there is noise with the High Medium or Low settings Please note that the effect may no be immediately noticeable and the effect depends on the content of the movie Video Video Audio Select SEL Channels Setup EXIT Exit Move Return Noise Reduction Auto Movie Color Temp Aspect Ratio Backlight Reel120 Motion Auto 30 Auto Mid High Reset Off Aspect Ratio refe...

Страница 32: ...ptical Output NOTE PCM Select this feature if the TV is connected to an amplifier receiver with a PCM only decoder it will provide two independent soundtrack channels through the optical audio output jack Digital Audio RAW Select this feature to allow the original audio bit stream to be passed through to the audio receiver Internal Speakers This function is useful when using external speakers Sele...

Страница 33: ... the 3 MENU key to return Menu Language Sets the Language of the Menu OSD This feature will allow you to select any one of three different languages for the on screen displays Use the 1 CURSOR Pad to select the language of your choice Press 2 EXIT to quit the menu or MENU key to return to the previous menu Time Use this option to set the Clock Date and Time Zone for your LCD TV Use the CURSOR PAD ...

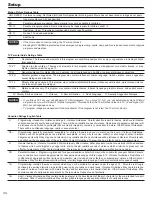
Страница 34: ...themes which could threaten children s sense of security and well being There will be no realistic scenes of violence Depictions of aggressive behavior will be infrequent and limited to portrayals that are clearly imaginary comedic or unrealistic in nature Other Content Guidelines There will be no offensive language nudity or sexual content C8 Programming generally considered acceptable for childr...

Страница 35: ...lts Contains constant violence or scenes of extreme violence Region 5 Alternate Ratings Example Only G General audiences All ages admitted PG Parental guidance suggested Some material may not be suitable for children PG 13 Parents strongly cautioned Some material may be inappropriate for children under 13 R Restricted Under 17 requires accompanying parent or adult guardian NC 17 No one 17 and unde...

Страница 36: ... such as news reports or a TV program guide This information covers the entire screen and viewing the TV program is not possible Text may not be available with every program Energy Options Use this feature to save energy when watching your Hitachi LCD TV Press the 1 CURSOR PAD or to highlight Energy Options Press the 2 CURSOR PAD to select your choice Picture Energy Saving This function allows you...

Страница 37: ...truction manuals for the device you are trying to control to confirm whether or not CEC is available Input Labels Use this feature to give a name to any of the nine video inputs excluding the TV input Press the 1 CURSOR PAD or to highlight the Inputs labels Press the 2 CURSOR PAD to select your choices The Input labels is Grayed out Skip or disabled until you are on the INPUT that you like to chan...

Страница 38: ...sts Horizontal Position Vertical Position Clock and Phase automatically Reset Each item in RGB Options Menu will be restored to the factory setting by selecting Yes Reset AV Setup This feature restores all Audio Video and Setup configuration that you have made on the TV and it will return to the factory settings Video Audio Select SEL Channels Energy Options Setup EXIT Exit Move Return HDMI CEC Tr...

Страница 39: ...l channels Use the CURSOR PAD to select the Add Channels to List 1 Press the SELECT button to start scanning 2 Press the EXIT button to return to normal viewing 3 Only the Channels that have not been added to the list will be stored Channel List This function allows you to review which channels have been added to the CHANNEL list Use the CURSOR PAD to navigate the Channel List 1 Press the SELECT o...

Страница 40: ...o digital only broadcasting Information about the DTV transition is available from your local television stations www DTV gov or 1 888 CALL FCC TTY 1 888 TELL FCC and www dtv2009 gov or 1 888 DTV 2009 TTY 1 877 530 2634 for information about subsidized coupons for digital to analog converter boxes Please review this Operating Guide for further information regarding such connections Hitachi support...

Страница 41: ...place the old batteries with two new AAA size batteries Do not use an old battery with a new battery Exposing the screen to direct sunlight for a long period of time or heat may cause damage to the LCD screen Troubles are sometimes caused by simple faults that you can correct without the help of a service technician If you experience any diffi culty with your TV check a few basic remedies before c...

Страница 42: ... the current signal status 11 20 53 No power Check the power cord is connected to the AC oulet 9 12 Turns Off by itself Check or ensure Sleep Timer settings are not activated 11 18 33 Turns On by itself Check if the HDMI CEC feature is activated 37 Picture may block or freeze when watching a digital channel Check signal strength under Signal Strength 39 HDMI Issues SYMPTOM CHECKLIST PAGES No pictu...

Страница 43: ...ss of contrast in the picture PREVENTION OF AN OBSTACLE TO RADIO RECEIVERS This television has been designed pursuant to the FCC class B Rules This is to prevent a problem to Radio receivers If this television causes a problem to Radio receivers then take the following steps Keep the television away from Radio Adjust Radio antennas in order for the television not to receive interference The antenn...

Страница 44: ...cations weights and dimensions are subject to change without prior notice Please access www hitachi us tv for detailed specifications and dimensions for custom installations Features New High Gloss Black Frame 4 HDMI V 1 3 with x v Color Deep Color CEC 1080p60 1080p24 Input Compatible New Multi Function Remote Control 120Hz 1080p Perfected Reel 120 Motion Correction Dynamic Standard Movie Custom G...

Страница 45: ... Screw specification Screw Length A Insertion length B Spring Washer C Plane Washer D Wall Mount Bracket E Example A B C D E A 13 5 15 5 mm B 8 5 10 5 mm C 1 mm D 1 mm E 3 mm LOCATION OF THE AC POWER CORD HOLE FOR WALL MOUNT 4 PLACES CENTER OF THE SCREEN ACTIVE AREA ACTIVE AREA 40 1015 40 36 3 4 933 50 25 13 16 655 10 20 23 32 526 20 22 11 20 572 90 25 13 16 655 10 3 3 4 95 60 4 3 4 121 11 11 280 5...

Страница 46: ...erte par la garantie sur le fonctionnement ou pour de l assistance technique communiquez avec Au Canada 800 HITACHI 800 448 2244 Lundi Vendredi 8 00 am 7 00 pm HNC Samedi 10 00 am 5 00 pm HNC Hitachi Home Electronics America Inc Customer Service Support PO Box 3900 Peoria IL 61612 U S A customerservice ce hhea hitachi com Canada customerservice ca hhea hitachi com Customer Record The MODEL NAME an...

Страница 47: ...ge MODEL NO SERIAL NO DEALER NAME DATE OF PURCHASE DEALER ADDRESS CITY STATE Warranty Limitations This Hitachi Limited Warranty does not cover A Any Product that has been modified or repaired in a manner not previously authorized by Hitachi in writing B Any Product whose serial number has been removed altered replaced defaced or rendered illegible C Any defect malfunction or failure caused by or r...

Страница 48: ...REE WITH ALL THE TERMS AND CONDITIONS OF THIS AGREEMENT OR ALL THE TERMS AND CONDITIONS OF ANY DIFFERENT OR SUPPLEMENTARY LICENSE THAT MAY ACCOMPANY SUCH UPGRADE A DO NOT USE ANY HITACHI PROVIDED FLASH CARD OR OTHER MEDIA B DO NOT PERFORM INSTALL ANY HITACHI PROVIDED UPGRADE SOFTWARE ON YOUR DTV AND C PROMPTLY RETURN SUCH FLASH CARD OR OTHER MEDIA TO HITACHI EXPORT RESTRICTIONS 5 HITACHI is licens...

Страница 49: ...ml http www libpng org pub png src libpng LICENSE txt zlib Zlib 1 1 3 www zlib net http www zlib net zlib_license html THESE SOFTWARE MODULES AND THE SOURCE CODE MODIFICATIONS THERETO ARE PROVIDED AS IS AND BOTH THE LICENSORS AND HITACHI DISCLAIM ANY AND ALL WARRANTIES OF ANY KIND INCLUDING THE IMPLIED WARRANTY OF MERCHANTABILITY AND OF FITNESS FOR A PARTICULAR PURPOSE See above links and the GNU ...

Страница 50: ...nditions stated below Sublicensing is not allowed section 10 makes it unnecessary 3 Protecting Users Legal Rights From Anti Circumvention Law No covered work shall be deemed part of an effective technological measure under any applicable law fulfilling obligations under article 11 of the WIPO copyright treaty adopted on 20 December 1996 or similar laws prohibiting or restricting circumvention of s...

Страница 51: ...thin the meaning of section 10 If the Program as you received it or any part of it contains a notice stating that it is governed by this License along with a term that is a further restriction you may remove that term If a license document contains a further restriction but permits relicensing or conveying under this License you may add to a covered work material governed by the terms of that lice...

Страница 52: ...fero General Public License Notwithstanding any other provision of this License you have permission to link or combine any covered work with a work licensed under version 3 of the GNU Affero General Public License into a single combined work and to convey the resulting work The terms of this License will continue to apply to the part which is the covered work but the special requirements of the GN...

Страница 53: ... 1080i 720p 480p 480i Yes Yes Yes Yes Yes Yes HDMI 1 HDMI DVI VGA Yes Yes 1080p 1080i 720p 480p 480i Yes Yes Yes Yes Yes Yes HDMI 2 HDMI VGA Yes Yes 1080p 1080i 720p 480p 480i Yes Yes Yes Yes Yes Yes HDMI 3 HDMI VGA Yes Yes 1080p 1080i 720p 480p 480i Yes Yes Yes Yes Yes Yes HDMI 4 HDMI VGA Yes Yes RGB Analog RGB Yes Yes Resolution Frequency Hz Resolution Frequency Hz 640x480 60 72 75 1280x1024 60 ...

Страница 54: ...nput Setup 37 L Language Menu Language 33 M Menu Preference Language 33 OSDTransparency 36 N Noise Reduction 30 P Parental Control Set Password 33 BlockUnratedChannel 33 Panel Lock 33 Movie Ratings 34 35 TV Ratings 34 35 TVRatings Canadian English 34 35 TVRatings Canadian French 34 35 Region 5 Downloadable VChip 34 35 Perfect Volume 32 Picture Mode 30 R Remote Control Functions 18 27 Installing Ba...

Страница 55: ...55 Notes ...

Страница 56: ...56 Notes ...

Отзывы: