


English
18
PRIOR TO OPERATION
1. Power
source
Ensure that the power source to be utilized conforms to the power requirements speci
fi
ed on
the product nameplate.
2. Power
switch
Ensure that the power switch is in the OFF position.
If the plug is connected to a receptacle while the power switch is in the ON position, the
power tool will start operating immediately, which could cause a serious accident.
3. Extension
cord
When the work area is removed from the power source, use an extension cord of su
ffi
cient
thickness and rated capacity. The extension cord should be kept as short as practicable.
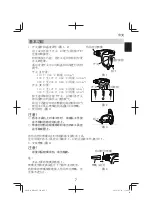
BASIC FUNCTIONS
1. Switch Operations and Temperature
Adjustments (
Fig. 1, 2
)
Press the switch upward or downward to enable
continual operations even when your
fi
nger is
removed.
Press the protrusion lightly to return the switch
to the central position and turn o
ff
the power.
The wind temperature and wind volume can be
adjusted in two stages depending on which way
the switch is set.
Switch [I] position:
110 V: 250°C (wind volume 0.25 m
3
)
120 V to 127 V: 350°C (wind volume 0.25 m
3
)
220 V to 240 V: 350°C (wind volume 0.25 m
3
)
Switch [II] position:
110 V to 127 V: 500°C (wind volume 0.5 m
3
)
220 V to 240 V: 600°C (wind volume 0.5 m
3
)
Press the quick cooling button and press the
switch to blow warm air at approximately 50
degrees Celsius for each of the switch’s wind
volumes.
This is used to quickly cool material that is heat-warping and to cool the nozzle when it
reaches high temperatures after using the tool.
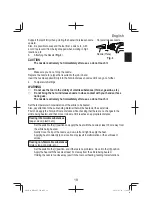
2. Using the Hook (
Fig. 3
)
CAUTION
○
When pointing the tool upward to work, make sure that
it is placed on a stable block that does not tilt.
○
Do not hang the tool from your wrist or waist when
moving around with the nozzle still hot.
Switch
Quick cooling button
Fig. 2
Switch
Quick cooling
button
Hot wind release nozzle
Hook
Fig. 1
Hook
Fig. 3
000Book̲RH600T̲ChS.indb 18
000Book̲RH600T̲ChS.indb 18
2016/07/19 13:49:42
2016/07/19 13:49:42


