


E-9
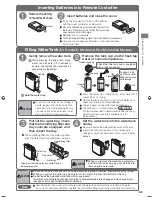
Inserting Batteries into Remote Controller
Remove the battery
compartment cover.
Insert batteries and close the cover.
Insert the provided two “AAA” R03 batteries
with the correct polarities as instructed.
Since the batteries are provided when shipped from
the factory, their lives may be shorter than brand-new
ones because of self-discharge.
Batteries are consumable
When replacing batteries, replace the two batteries simultaneously.
Only use two manganese batteries or two alkali batteries.
Do not mix them.
Cover
Pr
eparations for Operation
ᚻ೨
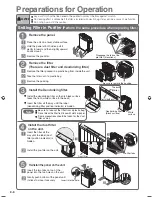
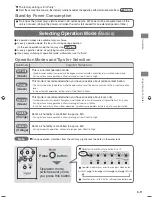
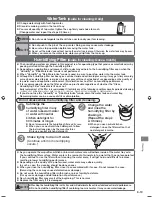
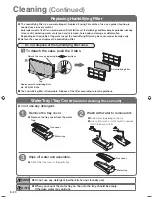
Filling Water Tank
(for Humidify Mode and Skin Moisturize Modes)
Gently remove the water tank.
Remove the tank cap and fill fresh tap
water of normal temperature.
CAUTION
Do not carry the water tank by holding its
handle. Instead, hold the tank with both
hands and carry it while keeping the tank
cap side up. When the water tank is wet,
wipe off water drops before carrying.
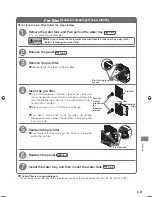
Press the center pin of the tank cap, and check that it
comes back by spring.
Tighten the tank cap firmly, wipe off spilt water, and
check that there is no water leakage.
Wipe off water on the water tank handle if any.
The tank cap is a consumable part.
P.E-28
(If it leaks water due to deteriorated rubber packing,
please purchase separately available part for
replacement.)
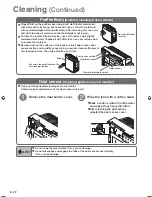
Pull out the water tray, check
that the humidifying filter and
tray cover are equipped, and
then retract the tray.
Set the water tank into the water tank
holder.
The humidifying filter absorbs water supplied
from the water tank for humidifying operation.
Be sure to handle the water-filled tank with both hands.
Press in the tank securely until it clicks. Inadequate
setting may cause the water tank to fall or result in water
leakage.
CAUTION
When you remove the water tank, water may
drip from the tank cap. Lay a dry cloth before
removing the water tank.
CAUTION
Do not set the water tank without having the water tray in place. Otherwise, the water tank may tip over.
When you pull out the water tray, be careful not to scratch the floor with bottom of the tray.
Do not leave the detached water tank with its cap closed.
Inner pressure of the tank changes according to ambient temperature change and may cause water
leakage or injury due to deformation or damage.
Note
Humidifying function works automatically when the water tank and water tray are filled with water.
If you do not need humidification, operate the unit without filling water in the water tank and water tray.
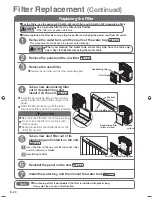
While pressing the upper part of the
water tank handle, lift it obliquely
upward, and remove the water tank by
supporting it in the bottom.
Hold the water tray.
Handle
Water tray
Humidifying filter
Water tray
Tray cover
Slowly pull out the water tray while lifting it
obliquely upward.
Check that the tank cap is equipped
with a rubber packing.
Rubber packing
Tighten
Do not push in the
pin in the cap center.
Doing so may cause
water leakage.
Loosen
Pin
Handle
T_S-EP-A6000.indd 9
T_S-EP-A6000.indd 9
11/18/2011 11:20:49 AM
11/18/2011 11:20:49 AM


