background image

140

E

nglis

h

QR34642

7

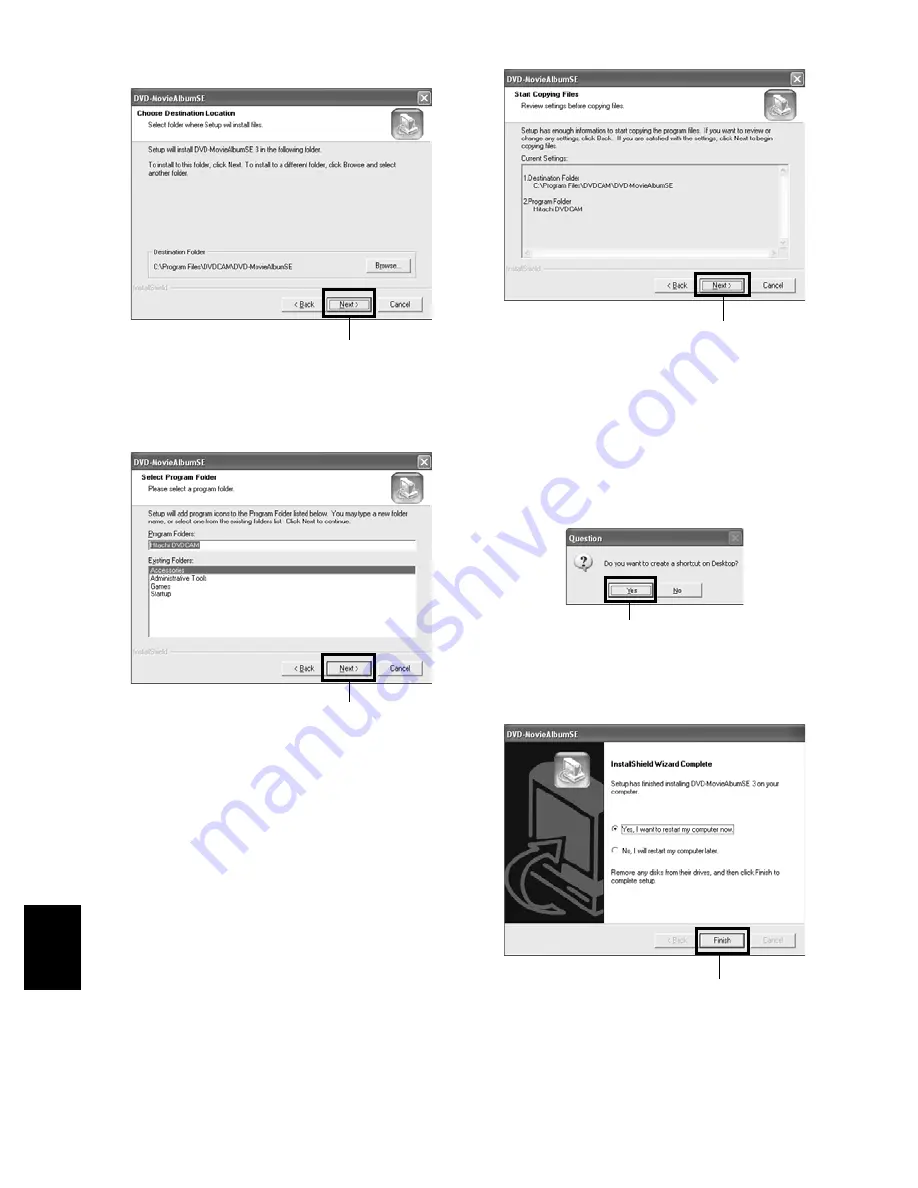
If you do not change the folder where the 
software is installed, click “Next”.

8

If you do not change the program folder name, 
click “Next”. 

9

Check the contents, and then click “Next”.

Installation will start.
Proceed with installation, following the 
instructions on screen.

10

A message for verifying whether a shortcut icon 
is to be created on desktop will appear:

If you want to create one, click “Yes”. If not , 
choose “No”.

11

Choose the restart option, and then click 
“Finish”.

Click

Click

Click

Click

Click

Содержание DZ-MV350A - Camcorder

Страница 1: ...800 448 2244 HITACHI CANADA LTD DIGITAL MEDIA DIVISION 6740 Campobello Road Mississauga Ontario L5N 2L8 CANADA Tel 1 800 HITACHI 1 800 448 2244 Thank you for buying a Hitachi product Please take time to become familiar with the manual and how it is set up Keep it handy for future reference QR34642 Hitachi Ltd 2003 Printed in Japan OM F I ...

Страница 2: ...isdangerous to make any kind of contact with any inside part of this unit This symbol alerts the user that important literature concerning the operation and maintenance of this unit has been included Therefore it should be read carefully to avoid any problems WARNING TO PREVENT FIRE OR SHOCK HAZARD DO NOT EXPOSE THIS UNIT TO RAIN OR MOISTURE WARNING TO PREVENT FIRE OR SHOCK HAZARD USE THE RECOMMEN...

Страница 3: ... comply with the limits for a Class B digital device pursuant to Part 15 of the FCC Rules These limits are designed to provide reasonable protection against harmful interference in a residential installation This equipment generates uses and can radiate radio frequency energy and if not installed and used in accordance with the instructions may cause harmful interference to radio communications Ho...

Страница 4: ...the video product and to protect it from overheating These openings must not be blocked or covered The openings should never be blocked by placing the video product on a bed sofa rug or other similar surface This video product should never be placed near or over a radiator or heat register This video product should not be placed in a built in installation such as a bookcase or rack unless proper v...

Страница 5: ...7 Conditions Requiring Service Unplug this video product from the wall outlet and refer servicing to qualified service personnel under the following conditions a When the power supply cord or plug is damaged b If liquid has been spilled or objects have fallen into the video product c If the video product has been exposed to rain or water d If the video product does not operate normally by followin...

Страница 6: ...dicate a fault that will interfere with recording The LCD screen and viewfinder will be slightly dimmer than usual when the DVD video camera recorder is at low temperature as in cold areas or immediately after power is turned on Normal brightness will be restored when the temperature inside the DVD video camera recorder rises Hold the DVD video camera recorder correctly Do not hold the viewfinder ...

Страница 7: ...r is used near strong radio waves or magnetism such as near a radio wave tower or electric appliances noise could enter video and audio that are being recorded During playback of normally recorded video and audio noise may also be present in picture and sound At worst the DVD video camera recorder could malfunction Do not expose the DVD video camera recorder to soot or steam Thick soot or steam co...

Страница 8: ...backoperation could be slowed down In this case turn it off and wait for a while before using it again Do not turn the DVD videocamera recorder off while the ACCESS PC indicator or CARD ACCESS indicator is lit or blinking TheACCESS PCorCARD ACCESSindicatorislitorblinking to show that data is being written to disc or card or being read from it At this time do not do any of the following so as not t...

Страница 9: ...l recording Always make a trial recording before doing actual recording to make sure that recording is normal The data that have not been stored normally because of a defect in the DVD video camera recorder cannot be restored It is recommended that you use DVD RAM disc from which recorded contents can be deleted for trial recording Do not use the DVD video camera recorder for professional applicat...

Страница 10: ...o products sold separately proper cleaning and troubleshooting We want this manual to be as helpful as possible so it includes two easy ways to find the information you need A quick index for the information you use most often this page A detailed table of contents directing you to specific information quickly see page 13 15 Get to know your DVD video camera recorder by using this manual and get t...

Страница 11: ...d data You can immediately play back desired recorded scenes You do not need to rewind unlike recorders using tape You can select any scene you want and immediately play it back using Disc Navigation function Use Disc Navigation to create your original movie You can delete unnecessary scenes move any scenes etc and create your original movie work Play List If you stop playback midway and start rec...

Страница 12: ...y list and dub it on VCR It is also easy to make any number of identical tapes Create original DVDs on PC You can use a DVD R disc to create an original DVD using the provided software CD ROM The created DVD disc can be played back on DVD player DVD ROM drive etc Up to now you had to repeatedly press buttons With DVD you can simply play back this DVD video camera recorder and press the record butt...

Страница 13: ...IENT USE OF BATTERY 39 USING DVD VIDEO CAMERA RECORDER WITH AC ADAPTER CHARGER 40 Inserting and Removing Disc 41 INSERTING DISC 41 REMOVING DISC 43 Inserting and Removing Card 44 Basic Techniques Basic Handling of DVD Video Camera Recorder 45 TURNING DVD VIDEO CAMERA RECORDER ON AND OFF 45 VIEWING SUBJECT THROUGH VIEWFINDER 46 VIEWING IMAGE ON LCD MONITOR SCREEN 46 CLOSING LCD MONITOR 47 Setting D...

Страница 14: ... AVAILABLE WITH DISC NAVIGATION 99 UNDERSTANDING FLOW OF DISC NAVIGATION MENU 100 Scene 101 DELETING SCENES DELETE 101 CHANGING IMAGES FOR THUMBNAILS EDIT THUMBNAIL 103 PLAYING BACK BY SKIPPING SCENES EDIT SKIP 104 ADDING SPECIAL EFFECTS EDIT FADE 105 ARRANGING ORDER OF SCENES EDIT MOVE 106 COMBINING MULTIPLE SCENES EDIT COMBINE 107 DIVIDING MOVIES EDIT DIVIDE 108 COPYING STILLS ON DVD RAM DISC TO...

Страница 15: ...NG DVD MovieAlbumSE 139 INSTALLING MyDVD 141 Creating DVD Video on PC from DVD RAM Disc Recorded on DVD Video Camera Recorder 143 Subsidiary Information Cleaning 145 Changing Setting of Demonstration 146 No DVD Video Camera Recorder Operation Check the Following 147 Trouble Messages 149 Troubleshooting 156 System Reset 163 Major Specifications 164 Introduction to Optional Accessory 166 POWER SUPPL...

Страница 16: ...distance Lithium battery model CR2025 To power the remote control AV S input output cable Used when viewing the picture played back on the DVD video camera recorder on TV screen or input or output video from to another video device Shoulder strap Attach to the DVD video camera recorder to hang it from shoulder Lens cap and lens cap string Attach the lens cap when not recording to protect the lens ...

Страница 17: ... camera recorder this receiver will receive the infrared signal 5 Zoom lever P 55 Push the lever to the T side for telephoto or to the W side for wide angle 6 Accessory shoe 7 External microphone jack P 52 8 AV input output jack P 65 72 9 Stereo microphone P 52 10 2 5 type liquid crystal display inside P 46 11 BATTERY EJECT switch P 37 The BATTERY EJECT switch is located on the bottom of this DVD ...

Страница 18: ...korlightwhiletheDVDvideocamera recorder is operating 15 DISC EJECT button P 41 Press down and release this button to open the disc guide 16 CARD ACCESS indicator P 8 53 17 Card insertion block P 44 18 Battery attachment platform P 37 19 Record button REC P 50 20 Power switch P 45 50 53 21 Speaker P 67 22 Hand strap P 32 ACCESS PC DISCEJECT REC 12 13 14 17 15 18 19 20 22 21 16 ...

Страница 19: ...vigation The camera menu will appear even if disc is not loaded 30 DISPLAY Screen display button P 71 Press this button to display the details of image being played back or camera setting status or switch the display off 31 Volume control buttons VOL buttons P 57 59 67 To adjust the volume of sound from speaker etc 32 RESET button P 163 To reset all settings to defaults status when the DVD video c...

Страница 20: ...M W button P 55 44 Forward search button P 68 45 Play pause button P 67 46 Forward skip button P 69 47 DISPLAY button P 71 48 Stop button P 21 67 97 49 DELETE button P 101 50 SELECT button P 98 The buttons on remote control will function the same as those on DVD video camera recorder ZOOM DISPLAY DELETE SELECT MENU REC DIGITAL ZOOM T W DISC NAVIGATION DZ RM3W 36 37 38 39 40 41 42 43 46 44 45 48 47...

Страница 21: ...idway or return the menu screen to the preceding one The expression press the button will be used in this text and marks beside headings Some functions of this DVD video camera recorder are unavailable with disc or card used Refer to the marks at right above each function to identify whether the disc or card is compatible with the function Refer to these marks and identify the functions and operat...

Страница 22: ...g a disc other than those made by Hitachi Maxell may not allow the DVD video camera recorder to deliver optimum performance It is necessary to initialize an unformatted disc When an unformatted disc is inserted into the DVD video camera recorder a message will appear Initialize the disc following the instructions on screen P 127 The Round DVD Holder cannot be used on the following DVD video camera...

Страница 23: ... disc Before using the 8 cm DVD R disc provided on this DVD video camera recorder on a DVD player or DVD video recorder that is compatible with 8 cm DVD Rdisc thediscmustbefinalizedonthisDVD video camera recorder For the finalizing procedure of 8 cm DVD R disc refer to Finalizing DVD R Disc P 129 Note Do not insert a DVD R disc recorded on this DVD video camera recorder but not finalized into a re...

Страница 24: ...ccur When recording images the DVD video camera recorder may avoid the portions of disc where recording is not possible due to dust scratches etc It will pause at such a portion andautomatically restart recording This will cause recording to be interrupted for several seconds to several minutes andmultiplethumbnailswillbecreated by one recording session as shown above In this case the recordable t...

Страница 25: ...e following or the data on card may be damaged or lost Do not remove the card or turn DVD video camera recorderoffduringreading or writing of data Do not use DVD video camera recorder in a place subject to static electricity or electrical noise Note This DVD video camera recorder can play back image data recorded on other digital cameras conforming to the DCF Design rule forCamera File system stan...

Страница 26: ...pprox 6 Mbps 3 Transfer rate Approx 3 Mbps 4 Linear PCM recording If your DVD player does not conform to MPEG audio player 2 record in LPCM mode Note Audio in XTRA FINE or STD mode is recorded in the MPEG audio layer 2 format which is the option standard of DVD video standard No movie can be recorded on SD memory card or multimedia card The movie quality mode can be changed for recordings on DVD R...

Страница 27: ...amera recorder In addition no such a data file can be displayed on this DVD video camera recorder Use the remaining display function to check the remaining free space on disc before use See Verifying Remaining Free Space on Disc or card Capacity on page 126 Some still data recorded on this DVD video camera recorder may not be playable on another device for example on a device that limits the maxim...

Страница 28: ...ra Functions Available Unavailable 1 Except for LPCM mode 2 Except for XTRA mode Function Disc used Reference page DVD RAM DVD R CARD Camera Functions Setup Program AE 80 White Bal 81 EIS 83 Dig Zoom 84 MIC Filter 85 Record Functions Setup VIDEO Mode 1 2 86 Quality 87 Input Source 88 PHOTO Input 88 Self Timer 89 OSD Output 90 Date Setup Date Mode 49 Date Set 48 LCD Setup Brightness 91 Color Level ...

Страница 29: ...08 Move 106 123 Copy 109 Select Start Current 112 Current End 112 All 112 Detail 113 PlayList Switch 118 Play 119 Create 117 Edit 120 123 Title 124 Delete 124 Program Switch 114 Play 115 Title 115 Go To Top 125 End 125 Disc Capacity 126 Protect Disc 126 Format Disc 127 Update Control Info 128 Finalize Disc 129 Others Category All 130 VIDEO 130 PHOTO 130 Repeat Play On 130 Off 130 ...

Страница 30: ...atible with 8 cm DVD R disc however the finalized DVD R disc may not be usable on some DVD players RECORDING MOVIE AND STILL The DVD video camera recorder can record movies of events and sports in the same way as with conventional camcorders It can also record stills on a DVD RAM disc or card as witha digitalstillcamera WithCCDof1 100 000 pixels high quality movies and stills on DVD RAM disc only ...

Страница 31: ...ie or still With Disc Navigation you can arrange the playback order and edit multiple images to play them back continuously Youcancreateanentiremovieonthis DVD video camera recorder alone without inputting video to a PC for editing USING WITH VARIOUS DEVICES Connect this DVD video camera recorder to your TV and you can enjoy the playback picture with your family and friends on the large TV screen ...

Страница 32: ... video camera recorder Doing this could cause the DVD video camera recorder to fall and be damaged ATTACHING LENS CAP Pass the provided string through the hole in the lens cap and attach it to the hand strap of DVD video camera recorder 1 Usethestring to attachthe cap to the DVD video camera recorder 2 Push the both sides of cap inward and attach it over the lens Note Always keep the lens cap on w...

Страница 33: ...33 English ATTACHING SHOULDER STRAP Pass the shoulder strap through the shoulder strap attachments Be sure to pass through the 2 slots ...

Страница 34: ... the battery out Warning KEEP THE BATTERY AWAY FROM CHILDREN AND PETS IF SWALLOWED CONSULT A PHYSICIAN IMMEDIATELY FOR EMERGENCY TREATMENT BATTERY MAY EXPLODE IF NOT HANDLED PROPERLY DONOTRECHARGE DISASSEMBLEOR DISPOSE OF IN FIRE Note Replace the battery with a Hitachi Maxell Sony Panasonic Sanyo Toshiba CR2025 or Duracell DL2025 Use of another battery may present a risk of fire or explosion Dispo...

Страница 35: ...the infrared light from remote control the DVD video camera recorder cannot be operated by remote control If there is an obstacle between the remote control and infrared receiveron DVD video camera recorder remote control may not be possible The DVD video camera recorder uses the VCR2 remote control code of Hitachi VCRs If you use a Hitachi VCR etc with remote control code set to VCR2 a VCR placed...

Страница 36: ...ire Charge the battery at temperatures of 50 86ºF 10 30 C CHARGING BATTERY Use the provided AC adapter charger to charge the battery 1 Connect the power cable to AC adapter charger 2 Plug the power cable into AC outlet TheCHARGEindicatoronACadapter charger will light 3 Attach the battery to AC adapter charger Note When charging a battery unplug the DC power cord from the DC output jack on AC adapt...

Страница 37: ... the battery to fall resulting in damage REMOVING BATTERY After using the DVD video camera recorder remove the battery from it 1 Slide the BATTERY EJECT switch on the bottom of DVDvideocamera recorder Thebatterycan be removed Note For safety be sure to turn the DVD video camera recorder off before attaching or removing the battery Be careful not to drop the removed battery If the battery remains a...

Страница 38: ...ime taken for charging the battery is as follows at 77ºF 25 ºC Note See page 156 when charging is not possible The charge time will vary depending on the battery remaining level During and after charging the battery will be warm but this does not indicate a fault If the following phenomena appear the battery may be dead Replace it Charging does not start within 10 seconds the CHARGE indicator does...

Страница 39: ...commendedthatyoufully charge thebattery once a year attach it to DVD video camera recorder and use it up then remove the battery and store it in a cool place again Store in cool dark place When you are not using the DVD video camera recorder remove the battery and store it in a cool dark place If you store it in a place where the temperature is high the battery life will be shortened Be especially...

Страница 40: ...of DC power cord into the DC output jack on AC adapter charger 4 Attach the other end of DC power cord to the battery attachment platform on DVD video camera recorder Note The AC adapter charger can be used around the world An ACplug adapteris required in someforeign countries If you need one purchase it from your Hitachi distributor If the CHARGE indicator does not light when the AC adapter charg...

Страница 41: ...ction as the lens as shown in figure The recording playback side must face the inside DVD video camera recorder 4 Push the section marked PUSH CLOSE on the cover of disc insertion block to close the cover 5 Turn the DVD video camera recorder on VIDEO or PHOTO When DISC ACCESS disappears the DVD video camera recorder is ready for recording Identifying recording playback sides of disc Single sided d...

Страница 42: ... choose YES and then press the button The disc will be automatically formatted When formatting is complete DVD R disc Video mode cannot be changed will appear See page 152 Press the button to erase the message Once formatted a DVD R disc can no longer be changed to a disc for PC even if it has not been recorded on this DVD video camera recorder Note See page 86 for movie quality mode When recordin...

Страница 43: ...n the disc can be removed unless it is in recording status Hold down the DISC EJECT button for approximately 2 seconds and then release it to remove the disc The DISC EJECT indicator on the LCD screen will blink It is recommended that you turn the DVD video camera recorder off before inserting or removing disc to prevent misoperation Do not detach the battery or AC adapter charger until the DVD vi...

Страница 44: ...R OFF to turn the DVD video camera recorder off 1 Open the cover of card insertionblockwithpower turned off 2 Insert card with its terminal inward until it locks Removing Card Push the center of card edge The card will come out so that it can be held by fingers 3 Close the cover of card insertion block ...

Страница 45: ... recognize the disc again See page 147 It will take some time for the DVD video camera recorder to display the Disc navigation screen after power is turned on If you turn the DVD video camera recorder on the ACCESS indicator will light or blink to show that the DVD video camera recorder is recognizing the disc or card During this time no operation such as recording can be performed After several s...

Страница 46: ...nitor is open 90 it can be tilted with the screen down as much as 90 and can also be tilted with screen up and turned up to 180 so the screen faces in the same direction as the lens IftheLCDmonitoristurned180 sothescreenfaces in the same direction as the lens during recording subject image will also appear in the viewfinder as an mirror image left right reversed Tilt the LCD monitor to adjust its ...

Страница 47: ...facing inward until a click is heard Note Be sure to return the LCD monitor at right angles to the DVDvideo camera recorderbeforeclosingit orreplacing it on the DVD video camera recorder with its screen facing outside If the LCD monitor is tilted it cannot be closed to the DVD video camera recorder IftheLCDmonitorisnotsecurelylockedtotheDVDvideo camera recorder no image will appear in the viewfind...

Страница 48: ...nt date and time Note To stop date time setting midway press the button 6 After setting the current date and time press the button The screen for verifying the set date will appear 7 Ifthedisplayeddateandtimearecorrect usethe joystick to choose YES and then press the button Thedateandtimewillbeset andtheDVDvideo camera recorder will enter the recording pause status Choosing NO will restore the men...

Страница 49: ...d to the currently selected option 3 Use the joystick to select the desired date display format andthenpressthe button The menu screen for setting date will be restored and the Date Mode has been changed as you designated 4 Press the MENU button to switch off the menu screen Note If the date display format has been changed the display format during playback as well as during recording will also be...

Страница 50: ...ophone is not blocked You can press the REC button immediately afterthe DVD video camera recorder enters the recording pause status but no further recording can be made while DISC ACCESS is being displayed Recording will restart after the message disappears Take care that power is not interrupted while the ACCESS PC indicator is blinking The minimum recordable time of movie is approximately 3 seco...

Страница 51: ...cording set the power switch to POWER OFF and then set it to VIDEO To set or release power save see Turning DVD Video Camera Recorder Off Automatically Power Save on page 92 It is recommended that you specify Power Save On since even during recording pause battery power is consumed at the same level as during recording Especially when power save has been released turn the DVD video camera recorder...

Страница 52: ...able to use the external microphone This DVD video camera recorder cannot use a plug in power type microphone power supplied from camcorder Attaching Ferrite Core Although no ferrite core is attached in the illustrations of the cables in text be sure to attach the provided core to the external microphone cable using the following procedure 1 Open the cover of ferrite core 2 Attach the core to exte...

Страница 53: ...hen the recorded still will be displayed When the mark appears you can proceed with the next recording while DISC ACCESS or CARD ACCESS is being displayed you cannot proceed with the next recording 4 Set the power switch to POWER OFF to turn the DVD video camera recorder off Note See Still recording quality on page 54 for details of stills on card Do notoperate the powerswitch orremovethecard whil...

Страница 54: ... automatically sets the shutter speed between 1 800 and 1 30 second between 1 800 and 1 10 second if Program AE has been set to Low Light depending on the subject brightness During recording of stills the electronic image stabilizer will not function See Switching Quality of Still Image Quality on page 87 if you want to change the still quality mode Quality File size Application FINE Approx 128 KB...

Страница 55: ...See page 84 Note The setting of digital zoom 240 is effective only during movie recording If you set zoom to 240 when recording still the digital zoom will be up to 40 When a subject is zoomed it may be momentarily out of focus When digital zoom is engaged the image quality will be rougher If the zoom ratio is frequently changed at short intervals the recorded image will be unclear Recordinginwide...

Страница 56: ... depending on the distance to the subject In this case move the zoom to W control side to focus The amount of light tends to be insufficient during macro recording If the subject image is too dark use additional lighting USING CONVERSION LENS GENERALLY AVAILABLE Use generally available tele conversion lens or wide conversion lens with filter diameter of 30 5 mm Remove the lens hood on the top surf...

Страница 57: ... to infinity 1 Press the FOCUS button during recording MF will appear on the screen 2 Press the zoom lever down to T control side to zoom in on subject 3 Use the buttons to adjust the focus while viewing the image in the viewfinder or on the LCD screen Note Pressing FOCUS will alternate between manual focus and auto focus With auto focus no indication will appear on the screen Be sure to zoom in o...

Страница 58: ... not in the center of screen Objects moving rapidly Object behind glass with waterdroplets dirt on it Objects that are far and near at the same time Objects with little variation in brightness such as white wall Dark objects Night view Objects lit by neon sign spotlight etc whichglaresor emits strong light ...

Страница 59: ...will appear on the screen 2 Use the buttons to adjust the exposure while viewing the image in the viewfinder or on the LCD screen Note Pressing EXPOSURE will alternate between manual adjustment and auto exposure With auto exposure no indication will appear on the screen The exposure setting will return to Auto when the DVD video camera recorder is turned off 8 0 0 AM 9 3 0 2 0 0 3 3 0 MIN 0 0 0 0 ...

Страница 60: ...ess the BLC button during recording The backlight correction icon will appear Note Pressing the BLC button will alternate between backlight setting between on and off The backlight setting will automatically return to off when the DVD video camera recorder is turned off 8 0 0 AM 9 3 0 2 0 0 3 3 0 MIN 0 0 0 0 0 REM FINE Backlight correction icon ...

Страница 61: ...utton will fully automate the camera functions 1 Press the FULL AUTO button The following settings will reset to defaults Function When setting full auto Program AE Auto White balance Auto Exposure Auto Backlight compensation Off Focus Auto EIS On MIC Filter Off ...

Страница 62: ... in still recording mode No display Self timer OFF Self timer ON count is from 10 seconds 8 External Input L IN AV input 9 Recording status During recording During recording pause No display 1 10 Electronic image stabilizer EIS only in movie recording mode No display EIS OFF 9 EIS ON 11 Zoom Digital Zoom Off Digital Zoom 40 Digital Zoom 240 only in movie recording mode 12 Exposure correction 13 Wa...

Страница 63: ...E low remaining charge 19 Brightness Color density of LCD screen or Volume The volume can be adjusted during external input and playback 20 Current date time 1 When no disc or card is in the DVD video camera recorder or disc has not yet been initialized a write protected disc or locked card or a disc or card with no remaining space has been inserted 2 When a disc or card that cannot be used in thi...

Страница 64: ...ry remaining level will blink when the battery has almost no remaining charge The following operating status indicator will light or blink to give warning messagetouser ThemessagecanbecheckedwhenreturningtheLCDmonitor 180 to the original status from the status in which the LCD screen was facing the same direction as the lens The disc has almost no free space Write protected disc or locked card is ...

Страница 65: ...AC outlet using the AC adapter charger If you use a Hitachi VCR it will be operated by the remote control provided with the DVD video camera recorder When recording an image from a Hitachi VCR change the remote control code of the VCR to other than VCR2 This DVD video camera recorder cannot record S VIDEO input signal Reduce the volume of external input sound heard from the built in speaker The lo...

Страница 66: ... Recording Stills on page 53 for how to record still images The Input Source setting will return to CAMERA whenever DVD video camera recorder is turned off Recording of most images is prohibited by the copy guard signal to protect the copyright except for images recordedoncamcordersforpersonalenjoyment COPY PROTECTED appearsin these images Theycannotbe recorded on this DVD video camera recorder Ty...

Страница 67: ...ng playback of movie playbacksoundwillbeheardfromthespeaker Adjustthe sound volume using the volume control buttons To temporarily stop playback press the button Press the button again to restart playback Even if you stop playback midway and immediately start recording again the new image will be recorded after the last scene on disc orcard the previous imageswill notbe overwritten When playing ba...

Страница 68: ...f search playback does not operate normally FRAME ADVANCE FRAME BACK SLOW PLAYBACK OF MOVIE During playback pause tilt the joystick Frame advance frame back or slow playback will start Tilt once Picture will advance one frame Tilt once Picture will go back one frame Tilt and hold Forward slow playback Tilt and hold Reverse slow playback After frame advance frame back or slow playback the DVD video...

Страница 69: ... at the beginning of the located scene Tilting down in the last scene on disc will set the DVD video camera recorder to the playback pause status at the last image See page 147 if skip playback does not operate normally PLAYING BACK STILLS Tilt the joystick up or down during playback to quickly play back stills in sequence Tilt once To display stills one by one forward Tilt once To display stills ...

Страница 70: ...ection The DVD video camera recorder will go to the specified point and enter the playback pause status To cancelthe Go To procedure midway press the button before going to the specified point Note If multiple scenes are selected using the Disc Navigation function or SELECT button choosing Top will jump to the beginning of selected scenes P 125 When multiple scenes are selected the total time of s...

Страница 71: ...se skip playback Forward frame advance Reverse frame back Referto PlayingBack beginningonpage 67for how to operate The mark will appear on the first image on disc The mark will appear on the last image on disc Recording date time display Shows the date time when recording was started Even when playback starts the date time display will not advance No display No information will appear However when...

Страница 72: ...connecting make sure that the volume on TV is turned down Forgetting this may cause howling fromthe TV speakers Insert the AV S input output cable plugs into jacks straight Obliquely inserting them could damage the jacks To AV input output jack AV S input output cable provided To video audio input jacks Red Yellow White To S video input jack S VIDEO VIDEO AUDIO L R VIDEO AUDIO L R VIDEO AUDIO Ster...

Страница 73: ...wing an image on TVscreen However ifyouuseaHitachiVCR theremote control may inadvertently operate the VCR if it is nearthe DVD video camera recorder To prevent this set the remote control code of the VCR to a position other than VCR2 Information that the DVD video camera recorder is recording will appear on the TV screen You can also display only part of information or switch off the display Refer...

Страница 74: ...lize the DVD R disc recorded on the DVD video camera recorder 2 Remove the disc from Round DVD Holder See Removing and Replacing from in Round DVD Holder on page 75 3 Insert the disc into the DVD player and play it back See the instruction manual for DVD player Note DVD R discs recorded on this DVD video camera recorder can be played back on other DVD players but playback on all DVD players is not...

Страница 75: ...xell It is recommended that you do not remove the disc from Round DVD Holder until camera recording is finished in order to avoid getting dirt on disc Note Using discs removed from holders on various devices may not always be possible HOW TO REMOVE DISC 1 Hold the Round DVD Holder with SIDE A facing up While pushing the two release levers in the direction of arrows 1 marked on holder slowly openSI...

Страница 76: ...nto the warped hinge portion Note Handle the disc carefully so that no scratch dirt fingerprint or dust adheres to the recording playback surface When not using the Round DVD Holder store it in case Do not leave a bare holder as is Be careful of drop or impact If you drop the Round DVD Holder the disc may pop out Do not subject the Round DVD Holder to force DISC CLEANING Use a soft dry cloth to li...

Страница 77: ...e disc from Round DVD Holder 2 Insert the disc into the DVD video recorder player and play it back See the instruction manual for DVD video recorder player Note DonotinsertaDVD Rdiscthathasnotbeenfinalizedinto a DVD video recorder The recorded image data may be damaged When playing back disc on another device the Disc Navigation display will be different from the one on this DVD video camera recor...

Страница 78: ...ens used here to explain are displayed when DVD RAM disc is used Some items will not appear when a DVD R disc or card is used or when no disc or card is inserted Interpreting screen for setting Camer a Func t i ons Setup Spo r t s Por t r a i t Spo t l i ght Sand Snow Low L i gh t Auto RAM Pr og r am AE Whi te Ba l Dig Zoom MIC F i l t er E I S ENTER RETURN Display of selected setup item Selection...

Страница 79: ... AE Whi te Ba l Dig Zoom MIC F i l t er E I S ENTER RETURN 40x Of f Au t o Rec o rd Func t i ons Se t up RAM VIDEO Mode F INE I npu t Source CAMERA Se l f T imer Of f OSD Ou t pu t On PHOTO I npu t F i e l d ENTER RETURN Da t e Se t up RAM Da t e Se t Da t e Mode M D Y ENTER RETURN LCD Setup RAM Co l or L eve l B r i gh t n e s s ENTER RETURN I n i t i a l Se t up RAM Demo Mode Auto Reset Language...

Страница 80: ...nvironment for optimum recording Sports Reduces blurring when recording rapidly moving subjects such as in golf or tennis IftheSports modeisusedunder a fluorescentlight the image may flicker In this case use the Auto mode for recording Portrait Makes a subject such as a person or a creature stand out from a blurred background Spotlight Prevents overexposure of subject portrait face etc when strong...

Страница 81: ...nt If the object that fills the screen is not focused correct the focususing Manual Focus P 57 2 Press the MENU button choose White Bal Set and then press the button 3 Press the button The indicator will change from blinking to a steady light The steady light indicates that the white balance setting is complete 4 Press the button to end the setting Mode Setting content On screen display Auto White...

Страница 82: ...generally available tele or wide conversion lens is used the auto white balance may not operate depending on the recording conditions If this happens set to the mode to match the recording conditions or manually set the white balance Be sure to remove the lens cap before turning the DVD video camera recorder on If the DVD video camera recorder is turned on with the lens capped the white balance wi...

Страница 83: ...th Off setting This function is effective only during movie recording It will not work during still recording Note The EIS setting will be stored in memory even when the DVD video camera recorder is turned off Although you can switch EIS between on and off during still recording the setting will be effective only during movie recording It is recommended that you specify EIS Off when using the DVD ...

Страница 84: ...heck whether Dig Zoom is 240 40 or Off by pressing the DISPLAY button and reviewing the on screen information You can also use the DIGITAL ZOOM button on remote control to switch the digital zoom setting Pressing the button during movie recording will switch the setting between Off 40 and 240 Pressing the button during still recording will switch between Off and 40 When using card zooming only up ...

Страница 85: ...d then press the button 2 Choose the desired option and then press the button 3 Press the MENU button to end the setting Note Youcanalsousetheon screendisplaytoconfirmthatthe MIC Filter has been set The MIC Filter setting will be stored in memory even when the DVD video camera recorder is turned off The MIC Filter function will work only during movie recording The microphone filter function works ...

Страница 86: ...e versa However if XTRA has been set with DVD RAM disc or LPCM hasbeensetwithDVD Rdisc FINE will be set when the disc is changed When using DVD R disc you cannot switch the movie quality while recording on the disc The DVD video camera recorder will be automatically set to the movie quality first used with the disc for recording The movie quality setting is effective only during movie recording Sw...

Страница 87: ...ALITY You can switch the still recording quality only when using card 1 Press the MENU button choose Quality on the Record Functions Setup menu screen and then press the button 2 Choose the option you want and then press the button 3 Press the MENU button to end the setting Note The still quality setting will be stored in memory even when the DVD video camera recorder is turned off It is recommend...

Страница 88: ...tions Setup menu screen and then press the button 2 Select the desired option and then press the button 3 Press the MENU button to end the setting Note The PHOTO Input setting can be confirmed using the on screen information The PHOTO Input setting will be stored in memory even when the DVD video camera recorder is turned off Refer to Recording Image from Other AV Devices on page 65 to see how to ...

Страница 89: ...r will blink Theself timerindicatorwillstarttocountdown andrecording willcommence approximately10 seconds later Note You can also check that self timer has been set by reviewing the on screen information To release the self timermode choose Off on the menu screen or turn DVD video camera recorder off Tosuspendself timer presstheRECbuttonagainbefore recording starts or press the button When the REC...

Страница 90: ...ing Note The OSD Output setting will be stored in memory even when the DVD video camera recorder is turned off Even if Off is chosen the on screen information will appear during playback See page 71 for playback on screen information display Evenafterthe on screen informationis removed fromthe TV screen it will still appear in the viewfinder or on the LCD screen Record Func t i ons Setup On Of f R...

Страница 91: ...ned off SETTING COLOR DENSITY OF LCD SCREEN COLOR LEVEL 1 Choose Color Level on the LCD Setup menu screen andthenpressthe button The color density adjustment bar will appear on the screen 2 Use the joystick for adjustment For lighter color For denser color 3 Press the MENU button Note The color level setting will be stored in memory even when the DVD video camera recorder is turned off LCD Setup R...

Страница 92: ...ng operated for 5 minutes it will automatically turn off to prevent the battery from discharging needlessly 1 Press the MENU button choose Power Save on the Initial Setup menu screen andthenpressthe button 2 Select On or Off and then press the button 3 Press the MENU button to end the setting Note To turn the DVD video camera recorder on again from automatic off activated by the power save functio...

Страница 93: ...HANGING DISPLAY LANGUAGE LANGUAGE You can change the language used to display the menu and information The following shows that English is changed to French 1 Press the MENU button choose Language on the Initial Setup menu screen andthen press the button English has been set 2 Select Français and then press the button 3 Press the MENU button to end the setting Note The language setting will be sto...

Страница 94: ...u screen andthenpressthe button The screen for verifying reset will appear 2 If you are sure that you wish to reset use the joystick to choose YES and then press the button The setting items have now been reset to defaults 3 Press the MENU button to end the setting Note To cancel resetting midway choose NO on the screen for verification in step 2 or press the button Record LED I n i t i a l Setup ...

Страница 95: ...NAVIGATION button The Disc Navigation screen shown on page 96 will appear Note Do not proceed with a following step while the disc is being recognized or the ACCESS PC indicator is blinking Thumbnail This refers to a reduced image that helps to distinguish recorded scenes quickly Immediately recording is finished the first image of the recorded scene will be used as a thumbnail of the scene The th...

Страница 96: ...ofthescene on which the cursoris placedin the space for operating guide Pressing DISPLAY again will display the operating guide If no disc or card is inserted the Disc navigation screen cannot be displayed even by pressing the DISC NAVIGATION button Each time Disc Navigation is started with a DVD R disc inserted message Creating Thumbnail will appear After the message appears the Disc Navigation s...

Страница 97: ... restore the Disc Navigation screen When the playback pause status continues for as long as 5 minutes the Disc Navigation screen will automatically be restored Playing back stills A still will be displayed for approx 3 seconds When playing back stills on card playback will stop after each still playback Note Press the button to temporarily stop playback Pressing again will start from that point If...

Страница 98: ...in yellow and blue 4 Use the joystick to select the last sceneintherange you want and then press the button The thumbnails ofscenes inthespecifiedrangewill be framed in red and then selected Note You can know the status of scenes from the colors of cursor and bargraph Pressing the button after selecting scenes will play back only the selected scenes from the beginning of each You can also select s...

Страница 99: ...tialize a DVD RAM disc or card so that it can be used on this DVD video camera recorder 127 Copy from disc to card You can copy photos recorded on DVD RAM disc to card 109 Disc finalization You can use this DVD video camera recorder to finalize any DVD R disc recorded on it so that the disc can be viewed on DVD player etc 129 Repeat play You can repeatedly play back programs and scenes 130 Slide s...

Страница 100: ...d P 112 All P 112 Switch P 114 Play P 115 Title P 115 Switch P 118 Play P 119 Create P 117 Edit P 120 123 Title P 124 Delete P 124 Scene Program Play list Top P 125 End P 125 Category P 130 Repeat Play P 130 Capacity P 126 Protect Disc P 126 Format Disc P 127 Update Control Info P 128 Go To Disc Others ETC Switch P 114 Play P 115 Select P 112 Detail P 113 Program Scene Top P 125 End P 125 Repeat P...

Страница 101: ...ELETE button on remote control the screen in step 5 will appear If you delete all data on disc or card initializing the disc or card will be recommended See page 127 If even one play list has been created message Same scenes on PlayList will be deleted Delete scenes will appear before deleting scene s This message will appear even if the scene s to be deleted is not used in the corresponding play ...

Страница 102: ... t RAM ENTER RETURN Ex i t De l e t e Se l ec t RAM ENTER RETURN S t a r t Cu r r en t Cu r r en t End A l l Go To RAM ENTER RETURN End To p Edit Exit To restore the Disc Navigation screen Delete To delete selected scenes Select Start Current To select scenes from the start to the one that the cursor is on at the moment Current End To select scenes from the scene the cursor is on to the end All To...

Страница 103: ...oucanchangeiton this screen 6 When the image you want to use as the thumbnail of the scene appears press the SELECT button 7 The screen for verifying switching of thumbnail will appear Choose YES andthenpressthe button Choose NO to cancel switching of thumbnail After Yes or No setting the Change Thumbnail screen will be restored Repeat steps 5 7 to change the other scenes 8 Press the button to qui...

Страница 104: ...ng the Set Skip screen will be restored Repeat step 5 to set skipping of other scenes 6 Press the button to quit A skip mark will appear in the thumbnail of any scene for which skipping has been set Releasing Skip Select the scene set to be skipped and perform the same procedure as setting skip The skip mark will disappear and skipping of the scene will be released Note Multiple scenes can be sele...

Страница 105: ... After setting the Fade Set screen will be restored Repeat steps 5 and 6 to add fade to other scenes 7 Press the button to quit The and or mark s will appear in the scenes for which special effects have been set Fade Out Fade Out Fade Out Fade In Fade In Fade In White Fades in from white screen Fades out to white screen Wipe Fades in from black screen to vertical direction of screen Fades out from...

Страница 106: ...r a movie with recording time of no more than 3 seconds only fade in will be valid No fade effect will operate if you start playback in the recording pause status If you locate the start of a scene by skipping the image at the start of the scene will appear for a moment and then fade will operate The fade effect will not function during frame advance frame back slow playback or search playback ARR...

Страница 107: ...t scene will appear in the combined scene Repeat steps 5 and 6 to combine other scenes To cancel setting choose Cancel After setting the scene select screen will be restored Repeat steps 5 and 6 to add fade to other scenes 7 Press the button to quit Note If you press the MENU button before pressing the button in step 5 the submenu screen will appear P 102 With special effects the IN effect of the ...

Страница 108: ... status bar of scene being played back can be switched off or on by pressing the DISPLAY button Search and frame advance are useful when designating division points If a special effect has been added to the original scene the IN effect will be added to the first half of scene and the OUT effect to the latter half The division point may drift before or afterthe designated point by approximately 0 5...

Страница 109: ...ard screen will be restored Repeat steps 6 and 7 to copy other stills to card 8 Press the button to quit Note No movie can be copied If you press the MENU button before pressing the button in step 6 the submenu screen will appear P 102 See Category P 130 to check the stills recorded on DVD RAM disc You can also select multiple scenes P 98 Even if all scenes including movies are selected to be copi...

Страница 110: ...gethesceneto belocked you can change it on this screen After setting the Lock Set screen will be restored Repeat step 6 to lock another scene 7 Press the button to quit To unlock the scene Select the locked scene and then use the same procedure as above to unlock the scene The lock mark will disappear and locking will be released Note If you press the MENU button before pressing the button in step...

Страница 111: ...the number of prints and then press the button Tilt it up or to right To increase the number one by one Tilt it down or to left To decrease the number one by one After setting the DPOF Set screen will be restored Repeat steps 6 and 7 to set DPOF to another still 8 Press the button to quit Note If you press the MENU button before pressing the button in step 6 the submenu screen will appear P 102 Yo...

Страница 112: ... the scene to be deselected and then press the SELECT button Note Up to 999 scenes can be selected Deselecting all the selected scenes at once While you are displaying the All Programs screen on which scenes have been selected press the button Scene RAM ENTER RETURN De l e t e Ed i t Copy Se l ect De t a i l ETC S t a r t Cu r r en t Cu r r en t End A l l 006 011 Al l Programs PLAY RAM 006 011 Al ...

Страница 113: ...nown Also this will not appear when a DVD R disc is used 3 This will not appear with DVD R disc since no still image can be recorded on it Note Ifmultiple scenes have been selected the totalrecording time of the selected scenes total number in case of stills will appear If a DVD R disc recorded on a device otherthan this DVD video camera recorder is inserted already finalized no scene information ...

Страница 114: ...be displayed andthenpress the button The Disc Navigation screen of the selected program will appear Note Pressing the button on the Switch Program screen will restore the Disc Navigation screen The dates displayed on the program select screen will be in the Date Mode used when the first scenes of programs were recorded and the date displays M D Y D M Y and Y M D may be mixed 9 00AM 10 20AM 11 45AM...

Страница 115: ...utton 2 Press the MENU button 3 Choose Title on the Program menu screen and then press the button 4 Select the program whose title you want to change and then press the button The screen for setting a title will appear 5 Select a letter and then pressthe button The selected letter will be entered Repeat this procedure to create a title P r og r am RAM ENTER RETURN Sw i t ch P l a y T i t l e ETC S...

Страница 116: ...s the button on the screen for verifying change in title the title setting screen will be restored Double byte characters set on other devices may be displayed blank on this DVD video camera recorder Characters available for entering title Youcanusethejoysticktoselectcharactersfromthe capital letter small letter and symbol input modes With step 5 select the input mode and then press the button or ...

Страница 117: ...e the scenes with which youwanttocreateaplay list you can change them on this screen With the created play list you can also add scenes recorded on another day or delete unnecessary scenes afterwards 6 When creation of a play list is complete the Disc Navigation screen will appear Note You can also select multiple scenes P 98 If the added scene had skip or fade setting that information will also b...

Страница 118: ...llappear 1 Press the DISC NAVIGATION button 2 Press the MENU button 3 Choose Switch on the PlayList menu screen and then press the button 4 Use the Switch Playlist screen to select the play list you wish to display and then press the button The Disc Navigation screen of the selected play list will be displayed Note To display the Disc Navigation screen showing all programs all recorded scenes choo...

Страница 119: ... list will be played back from the first scene To cancel playback midway press the button The Disc navigation screen of the play list being played back will appear Note If Repeat Play On is specified the play list will be repeatedly played back See page 130 S t a r t P l ay L i s t 01 8 30 2003 12 30PM 02 9 10 2003 8 00AM ENTER RETURN 03 9 12 2003 9 30AM 04 9 20 2003 3 15PM P l ay L i s t RAM ENTE...

Страница 120: ... completed the edited play list will appear Repeat steps 5 7 to add other scenes 8 Press the button The screen for verifying exit will appear Note The cursor shows the position where the scene is to be added You can also select multiple scenes P 98 Pressing inthemiddleofaddingsceneswilldisplaythe screen for verifying an exit from Edit PlayList Choose YES to exit the edition of play list Choosing N...

Страница 121: ...n 2 Display the editing screen of the play list to be edited Perform steps 2 4 on page 120 3 From the play list in lower row select the position where you wish to insert a scene 4 Selectthescenestobeaddedfromtheupperrow 5 Press the MENU button 6 Choose Add and then press the button Repeat steps 3 6 to add other scenes 7 Press the button to quit Note The selected scenes will be added in the inserti...

Страница 122: ...tingconsecutivemultiplescenes to fromplaylist This Select menu item is useful when selecting consecutive multiple scenes in items for adding or deleting scenes using menu on page 112 1 Press the DISC NAVIGATION button 2 Displaytheeditingscreen of the play list to be edited Perform steps 2 4 on page 120 3 Specifythefirstsceneofthoseyouwishtoselect and then press the MENU button 4 Choose Start Curre...

Страница 123: ...position where you wish to move the scene and then press the button 9 The screen for verifying movewillappear Choose YES and then press the button Choose NO to cancel move After Yes or No setting the scene select screen will be restored Repeat steps 7 9 to move another scene 10Press the button to quit Note If you press the MENU button before pressing the button in step 7 the submenu screen will ap...

Страница 124: ...edure DELETING PLAY LIST DELETE 1 Press the DISC NAVIGATION button 2 Press the MENU button 3 Choose Delete onthe PlayList menuscreen and then press the button 4 Use the Delete Playlist screen to select the play list you wish to delete and then press the button 5 The screen for verifying deletion will appear Choose YES and then press the button Choose NO to cancel deletion After Yes or No setting t...

Страница 125: ...mp to the first scene or last scene TOP END 1 Press the DISC NAVIGATION button 2 Press the MENU button 3 Choose Top or End on the Go To menu screen andthen press the button Go To RAM ENTER RETURN End ETC To p 014 014 Al l Programs PLAY RAM When End is specified ...

Страница 126: ... 2 Press the MENU button 3 Choose Protect Disc on the Disc menu screen and then press the button 4 The screen for verifying protection will appear Choose YES and then press the button Choose NO to cancel protection After YES or NO setting the Disc Navigation screen will be restored Note To release disc protection perform the same procedure as above The screen for verifying the release of protectio...

Страница 127: ...apter charger when initializing disc orcard so that the DVD video camera recorderis not turned off midway If initialization is interrupted by power off thediscorcardwillnotbeinitializedcorrectly oritmay be damaged It may not be possible to initialize a disc with many scratches or dirt Such a disc cannot be used Ifyou use a brand new DVD Rdisc message Disc isnot formatted will appear Initialize the...

Страница 128: ... for verifying Update Control Info will appear 4 Choose YES and then press the button The message for proceeding will appear and then the Disc Navigation menu screen will be restored A black screen may appear while the message for updating is displayed Choose NO to cancel updating 5 Press the button to quit Note BesuretousetheACadapter chargerwhenupdatingthe control information so that the DVD vid...

Страница 129: ...d on this DVDvideo camera recorder using any other device No recording can be done on any DVD R disc that has been finalized If the disc in the DVD video camera recorder has already been finalized you cannot choose Finalize Disc Be sure to use the AC adapter charger when finalizing disc Finalization cannot be executed using a battery If finalization is interrupted by power off the disc will not be...

Страница 130: ... Others menuscreen and then press the button 4 Choose On and then press the button Playback will start Choose Off to cancel Repeat Play Setting When Repeat Play is set If one scene has been specified When playback of the last scene is finished playback of all scenes will repeat from the first scene If the range for playback has been specified Playback of the scenes in that range will repeat To rel...

Страница 131: ...ton All To play all stills recorded on card in slide show DPOF To play only stills to which DPOF has been set in slide show Pressing the button will start slide show When playback is finished the DVD video camera recorder will enter the playback pause status at the final still Pressing the button will restore the Disc Navigation screen Note One still is played for approx 5 seconds With slide show ...

Страница 132: ...mera recorder or in the DZ WINPC3W PC editing kit for Hitachi DZ MV200A DZ MV230A or DZ MV270A DVD video camera recorder If another UDF driver has already been installed uninstall it and then install the UDF driver bundled on the provided CD ROM Uninstall the previous UDF driver by choosing Add Remove Programs or Add Remove Applications on Windows Control Panel If any question messages appear that...

Страница 133: ...page 141 for installation You can use MyDVD to create a DVD Video disc from movies edited on DVD MovieAlbumSE Contains the installer for UDF driver see page 137 for installation Install this driver if you wish to use JPEG stills recorded on DVD RAM disc on your PC Contains the installer for USB2 0 driver see page 135 for installation Install this driver when using the provided PC connection cable ...

Страница 134: ...VD and then open theelectronicinstructionmanualin Document folder To read the above manual a Web browser Internet Explorer Netscape Communicator etc must be set up in your PC If you cannot open the electronic instruction manual of MyDVD consult the maker of your PC about the setup method for Web browser UDF driver DVD RAM driver After installing the UDF driver DVD RAM driver open Programs or All P...

Страница 135: ...tion cable to connect the DVD video camera recorder to the USB terminal of PC 3 TheHardwareWizardwillstart Choose Install from a list or specific location Advanced and then click Next a figure will appear when Windows XP is used 4 Choose Search for best driver in these locations check Include this location in the search and then specify the folder to be browsed With Windows XP 2000 Professional D ...

Страница 136: ...136 English 5 With Windows XP the message concerning Windows Logo Test will appear Click Continue Anyway 6 Click Finish Click Click ...

Страница 137: ...en the UDF folder on the provided CD ROM and click setup or setup exe to start it 2 The driver setup screen will appear Click the Driver and Formatter Setup button 3 Click Next 4 Check thecontents of License Agreement If you acceptit click Yes Thecontentsdisplayedon actual screen may differ from those in the figure 5 Checkthefolder inwhichtheUDFdriverwillbe installed and then click Next Click Clic...

Страница 138: ... then click x at the top right of window The contents displayed on actual screen may differ from those in the figure 9 If your PC uses Windows XP 98 Second Edition Me a message that prompts you to restart will appear Click Finish and then restart the PC Installing the UDF driver is now complete If your PC uses Windows 2000 Professional proceed with step 10 Click Confirm Click Click Click ...

Страница 139: ...is now complete INSTALLING DVD MovieAlbumSE Software DVD MovieAlbumSE is used to edit movies that conform to DVD video recording standard and stills recorded on DVD RAM disc 1 Insert the provided CD ROM into the CD ROM drive of PC 2 UseWindowsMyComputerorExplorertoopen the folder where CD ROM is stored 3 Open the DVDMASE3 folder and then double click Setup or Setup exe 4 The screen for installing ...

Страница 140: ... Check the contents and then click Next Installation will start Proceed with installation following the instructions on screen 10A message for verifying whether a shortcut icon is to be created on desktop will appear If you want to create one click Yes If not choose No 11Choose the restart option and then click Finish Click Click Click Click Click ...

Страница 141: ...ot have authorization consult your system manager INSTALLING MyDVD 1 Insert the provided CD ROM into the CD ROM drive of PC 2 UseWindowsMyComputerorExplorertoopen the folder where CD ROM is stored 3 Open the MyDVD folder and then double click Setup exe 4 The screen for installing MyDVD will appear Click Next 5 CarefullyreadtheSoftwareLicenseAgreement If you accept it click Yes 6 Ifyoudonotwishtoch...

Страница 142: ...which developed MyDVD recommends user registration of MyDVD inordertoofferappropriatesupportto customer The guide for user registration will appearwhenyoustartMyDVDforthefirsttime or you can do it any time by accessing the following URL http www mydvd com You will need the connection environment to the Internet for user registration Click Click ...

Страница 143: ...e ofprogramrecorded on the DVDvideocamera recorderwillbesavedasanindependentmoviefileso that export can be executed at high speed If you do not choose Divide by Marker movie files may be unified and re encoded so it may take time to export them or the image quality may slightly deteriorate DVD MovieAlbumSE may automatically encode a movie recorded in the XTRA mode containing rapidly moving scenes ...

Страница 144: ...sc cover of DVD video camera recorder will open automatically Note The menu screen created on MyDVD will not appear on the DVD video camera recorder Use a general DVD player to display the created menu The following table shows the recordable time on 8 cm DVD R disc from MyDVD The recordable time is shorter thanthatof8cmDVD RAMdiscbecauseMyDVDalways records audio in the LPCM format Moviequalitymod...

Страница 145: ...such could cause a defect in the screen result in display unevenness or damage the LCD monitor If dust adheres to the viewfinder lens remove it using a cotton swab etc Do not rub the lens with force Doing so could scratch the lens Do not use benzene or thinner to clean DVD video camera recorder case The coating of case could peel off or the case could deteriorate Wipe off dirt on the case with a m...

Страница 146: ...tart To start demonstration immediately Press the MENU button again The menu screen will disappear To stop the demonstration midway press the button The demo mode will end when the DVD video camera recorder is turned off or the DISC EJECT button is pressed down Note You can press the DISC NAVIGATION button to stop demonstration midway The Disc Navigation screen will appear If a disc or card is loa...

Страница 147: ...ding space If still cannot be recorded after the above check is clear the disc or card may be damaged Use another disc or card Check 3 Skip or search playback does not work well If the temperature inside the DVD video camera recorder is high normal operation may not be possible Turn the DVD video camera recorder off wait for a few moments and then turn it on again for operation Check 4 No operatio...

Страница 148: ...image will appear in viewfinder unless the LCD monitor is closed and securely locked to DVD video camera recorder Check 7 No image appears on the LCD screen or in the viewfinder Is DVD video camera recorder connected to PC using PC connection cable Unplug the PC connection cable DoesDVDvideocamera recorderstopattheendof the scene to which wipe out was set and played back Press the DISC NAVIGATION ...

Страница 149: ...epaired data may be different from the original recorded content because of partial deletion of defective portion Since the date time for repair is added to the repaired data only the corrected portion for partial repair the original date time information will be lost Since all movies and then all stills are repaired the order of recorded contents will be lost In case of message 2 3 only See 1 on ...

Страница 150: ...e scenes The maximum number of selectable scenes is 999 112 CARD ALMOST FULL Remaining space is only enough to record less than 10 stills Delete unnecessary stills and try the card or use another card 27 101 Card error has occurred Format the card now Was the card formatted on PC Was formatting interrupted midway When using the card on this DVD video camera recorder choose YES and format it 127 Ca...

Страница 151: ...t to use the DVD video camera recorder This message will be displayed for a little longer when the date changes DISC ALMOST FULL The disc will soon be full and recording will be impossible Delete unnecessary scenes and try the disc again or use another disc 26 27 101 Disc error has occurred Finalizing is not complete Disc error occurred during finalizing and finalizing failed Replace the disc See ...

Страница 152: ... has executed software protect Disc is full Cannot add control info The number of entered scenes has reached the limit that can be entered so the control information for generating thumbnails cannot be added Combine several scenes or delete them 101 107 Disc is not formatted Format the disc now Has the disc been initialized on a PC Choose YES and initialize the disc when using it on this DVD video...

Страница 153: ...deocamera recorderor disc is moved from a cold place to a warm place Condensation has occurred on the camera recorder lens or DVD RAM drive Do not remove the disc leave the DVD video camera recorder turned off in a place as dry as possible for 1 2 hours 8 The disc has not been inserted Insert it 41 No more scenes Play List was deleted All scenes are deleted from the play list Since a play list wit...

Страница 154: ...op processing of multiple scenes There was no scene which can be deleted This message will appear if you try to delete multiple scenes on Card Navigation when all the selected scenes have been locked Release the lock on scenes before executing deletion 101 110 This card cannot be used Please replace card The card cannot be used in this DVD video camera recorder Use another card 25 This disc cannot...

Страница 155: ...densation occurs In thiscase do not initialize the disc turn the DVD video camera recorder off wait until it dries out and then turn it on again Initialization will delete all data on disc 3 This message may also appear when dirt adheres to disc Remove the disc and then use a soft dry cloth to clean the dirt before using it This message may also appear when condensation occurs Wait until the DVD v...

Страница 156: ... Keep extra batteries on hand 38 Battery may be dead The performance of battery will deteriorate if it is used for an extended period of time or frequently Purchase a new battery 39 The CHARGE indicator onACadapter charger is blinking Is the ambient temperature too low or too high Charge the battery in environment where the temperature is 50 86 F 10 30 The battery has possibly discharged excessive...

Страница 157: ...mitted or connect AV device directly 65 Are you attempting to record image from video game or PC From some video games or PCs image cannot be recorded on this DVD video camera recorder 66 LCD screen is hard to see Has brightness of LCD screen been adjusted Stop recording and adjust the brightness 91 Is the DVD video camera recorder being used outdoors Usethe viewfinder When using LCDmonitor adjust...

Страница 158: ...e video input jacks Check whether the correctinputwasselected on TVto matchtheconnected jacks Ifthe DVD video camera recorder is connected to VCR set its input selector to external input LINE 73 Is the DVD video camera recorder connected to TV correctly Check the connections 72 Playback picture is momentarily interrupted Is disc scratched or does dirt or fingerprint adhere to it Clean the disc 76 ...

Страница 159: ...sound is heard from mechanism These vibrations or sound are caused by disc drive This does not indicate a fault Error occurs during writing to DVD R disc The temperature of DVD video camera recorder is too high due to continuous operation Disconnect the DVD video camera recorder from PC once remove the disc from the DVD video camera recorder and then turn it off After a few moments connect them ag...

Страница 160: ...ve DVD MovieAlbumSE cannot be used for media other than DVD RAM Click the Preference button in the dialog box click the Device Setting tab to choose the drive where DVD RAM disc is loaded in the Drive Select column and then click OK An image that should have been recorded does not appear when DVD MovieAlbumSE is started Click the Preference button at top right of DVD MovieAlbumSE screen click the ...

Страница 161: ... and read If Divide by Maker is not chosen it may take some time because data will be read while being re encoded 143 Hardware Removal results in error Exit Windows once and then disconnect the DVD video camera recorder Ifyour PCusesWindows 2000 Professional theproblem may be solved if you install Windows 2000 Service Pack 3 or later Symptom Cause and Correction Reference page ...

Страница 162: ...ct the battery or AC adapter charger set the power switch to VIDEO and then POWER OFF and remove the disc 40 45 DVD video camera recorder cannot be operated from remote control Is the remote control pointed at the infrared receiver on DVD video camera recorder Point it at the infrared receiver to operate the DVD video camera recorder 35 Is the infrared receiver on DVD video camera recorder exposed...

Страница 163: ...n for several seconds All settings will be reset Note Do not press the reset button with undue force List of setting items Some items will not appear depending on the disc or card inserted Item Default Setting method Camera Functions Setup Program AE Auto P 80 White Bal Auto P 81 ElS On P 83 Dig Zoom 40 P 84 MIC Filter Off P 85 Record Functions Setup VIDEO Mode FINE P 86 Quality FINE P 87 Input So...

Страница 164: ...s FINE approx 60 minutes STD DVD R disc approx 30 minutes FINE approx 60 minutes STD approx 30 minutes LPCM Maximumnumberof recordable stills DVD RAM disc per side 999 However if movies and stills are mixed on one disc the recordable number will decrease SD memory card when using 32 MB card Approx 220 in FINE mode Varies depending on the recording quality and the type of card P 27 Recording format...

Страница 165: ...5 5 16 57 89 134 mm excluding projections Operating temperature humidity 32 104 F 0 40 C less than 80 32 86 F 0 30 C when connected to PC Storage temperature 16 8 140 F 20 60 C Weight approx 480 g without battery or disc Total weight when recording approx 532 g when using DZ BP7S battery Provided accessories AC adapter charger battery AV S input output cable infrared remotecontrol Lithium batteryf...

Страница 166: ...0 1P RemovethediscfromsquareadapterandsetitinRoundDVD Holder referring to the instruction sheet of disc Removing disc from square adapter Note Refer to page 76 if you want to correctly set the removed disc in Round DVD Holder that can be used in this DVD video camera recorder Battery DZ BP14S Example 1 Example 2 Snap off and remove lock pin Slide the disc obliquely upward so that it is not caught ...

Страница 167: ...ESSOIRES Canada seulement PAR TÉLÉPHONE HITACHI CANADA LTD DIGITAL MEDIA DIVISION 6740 Campobello Road Mississauga Ontario L5N 2L8 Phone 1 800 HITACHI 1 800 448 2244 Durant les heures de bureau Lundi au vendredi 9 00am 7 00pm h n e Samedi 9 00am 5 00pm h n e DECLARATION OF CONFORMITY with FCC Rules for Electromagnetic Compatibility Products DVD VIDEO CAMERA RECORDER Models DZ MV350A Trade Name HIT...

Страница 168: ...cator 53 CHARGE indicator 36 Cleaning 145 Color Level 91 Connecting to Other AV Device 65 to TV 72 Copy 109 Create 117 D Date and time 48 Date setup 48 Defaults 94 Delete edit 122 Delete play list 124 Delete scene 101 121 Demo Mode 146 Detail scene 113 Dig zoom 84 Diopter control 46 Disc 22 Available 22 Capacity 26 Finalize Disc 129 Format 127 Handling 24 Protect 126 Update Control Info 128 DISC E...

Страница 169: ...bmenu 122 Switch 118 Title 124 Portrait Program AE 80 Power Save 92 Power switch 45 Program 114 Play 115 Switch 114 Title 115 Program AE 80 Protect Disc 126 Q Quality Card 87 R Record button 50 Recording indicator 93 Remote control 34 Repeat Play 130 Reset 94 settings 94 system 163 RESET button 163 S Sand Snow Program AE 80 Scene Combine 107 Delete 101 Detail 113 Divide 108 Fade 105 Move 123 Selec...

Страница 170: ...170 English U Update Control Info 128 V VIDEO Mode 86 FINE 86 LPCM 86 STD 86 XTRA 86 Vol button 67 W White Bal 81 White fade 105 Wipe fade 105 X XTRA VIDEO Mode 86 Z Zoom lever 55 ...

Отзывы: