background image

3

Sorting and Naming Stored Programmes

.

Stored programmes can be moved using the 

SORT

 function and named using the 

NAME

 function.

Sorting Stored Programmes

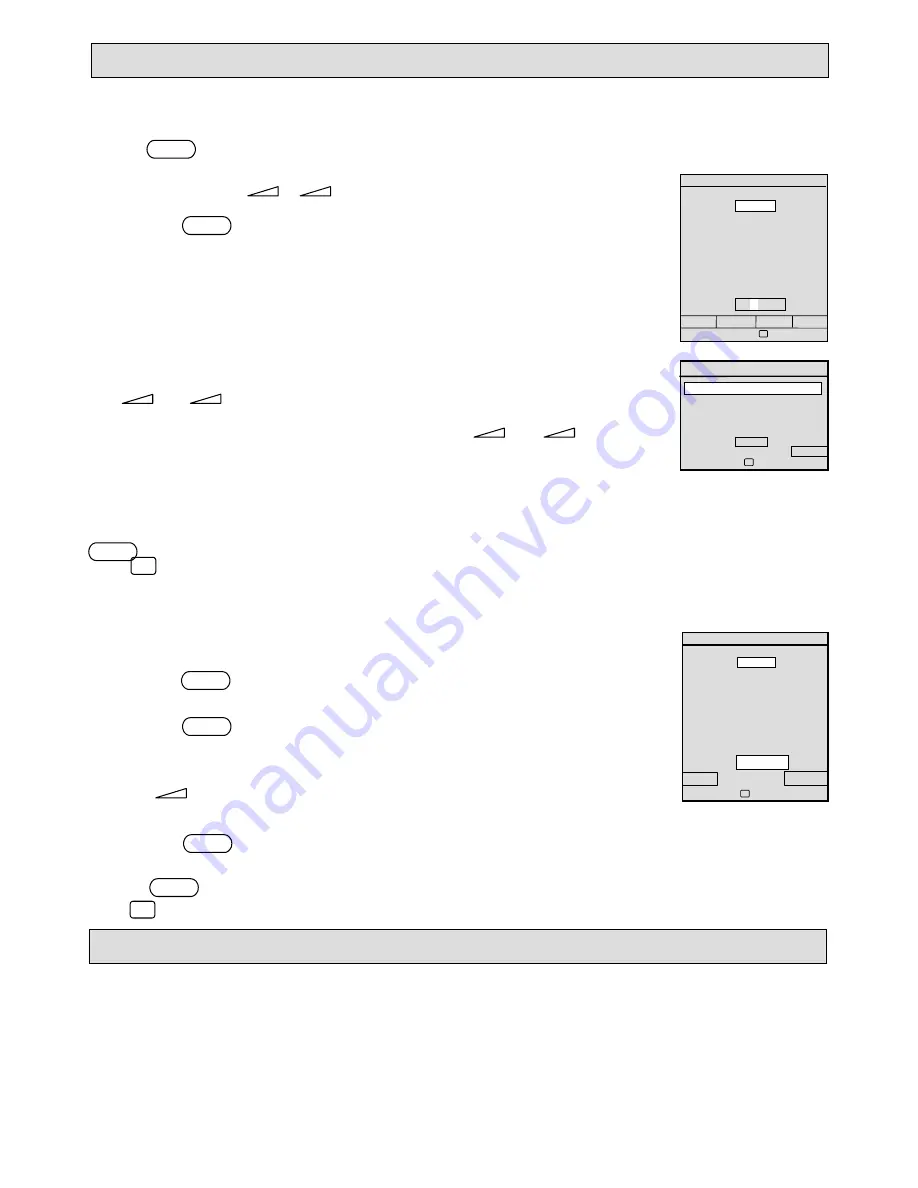
Press the   yellow   key twice to display the 

SETUP

 menu.

1.

With 

SETUP

 menu selected, position the blue cursor block on the programme to be moved

using the  P–/P+  and            – /           +  keys.

2.

Press the     green     key to display the 

MANUAL

 tuning menu.

3

Move the blue cursor bar to highlight 

PROG

, using the P–/P+  keys.

4


Select the programme number you wish to move the programme to, using the
           –  or            +  key.

5.

Move the cursor down  (P– ) to highlight 

STORE

, then press            –  or            +  key to

store the programme against its new number. 

STORED

 will appear on the screen for several

seconds.

Note:    Moving a programme to a new channel number does not delete the programme from its original channel number. Should
you want to do this, select the SETUP menu, move the blue cursor bar on to the original channel number and press and hold the
  yellow   key (SKIP) until NAME and SKIP prompts disappear.

Press 

to return to normal television viewing.

Naming stored programmes

All stored programmes with four white dashes after the programme number can be named to
suit your own requirements.

1.

Press the    yellow    key twice to display the 

SETUP

 menu.

2.


Move the blue cursor block onto the four white dashes where you want to enter a name.

3.

Press the       red       key - 

NAME

. The four dashes will be highlighted and a small white

cursor will appear on the first dash in the edit box.

4.

Press   P+   until the letter you want appears.

5.

Press            +  to move the cursor to the next character.

Continue steps 4 and 5 until up to four characters have been entered.

6.

Press the       red       key - 

OK

 - and the name you have entered will replace the four white

dashes.

Press the      blue      key to cancel if required.

Press

to return to normal television viewing.

Manual Tuning

Manual tuning need only be used for:

1)


Tuning and storing VCR and other equipment connected to the aerial system.

2)


Changing auto-tune programme allocations, (see Sorting and Naming Stored Programmes).

3)


Allocating your own preferred programme number.

SET UP

 00 _ _ _ _

10 _ _ _ _

20 _ _ _ _

 01 _ _ _ _

21 _ _ _ _

 02 _ _ _ _

12 _ _ _ _

22 _ _ _ _

 03 _ _ _ _ 

13 _ _ _ _

23 _ _ _ _

 04 _ _ _ _

14 _ _ _ _

24 _ _ _ _

 05 _ _ _ _ 

15 _ _ _ _

25 _ _ _ _

 06 _ _ _ _ 

16 _ _ _ _

26 _ _ _ _

 07 _ _ _ _

17 _ _ _ _

27 _ _ _ _

 08 _ _ _ _

18 _ _ _ _

28 _ _ _ _

 09 _ _ _ _

19 _ _ _ _

29 _ _ _ _

  NAME   MANUAL     SKIP      AUTO

Select:  

!


"


#


$

11 _ _ _ _

11   _ _ _ _

TUNING

BAND

UHF

MANUAL

FINE

STORE

    SETUP

Select   

!


"

Adjust  

#


$

PROG NO.

01

SET UP

 00 _ _ _ _

10 _ _ _ _

20 _ _ _ _

 01 _ _ _ _

21 _ _ _ _

 02 _ _ _ _

12 _ _ _ _

22 _ _ _ _

 03 _ _ _ _ 

13 _ _ _ _

23 _ _ _ _

 04 _ _ _ _

14 _ _ _ _

24 _ _ _ _

 05 _ _ _ _ 

15 _ _ _ _

25 _ _ _ _

 06 _ _ _ _ 

16 _ _ _ _

26 _ _ _ _

 07 _ _ _ _

17 _ _ _ _

27 _ _ _ _

 08 _ _ _ _

18 _ _ _ _

28 _ _ _ _

 09 _ _ _ _

19 _ _ _ _

29 _ _ _ _

  OK

 CANCEL


 Select  

!


"


 Adjust  

#


$

11 _ _ _ _

11   _ _ _ _

Содержание CP2155TA

Страница 1: ...CP2155TA STEREO COLOUR TELEVISION OPERATING INSTRUCTIONS ...

Страница 2: ...ision from the Remote Control 6 Standby 6 Selecting TV Programmes 6 Selecting On Screen Display Status 6 Volume Control 6 Sound Mute 6 Normalise 6 Stereo Mono Dual Sound Language 6 Videotext 7 Switching on videotext 7 Selecting a Page 7 Videotext Direct Page selection 7 Previous Page Next Page Selection 7 Return to Index Page 7 Stopping the Sequence of Sub pages 7 Direct Selection of a Sub page Cl...

Страница 3: ...ver Always use batteries that are guaranteed against leakage Never leave discharged batteries in the hand unit Always change BOTH batteries when necessary 4 Connect your TV to a 220 240VAC 50Hz power socket Switch on your TV with the switch marked on the front panel The red LED on indicator will illuminate shortly after followed by a programme number on the screen as it lights up Press the same sw...

Страница 4: ...ANCEL This will cancel all TV channels tuned since the automatic tuning was initiated but not previously stored TV channels 4 When automatic tuning and storing is complete the TV channels stored will have four white dashes after each number This is the completed SET UP display you will see on the screen Press to return to normal television viewing PROGRAMME 00 _ _ _ _ 10 _ _ _ _ 20 _ _ _ _ 01 _ _ ...

Страница 5: ...y NAME The four dashes will be highlighted and a small white cursor will appear on the first dash in the edit box 4 Press P until the letter you want appears 5 Press to move the cursor to the next character Continue steps 4 and 5 until up to four characters have been entered 6 Press the red key OK and the name you have entered will replace the four white dashes Press the blue key to cancel if requ...

Страница 6: ...e Volume Balance Treble Bass Mode Spatial and Headphone volume and balance 2 Press or key to change the level of adjustment to your own liking The white bar graph shows the progress of the adjustment Repeat steps 1 and 2 until you have completed all the adjustments you want to make 3 Press P or P key to select STORE 4 Press or key to store the settings The word STORED will appear on the screen for...

Страница 7: ...ages 20 to 24 TUNING YOUR TV Features Menu Use this menu to select and set cancel the features available to you on your television Press the blue key to display the FEATURES menu 1 Press P or P key to position the cursor on the feature you want to use Source Child lock Sleep timer or Text contrast 2 Press or key to either a toggle SOURCE between TV AV1 AV2 and RGB b activate the CHILD LOCK c set t...

Страница 8: ...ild lock on Volume lock on Sleep timer minutes remaining Only those modes that are active when the key is pressed will be displayed e g AV Source Audio mode showing Stereo Sleep timer 59 seconds remaining Volume control Use or key to decrease or increase sound level Sound mute Press key to quickly turn off sound completely Press again to restore Normalise Press to restore picture controls to user ...

Страница 9: ...on The coloured keys used in TV mode for menu access are also used in the videotext mode to select pages by means of coloured prompts corresponding to the coloured keys on the hand unit News Weather R G Y B Previous page Next page selection Press P or P key Return to Index page Press i key Main index appears Stopping the sequence of Sub pages A page sometimes consists of a number of sub pages whic...

Страница 10: ...trols at the Front of your Television At the front of your television there are four push button controls Setting the local control lock child lock It is recommended that your television is controlled from the remote control hand unit and local controls are only used if the hand unit ceases to function e g batteries exhausted A feature exists to enable you to lock the local controls This lock is t...

Страница 11: ...e information on how to connect various pieces of equipment to your TV set consult the other equipment s operating instructions AV1 Connections Pin Signal 1 Audio Output Right Dual II 2 Audio Inpput Right Dual II 3 Audio Output Left Dual I 4 Audio Common Return 5 Blue Return 6 Audio Input Left Dual I 7 RGB Blue Input 8 Function Switching 9 Green Return 10 No Connection 11 RGB Green Input 12 No Con...

Страница 12: ... ITALY Tel 39 02 487861 Tel 39 02 38073415 Servizio Clienti Fax 39 02 48786381 2 Email customerservice italy hitachi eu com HITACHI Europe AB Box 77 S 164 94 Kista SWEDEN Tel 46 0 8 562 711 00 Fax 46 0 8 562 711 13 Email csgswe hitachi eu com HITACHI EUROPE S A S Lyon Office B P 45 69671 BRON CEDEX FRANCE Tel 04 72 14 29 70 Fax 04 72 14 29 99 Email france consommateur hitachi eu com HITACHI EUROPE...

Отзывы: