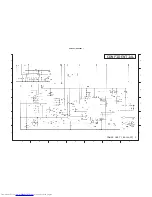
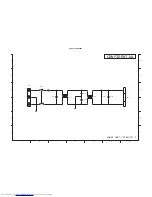
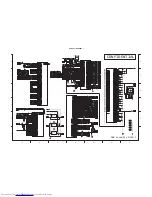
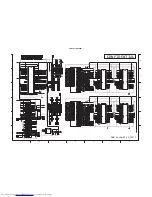
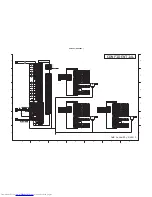
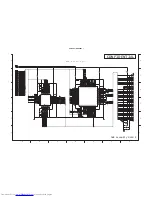
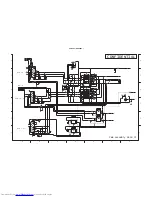
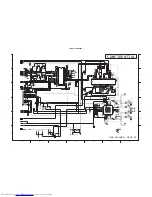
Hitachi CP-X600 series Скачать руководство пользователя страница 77

CP-X600 ( EDX40K3 )

1

2

3

4

5

6

6

1

2

3

4

5

D

G

F

E

C

B

A

PWB assembly MAIN 5

CONFIDENTIAL

M12

A6

I

+1.2V

+3.3V

+1.2V

O

I

O

I

I

I

I

I

O

I

I

I

I

I

I

I

I

I

I

I

I

I

I

I

I

I

I

I

I

I

I

I

I

I

O

O

O

O

O

O

O

O

V18

V3

U4

T17

U7

U16

U5

U17

U6

U15

R17

R16

T6

T15

T5

T7

T4

T16

R5

R4

P17

P16

P15

R7

R6

R15

M11

M10

M9

L12

L11

L10

L9

K12

F17

F15

A4

F1

D2

D1

B3

B2

E1

A2

F2

F3

E3

D3

C4

B4

C7

B7

A1

A7

H2

E20

B20

C6

B6

B5

A5

G1

E2

V4

V17

A20

A19

G2

H3

W17

V7

U2

D18

B18

C19

H1

P18

P5

P4

N17

N16

N5

N4

M17

M16

M5

M4

L17

L16

L5

L4

K17

K5

K4

D7

G6

D17

H5

D19

U9

E13

E10

E7

D11

D8
D9

U8

G3

K16

G4
G5

F16

F14

E6

E14

F5

E15

F6

E16
E17

F4

D14

E4

D6

D5

D16

D15

E5

C18

D4

C3

B19

C20

D20

C2

C1

B1

J12

K11

K10

K9

J11

J10

J9

J17

J16

J5

J4

H17

H16

H4

G17

G16

C14

C5

U14

U13

U12

U11

U10

A3

T14

T13

T12

T11

T10

T9

T8

E12

E11

E9

E8

D13

D12

L3E07110K0A 1/4

D10

O
O

O

O
O

O

O
O

O

O
O

O

O

O

O

O
O
O
O

R3

R2

N3

O

O
O

P2

O

O

N2

M2

N1

O

O

P3

M1

O

O

O

P1

O

O

O

I

I

I

I

I

I

I

I

I

I

O

O

O

O

O

O

O

W1

V2

K1

A8

C9

B9

A9

C8

B8

C10

B10

A10

C11

M3

T1

L1
L2

Y1

V1

W5
Y5

W2

Y4

W3

W4
Y3
Y2

U1

U3

R1

T2

T3

V5

J3

J2

J1

K3

K2

L3

L3E07110K0A 2/4

O
O

O

O
O

O

O
O

O

O
O

O

O

O

O

O
O
O
O

W12

Y12

W10

O

O
O

Y11

O

O

Y10

Y9

V11

O

O

W11

V10

O

O

O

V12

O

O

O

I

I

I

I

I

I

I

I

I

I

O

O

O

O

O

O

O

Y15

V15

V8

C12

B12

A12

C13

B11

A11

B13

A13

B14

A14

W9

V14

V9
Y8

V16

W15

W19
Y20

Y16

Y19

W16

Y18
W18
Y17

Y14

W14

V13

Y13

W13

W20

V6

W6

Y6

W7

Y7

W8

L3E07110K0A 3/4

O
O

O

O
O

O

O
O

O

O
O

O

O

O

O

O
O
O
O

M20

L18

P20

O

O
O

M18

O

O

N18

R20

N19

O

O

N20

P19

O

O

O

M19

O

O

O

I

I

I

I

I

I

I

I

I

I

O

O

O

O

O

O

O

H18

J19

T18

A15

C16

B16

A16

C15

B15

C17

B17

A17

A18

R19

K19

R18
T20

H19

J20

E19
F20

G18

F19

H20

F18
G20
G19

J18

K20

L19

K18

L20

E18

V19

V20

U18

U19

U20

T19

L3E07110K0A 4/4

C402
2.2/6.3

1

2

C428

2.2/6.3

1

2

C408

1005

0.01/16

1

2

C424

1005

0.01/16

1

2

C403

1005

0.01/16

1

2

C425

1005

0.01/16

1

2

C405

1005

0.01/16

1

2

C409

1005

0.01/16

1

2

C423

1005

0.01/16

1

2

C407

1005

0.01/16

1

2

C426

1005

0.01/16

1

2

C406

1005

0.01/16

1

2

C411

2.2/6.3

1

2

C443

1005

5.0p-C

1

2

C410

1005

0.01/16

1

2

C427

1005

0.01/16

1

2

C421

2.2/6.3

1

2

C441

1005

0.1/10

1

2

C422

1005

0.01/16

1

2

C404

1005

0.01/16

1

2

C401

220/6.3
MVK/SKV

1

2

C420

220/6.3

MVK/SKV

1

2

C442

33/10

MVK/SKV

1

2

2125

H401

SC020JT

1

2

3

2125

H403

SC020JT

1

2

3

2125

H402

SC020JT

1

2

3

GND1

2518

L401

10

H

1

2

2518

L402

2.2

H

1

2

I401

L3E07110K0A

D7

VDD1-D7

D8

VDD1-D8

D9

VDD1-D9

D10

VDD1-D10

D11

VDD1-D11

D12

VDD1-D12

D13

VDD1-D13

E7

VDD1-E7

E8

VDD1-E8

E9

VDD1-E9

E10

VDD1-E10

E11

VDD1-E11

E12

VDD1-E12

E13

VDD1-E13

T8

VDD1-T8

T9

VDD1-T9

T10

VDD1-T10

T11

VDD1-T11

T12

VDD1-T12

T13

VDD1-T13

T14

VDD1-T14

U8

VDD1-U8

U9

VDD1-U9

U10

VDD1-U10

U11

VDD1-U11

U12

VDD1-U12

U13

VDD1-U13

U14

VDD1-U14

C5

VDD2-C5

C14

VDD2-C14

D19

VDD2-D19

G3

VDD2-G3

G16

VDD2-G16

G17

VDD2-G17

H4

VDD2-H4

H5

VDD2-H5

H16

VDD2-H16

H17

VDD2-H17

J4

VDD2-J4

J5

VDD2-J5

J16

VDD2-J16

J17

VDD2-J17

K4

VDD2-K4

K5

VDD2-K5

K16

VDD2-K16

K17

VDD2-K17

L4

VDD2-L4

L5

VDD2-L5

L16

VDD2-L16

L17

VDD2-L17

M4

VDD2-M4

M5

VDD2-M5

M16

VDD2-M16

M17

VDD2-M17

N4

VDD2-N4

N5

VDD2-N5

N16

VDD2-N16

N17

VDD2-N17

P4

VDD2-P4

P5

VDD2-P5

P18

VDD2-P18

U2

VDD2-U2

V7

VDD2-V7

W17

VDD2-W17

H1

VSEL

C19

TEST1

B18

TEST2

D18

TEST3

V17

TEST4

V4

TEST5

E2

TEST6

G1

TEST7

H3

TEST8

G2

TEST9

A19

SCLK

A20

SCS

B20

SDATA

E20

RESET

H2

EN

A7

OSDSW

A5

OSDRIN0

B5

OSDRIN1

B6

OSDGIN0

C6

OSDGIN1

B7

OSDBIN0

C7

OSDBIN1

C4

TMS

D3

TCK

B4

TDI

E3

TRST

F3

TDO

A1

HSYNC

A2

VSYNC

E1

DCLK

B2

HSI

B3

HSO

D1

PLI

D2

PLO

F1

VDDP

F2

GNDP

V18

GND-V18

V3

GND-V3

U17

GND-U17

U16

GND-U16

U15

GND-U15

U7

GND-U7

U6

GND-U6

U5

GND-U5

U4

GND-U4

T17

GND-T17

T16

GND-T16

T15

GND-T15

T7

GND-T7

T6

GND-T6

T5

GND-T5

T4

GND-T4

R17

GND-R17

R16

GND-R16

R15

GND-R15

R7

GND-R7

R6

GND-R6

R5

GND-R5

R4

GND-R4

P17

GND-P17

P16

GND-P16

P15

GND-P15

M11

GND-M11

M10

GND-M10

M9

GND-M9

L12

GND-L12

L11

GND-L11

L10

GND-L10

L9

GND-L9

K12

GND-K12

K11

GND-K11

K10

GND-K10

K9

GND-K9

J12

GND-J12

J11

GND-J11

J10

GND-J10

J9

GND-J9

G6

GND-G6

G5

GND-G5

G4

GND-G4

F17

GND-F17

F16

GND-F16

F15

GND-F15

F14

GND-F14

F6

GND-F6

F5

GND-F5

F4

GND-F4

E17

GND-E17

E16

GND-E16

E15

GND-E15

E14

GND-E14

E6

GND-E6

E5

GND-E5

E4

GND-E4

D17

GND-D17

D16

GND-D16

D15

GND-D15

D14

GND-D14

D6

GND-D6

D5

GND-D5

D4

GND-D4

C18

GND-C18

C3

GND-C3

B19

DIRY

C20

NRG

D20

SHENB

C2

CLP2

C1

CLP1

B1

HPLL

A4

VRESET0

A3

HRESET0

A6

SELECT

M12

GND-M12

I401

L3E07110K0A

C11

RIN0

A10

RIN1

B10

RIN2

C10

RIN3

A9

RIN4

B9

RIN5

C9

RIN6

A8

RIN7

B8

RIN8

C8

RIN9

W1

CLYOUTR

Y1

DYOUTR

V2

ENBY2R

V1

ENBY1R

W3

CLXOUTR

W2

DXOUTR

Y2

ENBX5R

Y3

ENBX4R

W4

ENBX3R

Y4

ENBX2R

Y5

ENBX1R

W5

DIRXRN

V5

DIRXR

U3

FRPR

T1

STSQOR

T2

STSQER

T3

XFRR

U1

SHCLKRN

R1

SHCLKR

M2

R2OUT9

M1

R2OUT8

N3

R2OUT7

N2

R2OUT6

N1

R2OUT5

P3

R2OUT4

P2

R2OUT3

P1

R2OUT2

R3

R2OUT1

R2

R2OUT0

J3

R1OUT9

J2

R1OUT8

J1

R1OUT7

K3

R1OUT6

K2

R1OUT5

K1

R1OUT4

L3

R1OUT3

L2

R1OUT2

L1

R1OUT1

M3

R1OUT0

I401

L3E07110K0A

A14

GIN0

B14

GIN1

A13

GIN2

B13

GIN3

C13

GIN4

A12

GIN5

B12

GIN6

C12

GIN7

A11

GIN8

B11

GIN9

Y15

CLYOUTG

V16

DYOUTG

V15

ENBY2G

W15

ENBY1G

W16

CLXOUTG

Y16

DXOUTG

Y17

ENBX5G

W18

ENBX4G

Y18

ENBX3G

Y19

ENBX2G

Y20

ENBX1G

W19

DIRXGN

W20

DIRXG

W14

FRPG

V14

STSQOG

Y13

STSQEG

W13

XFRG

Y14

SHCLKGN

V13

SHCLKG

Y9

G2OUT9

V10

G2OUT8

W10

G2OUT7

Y10

G2OUT6

V11

G2OUT5

W11

G2OUT4

Y11

G2OUT3

V12

G2OUT2

W12

G2OUT1

Y12

G2OUT0

V6

G1OUT9

W6

G1OUT8

Y6

G1OUT7

W7

G1OUT6

Y7

G1OUT5

V8

G1OUT4

W8

G1OUT3

Y8

G1OUT2

V9

G1OUT1

W9

G1OUT0

I401

L3E07110K0A

A18

BIN0

A17

BIN1

B17

BIN2

C17

BIN3

A16

BIN4

B16

BIN5

C16

BIN6

A15

BIN7

B15

BIN8

C15

BIN9

H18

CLYOUTB

H19

DYOUTB

J19

ENBY2B

J20

ENBY1B

H20

CLXOUTB

G18

DXOUTB

G19

ENBX5B

G20

ENBX4B

F18

ENBX3B

F19

ENBX2B

F20

ENBX1B

E19

DIRXBN

E18

DIRXB

K20

FRPB

K19

STSQOB

K18

STSQEB

L20

XFRB

J18

SHCLKBN

L19

SHCLKB

R20

B2OUT9

P19

B2OUT8

P20

B2OUT7

N18

B2OUT6

N19

B2OUT5

N20

B2OUT4

M18

B2OUT3

M19

B2OUT2

M20

B2OUT1

L18

B2OUT0

V19

B1OUT9

V20

B1OUT8

U18

B1OUT7

U19

B1OUT6

U20

B1OUT5

T18

B1OUT4

T19

B1OUT3

T20

B1OUT2

R18

B1OUT1

R19

B1OUT0

CHEN2B

1

AP412

1

CHSQER

1

AP413

1

CHCKNG

1

CHSQOB

1

CH415

1

CH413

1

CHCKNR

1

AP411

1

CH412

1

CHSQEB

1

AP415

1

CHHPLL

1

CHENNR

1

CHEN2G

1

CHCP1

1

CHEN2R

1

CH414

1

CHCP2

1

AP410

1

CHSQOR

1

CHEN4G

1

CHTMS

1

CH410

1

CHENNB

1

CHSQEG

1

CHCKNB

1

AP414

1

CHHRST

1

CHSHE

1

CHENNG

1

CHDIRY

1

CHSQOG

1

CH411

1

CHEN4B

1

CHEN3G

1

CHEN3B

1

CHVRST

1

CHTDI

1

CHTDO

1

CHEN3R

1

CHEN4R

1

1005

R435

0

1

2

1005

R426

56

1

2

1005

R440

0

1

2

1005

R431

0

1

2

1005

R432

47K

1

2

1005

R430
10K

1

2

1005

R444
0

1

2

1005

R442

47

1

2

1005

R433

330

1

2

1005

R438

0

1

2

1005

R439

0

1

2

1005

R425

56

1

2

1005

R427

56

1

2

1005

R434
100

1

2

1005

R441

100

1

2

R437

2010

100K

5

6

3

4

1

2

7

8

R401

2010

150

1

2

3

4

5

6

7

8

R423

2010

56

1

2

3

4

5

6

7

8

R417

2010

150

1

2

3

4

5

6

7

8

R436

2010

100K

1

2

3

4

5

6

7

8

R420

2010

150

1

2

3

4

5

6

7

8

R415

2010

56

1

2

3

4

5

6

7

8

R422

2010

56

1

2

3

4

5

6

7

8

R403

2010

150

1

2

3

4

5

6

7

8

R412

2010

150

1

2

3

4

5

6

7

8

R402

2010

150

1

2

3

4

5

6

7

8

R413

2010

150

1

2

3

4

5

6

7

8

R409

2010

150

1

2

3

4

5

6

7

8

R404

2010

150

1

2

3

4

5

6

7

8

R424

2010

56

1

2

3

4

5

6

7

8

R406

2010

56

1

2

3

4

5

6

7

8

R411

2010

150

1

2

3

4

5

6

7

8

R418

2010

150

1

2

3

4

5

6

7

8

R416

2010

56

1

2

3

4

5

6

7

8

R414

2010

56

1

2

3

4

5

6

7

8

R410

2010

150

1

2

3

4

5

6

7

8

R405

2010

150

1

2

3

4

5

6

7

8

R419

2010

150

1

2

3

4

5

6

7

8

R408

2010

56

1

2

3

4

5

6

7

8

R407

2010

56

1

2

3

4

5

6

7

8

R421

2010

150

1

2

3

4

5

6

7

8

XFRG

GD2-0

DIRXR

DBE8

DXOUTB

RD1-2

DYOUTG

BD1-2

BD1-5

+1.2V

DYOUTR

DRE6

RD2-6

CLYOUTG

DIRXB

GD2-7

GD2-8

CLK2

DRE9

DRE7

GD2-9

GD2-4

DRE5

DBE5

BD2-9

DRE4

BD2-6

RD1-1

DGE3

GD1-2

CLXOUTG

RD1-9

ENBYB1

DYOUTB

BD1-1

RD2-4

ENBXG1

DHS

ENBYR2

DGE4

FRPB

DIRXG

RD1-0

RD2-5

DGE7

CLXOUTB

DXOUTR

DGE8

RD1-4

BD1-6

BD1-3

DVS

GD1-1

RD1-8

BD2-3

BD1-0

RD1-3

RD2-0

DGE5

DBE0

DRE1

GD1-4

GD1-3

ENBXG5

BD1-7

DBE1

DCLK

RD2-2

RD1-6

GD1-0

BD1-4

GD2-5

BD2-5

BD2-8

SHCLKB

DGE2

DGE9

RD2-3

ENBYB2

RD1-5

ENBYG1

DRE0

BD2-4

ENBXB5

DRE8

FRPR

+3.3VP

RD2-1

GD1-9

DGE0

XFRR

DRE3

BD1-9

GD2-2

GD2-1

GD2-3

ENBYR1

RESETP

DGE6

GD2-6

DRE2

ENBXR1

SHCLKR

DBE4

BD1-8

GD1-5

RD1-7

DXOUTG

DBE7

RD2-8

RD2-7

GD1-7

ENBXB1

DGE1

BD2-7

FRPG

GD1-6

DBE6

CLXOUTR

XFRB

RD2-9

ENBYG2

GD1-8

BD2-2

NRG

SHCLKG

BD2-0

DBE2

CLYOUTR

DATA2

BD2-1

CS_DR

CLYOUTB

ENBXR5

DBE3

DBE9

Содержание CP-X600 series

Страница 1: ...or 4 Do not touch the exhaust fan during operation 5 The LCD module assembly is likely to be damaged If replacing to the LCD LENS PRISM assembly do not hold the FPC of the LCD module assembly 6 Use the cables which are included with the projector or specified Service Warning Warning The technical information and parts shown in this manual are not to be used for the development design production st...

Страница 2: ...tion C signal 0 286 0 1Vp p NTSC burst signal 75Ω termination 0 3 0 1Vp p PAL SECAM burst signal 75Ω termination COMPONENT VIDEO Y 1 0 0 1Vp p 75Ω termination positive CB PB 0 7 0 1Vp p 75Ω termination positive CR PR 0 7 0 1Vp p 75Ω termination positive AUDIO signal AUDIO IN 1 500mVrms 47kΩ or more max 2Vrms AUDIO IN 2 AUDIO IN 3 4 L R 500mVrms 47kΩ or more max 2Vrms AUDIO OUT 0 500mVrms output im...

Страница 3: ...ring use or just after use since it is too hot Do not look into the lens or vents while the lamp is on since the strong light is not good for your eyes Do not grab the front cover to hold the projector up since the projector may drop down Do not handle the elevator knobs without holding the projector since the projector may drop down CAUTION Maintain normal ventilation to prevent the projector fro...

Страница 4: ...AUDIO IN2 port 14 AUDIO IN3 R L ports 15 AUDIO IN4 R L ports 16 RGB OUT port 17 AUDIO OUT port CAUTION Do not use the security bar and the security slot to prevent the projector from falling down since it is not designed for it Use the shutdown switch only when the projector is not turned off by normal procedure since pushing this switch stops operation of the projector without cooling it down 6 5...

Страница 5: ...BUTTON 1 button 14 MY BUTTON 2 button 15 KEYSTONE button 16 POSITION button 17 MENU button 18 cursor buttons 19 ENTER button 20 ESC button 21 RESET button 22 Battery cover HOME PAGE UP PAGE DOWN END VIDEO SEARCH FREEZE OFF ON MAGNIFY ASPECT AUTO BLANK MUTE VOLUME KEYSTONE MY BUTTON POSITION 1 2 ESC ENTER MENU RESET RGB 2 1 5 inactive 8 9 inactive 12 13 16 18 20 3 4 6 7 inactive 10 11 inactive 15 1...

Страница 6: ... the MENU button to display the EASY menu If Advanced menu comes up move to the Easy menu Select the RESET in the EASY menu and press the or ENTER button to open the RESET dialog Choose the EXECUTE with the button Note that the projector will not allow you to reset its adjustment values with no signal input 4 Perform all adjustments from the FACTORY MENU Operate as follows to display the FACTORY M...

Страница 7: ...ss than the flicker at the periphery When the flicker is about the same across the whole screen adjust so that the flicker at the center of the screen is somewhat less than elsewhere 2 In the same way use DAC P V COM G in the FACTORY MENU to adjust the G color flicker 3 In the same way use DAC P V COM B in the FACTORY MENU to adjust the B color flicker NOTE The test pattern shown on the left some ...

Страница 8: ... colors R and B 6 Select GAMMA SUB CNT and G in the FACTORY MENU If the background is white solid press the ENTER key on the remote control to change to W monochrome in the 33 tone grayscale 7 Adjust GAMMA SUB BRT R and B in the FACTORY MENU so that low brightness white balance is best 8 Adjust GAMMA SUB CNT R and B in the FACTORY MENU so that middle brightness white balance is best 9 Repeat steps...

Страница 9: ...The color uniformity of the entire screen can be adjusted by adjusting the white balance for each of the points starting in order from the low numbers 5 Adjustment point No 1 should not be adjusted because it controls the brightness of the entire screen 6 To temporarily turn correction off place the cursor on C UNIF in the Adjust Tone menu and press the key The ON OFF menu appears Place the cursor...

Страница 10: ...pletes adjustments required for MID 1 Note Since excessive correction may lead to a correction data overview during internal calculations use the following values for reference No 2 to No 5 40 or less No 6 to No 9 50 or less No 10 to No 13 70 or less No 14 to No 17 120 or less 10 Then adjust the MIN tone G so that the adjustment values are two times as much as MID 1 tone G values This completes G ...

Страница 11: ...lor shading 7 Next view measurement points No 4 No 5 No 12 No 13 and make similar adjustments 8 Then adjust measurement points No 6 No 7 No 8 No 9 No 14 No 15 No 16 and No 17 This completes the MIN tone adjustments 9 Make similar adjustments for other tones except the MID 4 and MID 6 tones as described in steps 1 to 8 above 8 3 16 17 9 11 6 14 2 12 15 13 10 7 4 1 5 8 3 16 17 9 11 14 12 15 13 10 4 ...

Страница 12: ...12 CP X600 EDX40K3 4 8 Adjusting the zoom and focus 1 Use the zoom ring to adjust the screen size 2 Use the focus ring to focus the picture Focus ring Zoom ring Top ...

Страница 13: ...ng Check points P501 P701 P601 E302 E301 E807 E800 E806 E804 E808 E805 EW51 EA02 EA03 EE01 EA04 E802 E803 E801 E305 IS04 IS07 IS01 IS02 EE02 E310 DK01 POWER DK02 TEMP DK03 LAMP E1 E2 PW assembly REMOTE PW assembly KEYPAD PW assembly SW ...

Страница 14: ...resistance Measure resistance between pins 9 and 14 and between pins 12 and 14 of E800 Disconnect TSW from power unit circuit and measure resistance of TSW Open 0Ω PWB assembly MAIN Power unit circuit Thermal switch TSW Open Power unit circuit Fuse on the power unit circuit NO Mea sure resis tance between pins 2 and 4 and between pins 7 and 11 of E800 0Ω PWB assembly MAIN Power unit circuit Power ...

Страница 15: ... the pin 2 of connectors for DC fans soon after the button is pressed Is the voltage supplied to the pin 4 of E805 and E804 soon after the button is pressed Observe the voltage waveforms at pin 1 of connectors for DC fans soon after the button is pressed Blinks DC fan failed in above check Correct waveform is drawn below f 40Hz PWB assembly MAIN NO 0V PWB assembly MAIN PWB assembly MAIN Correct YE...

Страница 16: ...CD Panels connection to the MAIN board No CPC36 connector PWB assembly MAIN LCD Lens prism assembly OK PWB assembly MAIN No SN74LVC1G97 IS06 IS07 EL8302IUZ IS01 IS02 PWB assembly MAIN EL8302IUZ IS01 IS02 No SN74LVC1G97 IS04 IS05 YES NG Picture is not displayed when the Video S Video or component signal is input Are the splash screen and the user menu displayed correctly YES Confirm the LCD Panels ...

Страница 17: ...n and measure its resistance The check after parts change 1 PC power supply OFF 2 Connection of cable 3 Projector starting 4 PC starting When not operating PC set up change of cable Can not control to RS 232C NO YES Use cross cable Check the RS 232C cable Are pin No 2 and 3 crossed Make sure PC setup NO YES PWB assembly MAIN PWB assembly CONTROL Are the signals input at each pins on the CONTROL Po...

Страница 18: ...lead free solder has been completely melted do not apply the soldering iron without solder Servicing soldering iron A soldering iron with a temperature setting capability temperature control function is recommended The melting point of lead free solder is higher than leaded solder Use a soldering iron that maintains a high stable temperature large heat capacity and that allows temperature adjustme...

Страница 19: ...ease prepare cleaning tools and materials as follows And prepare relatively clean room not to work in additional dust while removing operation 1 Swab for cleaning P NX05742 Cotton stick L70 2 Air duster Dust blower spray can 3 Vacuum cleaner 2 Disassemble and setting up 1 Turn off the projector and unplug the power cord 2 Remove the lamp cover and upper case according to the disassembling diagram ...

Страница 20: ...e it free and disconnect the LCD panel flexible cables 5 Press and hold the switch S941 using an insulator during maintenance 6 Keep the unscrewed wires away from all of electric parts Remove these screws Flexible cables of LCD panel Remove these 9 screws ...

Страница 21: ...the dust on screen While removing the dust separated dust will be blown off by air cooling system Please pay attention not to damage panels and optical filters 5 Re assembly 1 Turn off the set and unplug the power cord 2 Remove an insulator from S941 3 Screw down the PWB assembly MAIN and connect the LCD panel flexible cables to the PWB assembly MAIN 4 Re assemble the set 5 While re assembling ple...

Страница 22: ...ote sensor Switch between Setting 1 and 2 using the SERVICE REMOTE FREQ item found in OPTION MENU Use the button to change the Projector s remote sensor setting 1 NORMAL 2 HIGH Items with a checkmark are on The factory default setting is for both 1 NORMAL and 2 HIGH to be on If the remote control does not function correctly set this to either only 1 or only 2 Neither can be turned off at the same ...

Страница 23: ...the air filter An air filter of specified type will come together with a replacement lamp for this projector 1 Turn the projector off and unplug the power cord Allow the lamp to cool for at least 45 minutes 2 When the projector is suspended from the ceiling apply the vacuum cleaner to and around the filter cover first to prevent penetration of dust or the like 3 Hold the filter cover knobs while l...

Страница 24: ...ojector vents or get it in your eyes or mouth Before replacing the lamp turn the projector off and unplug the power cord then wait at least 45 minutes for the lamp to cool sufficiently Handling the lamp while hot can cause burns as well as damaging the lamp Never unscrew except the appointed marked by an arrow screws Do not open the lamp cover while the projector is suspended from above This is da...

Страница 25: ...by arrow of the lamp and slowly pick up the lamp by the handles 5 Insert the new lamp and retighten firmly the 3 screws of the lamp that are loosened in the previous process to lock it in place 6 Slide the lamp cover back in place and firmly fasten the screw of the lamp cover 7 Turn the projector on and reset the lamp time using the LAMP TIME function in the OPTION menu 1 Press the MENU button to ...

Страница 26: ... of the projector In order to ensure the safe use of the projector it needs to clean and inspect the projector about once a year Caring for the lens If the lens is flawed soiled or fogged it could cause deterioration of display quality Please take care of the lens being cautions of the handling 1 Turn the projector off and unplug the power cord Allow the projector to cool sufficiently 2 After maki...

Страница 27: ...gnal processing To avoid such phenomena AUTO function should be used with the full size picture that has bright tone on its peripheral Note 1 The phenomenon at the failure of AUTO adjustment depends on resolution of input source scene of picture etc 2 There is no failure above in AUTO with video source through VIDEO S VIDEO or COMPONENT input The reason is why recognition of input signal s standar...

Страница 28: ...button once then press Magnify off button of remote for 3 second or more to display SERVICE PASSWORD box 3 Enter the Life Key MENU KEYSTONE Then all security functions will be inactivated temporarily Note The Life key can be used up to 30 times The key cannot be used thereafter If the Life key cannot be used see the paragraph of SECURITY in the User s Manual The frequency in which Life key is inpu...

Страница 29: ...utton 4th entry code Press the button Note The Master PIN codes can be used up to 30 times The codes cannot be used thereafter If the Master PIN codes cannot be used see the paragraph of the PIN LOCK system inactivation The PIN LOCK System inactivation 1 When the PIN BOX menu is displayed press RESET for 3 seconds or more in order to get the ID Inquiring Code PIN BOX ID Inquiring Code 2 Send HITAC...

Страница 30: ...nal source specs CHECK THE AIR FLOW The internal portion temperature is rising Please turn the power OFF and allow the unit to cool down at least 20 minutes After having confirmed the following items please turn the power ON again Is there blockage of the air passage aperture Is the air filter dirty Does the peripheral temperature exceed 35 C If the same indication is displayed after the remedy pl...

Страница 31: ...ng In Red Turned off Blinking In Red The cooling fan is not operating Please turn the power off and allow the unit to cool down at least 20 minutes After the projector has sufficiently cooled down please make confirmation that no foreign matter has become caught in the fan etc and then turn the power on again If the same indication is displayed after the remedy please replace a fan Blinking In Red...

Страница 32: ... If this is executed all of the user data is initialized Never use it when not required Set operating time display method accumulated lamp time display method 1 Select OPTION from the Advanced menu then place the cursor on the LAMP TIME 2 Press the ENTER or RESET button 3 Press the Reset button once then press KEYSTONE button of the remote control for 3 seconds or more to display the screen shown ...

Страница 33: ...33 CP X600 EDX40K3 7 Wiring diagram Wiring diagram 1 ...

Страница 34: ...34 CP X600 EDX40K3 Wiring diagram 2 ...

Страница 35: ...35 CP X600 EDX40K3 Wiring diagram 3 ...

Страница 36: ...36 CP X600 EDX40K3 Wiring diagram 4 ...

Страница 37: ...37 CP X600 EDX40K3 Wiring diagram 5 ...

Страница 38: ...38 CP X600 EDX40K3 Wiring diagram 6 ...

Страница 39: ...39 CP X600 EDX40K3 Wiring diagram 7 ...

Страница 40: ...40 CP X600 EDX40K3 Wiring diagram 8 ...

Страница 41: ...41 CP X600 EDX40K3 Wiring diagram 9 ...

Страница 42: ...42 CP X600 EDX40K3 8 Disassembly diagram ...

Страница 43: ...43 CP X600 EDX40K3 ...

Страница 44: ...removed before the upper case when disassembling the machine If the upper case is detached with the lamp door installed the MAIN board might be damaged a Remove the Lamp door Loosen this screw Lamp door b Remove 2 screws on the front and 2 screws on the upper case 1 Before remove 2 screws on the upper case open the Lens shift cover 2 screws Lens shift cover Dial Hole Cover ...

Страница 45: ...e 9 screws on the bottom and 2 screws on the rear to detach the upper case 2 screws 9 screws 2 Remove 2 screws on the front 3 Remove the front cover 2 screws front cover Set the lever to the center Match the dent with the lever ...

Страница 46: ...Be careful not to bend the outside casing Torque 0 39 0 59N m When assembling b Attach the Front cover 1 Attach the Front cover 2 Tighten 2 screws on the front 3 Open the Lens shift cover 4 Attach the Dial Hole Cover 5 Tighten 2 screws on the upper case CAUTION When re assembling tighten these screw at the torque of 0 49 0 1 N m so that the screw holes are not damaged 2 screws Lens shift cover 2 s...

Страница 47: ...t NOTE One of screws is behind the duct Lamp door CAUTION The ballast bracket holding the bal last power unit is installed under neath the power supply bracket Be careful not to injure your fin gers or hand by the edges of the ballast bracket during mainte nance around the power units Ballast bracket CAUTION Tighten this screw using a manual screwdriver ...

Страница 48: ...and attaching the Panel Fan Duct assembly Tighten 6 screws and hook the panel fan duct assembly When assembling Remove 6 screws and unhook the panel fan duct assembly as shown in the diagram When disassembling Panel fan duct assembly ...

Страница 49: ...ing the power unit fan a Assemble the power unit fan and fan cushion as described below 1 Attach the fan bracket to the new power unit fan using 2 screws 2 Stick the Fan cushion along the right side of the fan as shown in the diagram Note If you install the new fan without the fan cushion the fan vibration in operating might make noise Be careful not to invert the fan when assembling the exhaust f...

Страница 50: ...ling the FOOT MTL Remove the remote board first when assembling the FOOT MTL This is necessary when replacing the FAN and so on CAUTION Make sure that power unit board was fixed by 4 hooks of PWB HOLDER Make sure that it is hard to remove Remote board Cross Section ...

Страница 51: ...IUZ T7 8 PE00251 BATTERY HOLD CAP 37 CK51461R SN74LVC1G97DCKR 9 PE00281 RUBBER FOOT 38 HA01762 EDX POWER UNIT BALLAST 10 QD52955 FRONT COVER ASS Y EDX40K3 39 HA01701 EDX POWER UNIT CIRCUIT 11 QD52851 FILTER COVER ASSY EDX40 40 2722449 FUSE 8A 12 PV00471 HANDLE EDX40 41 HA01711 EDX FILTER UNIT 13 PM31264 AC PANEL 42 GK01491 SP 40M PH2P 301 14 ML00863 PLASTIC RIVET FOR THERMAL SW ASY 43 DT00771 LAMP...

Страница 52: ...n the computer on and after the computer has started up turn the projector on Communications setting 19200bps 8N1 1 Protocol Consist of header 7 bytes command data 6 bytes 2 Header BE EF 03 06 00 CRC_low CRC_high CRC_low Lower byte of CRC flag for command data CRC_high Upper byte of CRC flag for command data 3 Command data Command data chart byte_0 byte_1 byte_2 byte_3 byte_4 byte_5 Action Type Se...

Страница 53: ...r setting value Decrement command 1 The computer sends the decrement code Header Command data 05H 00H type 2 bytes 00H 00H to the projector 2 The projector decreases the setting value on the above setting code 3 The projector returns the response code 06H to the computer When the projector cannot understand the received command When the projector cannot understand the received command the error co...

Страница 54: ...D3 06 00 00 70 00 00 CONTRAST Get BE EF 03 06 00 FD D3 02 00 04 20 00 00 Increment BE EF 03 06 00 9B D3 04 00 04 20 00 00 Decrement BE EF 03 06 00 4A D2 05 00 04 20 00 00 CONTRAST Reset Execute BE EF 03 06 00 A4 D2 06 00 01 70 00 00 PICTURE MODE Set NORMAL BE EF 03 06 00 23 F6 01 00 BA 30 00 00 CINEMA BE EF 03 06 00 B3 F7 01 00 BA 30 01 00 DYNAMIC BE EF 03 06 00 E3 F4 01 00 BA 30 04 00 BOARD BLACK...

Страница 55: ...int 6 Get BE EF 03 06 00 C4 FE 02 00 95 30 00 00 Increment BE EF 03 06 00 A2 FE 04 00 95 30 00 00 Decrement BE EF 03 06 00 73 FF 05 00 95 30 00 00 User Gamma Point 7 Get BE EF 03 06 00 80 FE 02 00 96 30 00 00 Increment BE EF 03 06 00 E6 FE 04 00 96 30 00 00 Decrement BE EF 03 06 00 37 FF 05 00 96 30 00 00 User Gamma Point 8 Get BE EF 03 06 00 7C FF 02 00 97 30 00 00 Increment BE EF 03 06 00 1A FF ...

Страница 56: ... 72 05 00 03 22 00 00 TINT Reset Execute BE EF 03 06 00 7C D1 06 00 0B 70 00 00 SHARPNESS Get BE EF 03 06 00 F1 72 02 00 01 22 00 00 Increment BE EF 03 06 00 97 72 04 00 01 22 00 00 Decrement BE EF 03 06 00 46 73 05 00 01 22 00 00 SHARPNESS Reset Execute BE EF 03 06 00 C4 D0 06 00 09 70 00 00 MY MEMORY Load Set 1 BE EF 03 06 00 0E D7 01 00 14 20 00 00 2 BE EF 03 06 00 9E D6 01 00 14 20 01 00 3 BE ...

Страница 57: ... 03 06 00 D3 82 04 00 02 21 00 00 Decrement BE EF 03 06 00 02 83 05 00 02 21 00 00 H SIZE Reset Execute BE EF 03 06 00 68 D2 06 00 04 70 00 00 AUTO ADJUST Execute BE EF 03 06 00 91 D0 06 00 0A 20 00 00 COLOR SPACE Set AUTO BE EF 03 06 00 0E 72 01 00 04 22 00 00 RGB BE EF 03 06 00 9E 73 01 00 04 22 01 00 SMPTE240 BE EF 03 06 00 6E 73 01 00 04 22 02 00 REC709 BE EF 03 06 00 FE 72 01 00 04 22 03 00 R...

Страница 58: ... 00 PRESENTATION BE EF 03 06 00 5B 2E 01 00 04 33 11 00 Get BE EF 03 06 00 38 22 02 00 04 33 00 00 WHISPER Set NORMAL BE EF 03 06 00 3B 23 01 00 00 33 00 00 WHISPER BE EF 03 06 00 AB 22 01 00 00 33 01 00 Get BE EF 03 06 00 08 23 02 00 00 33 00 00 MIRROR Set NORMAL BE EF 03 06 00 C7 D2 01 00 01 30 00 00 H INVERT BE EF 03 06 00 57 D3 01 00 01 30 01 00 V INVERT BE EF 03 06 00 A7 D3 01 00 01 30 02 00 ...

Страница 59: ...F 03 06 00 C2 DE 01 00 31 20 04 00 Get BE EF 03 06 00 31 DC 02 00 31 20 00 00 AUDIO S Video Set TURN OFF BE EF 03 06 00 46 DC 01 00 32 20 00 00 Audio1 BE EF 03 06 00 D6 DD 01 00 32 20 01 00 Audio2 BE EF 03 06 00 26 DD 01 00 32 20 02 00 Audio3 BE EF 03 06 00 B6 DC 01 00 32 20 03 00 Audio4 BE EF 03 06 00 86 DE 01 00 32 20 04 00 Get BE EF 03 06 00 75 DC 02 00 32 20 00 00 AUDIO Component Set TURN OFF ...

Страница 60: ...ENU POSITION H Reset Execute BE EF 03 06 00 DC C6 06 00 43 70 00 00 MENU POSITION V Get BE EF 03 06 00 40 D7 02 00 16 30 00 00 Increment BE EF 03 06 00 26 D7 04 00 16 30 00 00 Decrement BE EF 03 06 00 F7 D6 05 00 16 30 00 00 MENU POSITION V Reset Execute BE EF 03 06 00 A8 C7 06 00 44 70 00 00 BLANK Set My Screen BE EF 03 06 00 FB CA 01 00 00 30 20 00 ORIGINAL BE EF 03 06 00 FB E2 01 00 00 30 40 00...

Страница 61: ...0 40 70 00 00 AUTO KEYSTONE EXECUTE Execute BE EF 03 06 00 E5 D1 06 00 0D 20 00 00 AUTO KEYSTONE Set TURN OFF BE EF 03 06 00 EA D1 01 00 0F 20 00 00 TURN ON BE EF 03 06 00 7A D0 01 00 0F 20 01 00 Get BE EF 03 06 00 D9 D1 02 00 0F 20 00 00 MY BUTTON 1 Set RGB1 BE EF 03 06 00 3A 33 01 00 00 36 00 00 RGB2 BE EF 03 06 00 FA 31 01 00 00 36 04 00 COMPONENT BE EF 03 06 00 6A 30 01 00 00 36 05 00 S VIDEO ...

Страница 62: ... BE EF 03 06 00 66 3E 01 00 01 36 12 00 PICTURE MODE BE EF 03 06 00 F6 3F 01 00 01 36 13 00 FILTER RESET BE EF 03 06 00 C6 3D 01 00 01 36 14 00 ACTIVE IRIS BE EF 03 06 00 56 3C 01 00 01 36 15 00 VOLUME BE EF 03 06 00 36 3D 01 00 01 36 17 00 VOLUME BE EF 03 06 00 C6 38 01 00 01 36 18 00 Get BE EF 03 06 00 F5 32 02 00 01 36 00 00 MAGNIFY Get BE EF 03 06 00 7C D2 02 00 07 30 00 00 Increment BE EF 03 ...

Страница 63: ...Exhaust COLOR UNIFORMITY TIMING GENERATOR GAMMA CORRECTION L3E07110 TEMP SW Lamp 6dB AMP S H L3E06150 SW DC POWER SUPPLY PWB REMC PWB IR RECEIVER IR RECEIVER SW DDC A D Converter TVP7000 Wired RC Cs Video S Video Audio_Video Component Video Audio_Video L R L R Audio_OUT Common2 PWB Video Decorder PD64015 SP 4W SP 4W Reset SW TEMP SENSOR AC INPUT IRIS MOTER Motor Driver uPD168110 KEYPAD PWB RGB in1...

Страница 64: ...E302 AUDIO IN2 1 Sensor IR01 2 Sensor R C Rear EA02 IR02 1 L_Out BOTOM_R SP R C Rear 2 L_Out EA04 CNKEY E310 1 R_Out BOTOM_L SP EK01 1 KeyO 0 1 2 R_Out 2 KeyO 1 2 3 LED_IF 3 4 KeyI 0 4 5 KeyI 1 5 6 KeyI 2 6 7 LED_P_G 7 CNPW1 8 LED_P_R 8 E800 1 GND 1 CN102 9 LED_Temp 9 2 Fan_15V 2 10 LED_Lamp 10 3 Fan_15V 3 11 3_3V 11 4 FAN GND 4 12 GND 12 5 FAN GND 5 EA03 6 GND 6 EK02 1 Up_R_Out 1 7 17V 7 2 Up_R_O...

Страница 65: ...M 1 2 3 4 5 6 7 8 9 G1 G2 APSG 1 GND1 APU5 1 ET21 UBB 4R D14C 1 1 2 2 3 3 4 4 G1 G1 G2 G2 APUM 1 APUP 1 APT6 1 APT4 1 ET02 PH 05V D 1 2 3 4 5 ET03 PH 03V D 1 2 3 RD TD RS232C RD TD GND USB USB D USB D RD GND TD 1 EL05 CR2032BH 1 1 2 2 3 3 1608 LL37 600 H 1 2 1608 LL36 600 H 1 2 EL06 SH 02H 1 2 G1 G2 APL1 1 APL2 1 APL3 1 APL4 1 6 5 4 3 2 1 6 5 4 3 2 1 E D C B A ...

Страница 66: ...CR04 100p C 1 2 RR05 100 1 2 CR06 47 6 3 MVK SKV 1 2 IR03 KSM 2003LM2EL 1 Vout 2 GND 3 VCC IR02 KSM 2003LM2EL 1 Vout 2 GND 3 VCC RR03 100 1 2 ER01 ZH 06H 1 2 3 4 5 6 G1 G2 CR01 100p C 1 2 IR01 KSM 2003LM2EL 1 Vout 2 GND 3 VCC 2125 RR02 47 1 2 CR03 47 6 3 MVK SKV 1 2 CR02 4 7 6 3 1 2 RR01 100 1 2 2125 RR08 47 1 2 IR04 KSM 2003LM2EL 1 Vout 2 GND 3 VCC CR10 100p C 1 2 CR12 47 6 3 MVK SKV 1 2 CR11 4 7...

Страница 67: ...CP X600 EDX40K3 1 2 3 4 5 6 6 1 2 3 4 5 D G F E C B A POWER UNIT BALLAST 1 CONFIDENTIAL ...

Страница 68: ...CP X600 EDX40K3 1 2 3 4 5 6 6 1 2 3 4 5 D G F E C B A POWER UNIT BALLAST 2 CONFIDENTIAL ...

Страница 69: ...2 PC201 C119 C120 R119 R118 VR100 R117 C113 C112 C115 C114 D104 IC101 1 COM 2 FREQ 3 ISNS 4 OVP 5 COMP 6 VFB 7 VCC 8 GATE C111 C124 R138 C200 D203 ICP202 C201 ICP201 T201 2 13 4 7 6 5 9 10 11 15 16 12 14 C205 D202 L200 R246 R240 C207 R204 C208 PC201 R203 R206 R207 R208 IC201 C209 R236 C225 R237 PC203 Q201 R239 R235 R238 R221 C227 IC204 7 8 4 6 5 3 1 2 R220 R222 C230 D207 C231 R216 C222 D206 C223 I...

Страница 70: ...CP X600 EDX40K3 1 2 3 4 5 6 6 1 2 3 4 5 D G F E C B A POWER UNIT CIRCUIT 2 CONFIDENTIAL C101 C102 SW1 CN1 N L F101 C100 L100 L101 CN2 1 3 C103 R100 ...

Страница 71: ...3E 1 2 3 1005 RC23 10K 1 2 1005 RC24 10K 1 2 CC13 1005 220P 1 2 1005 RC05 180K 1 2 1005 RC12 150K 1 2 1005 RC09 120K 1 2 CC11 2125 4 7 16 1 2 CC14 2125 4 7 16 1 2 1005 RC20 120K 1 2 CC16 1005 220P 1 2 1005 RC14 10K 1 2 QC02 2SC5343E 1 2 3 1005 RC17 100 1 2 1005 RC21 150K 1 2 QC05 2SC5343E 1 2 3 1005 RC18 100 1 2 CC17 1005 220P 1 2 1005 RC13 10K 1 2 1005 RC11 150K 1 2 1005 RC10 120K 1 2 1005 RC06 1...

Страница 72: ... 1 DK03 SML 210VT 1 2 RK06 0 1 2 1005 RK23 220 1 2 QK22 DTC114EUA 1 2 3 QK24 DTC114EUA 1 2 3 SK06 SKRAAAE010 1 2 3 4 SK04 SKRAAAE010 1 2 3 4 DK01 SML 020MVT86 1 2 3 4 APY03 1 RK04 0 1 2 APY06 1 EK02 ZH 04H 1 2 3 4 G1 G2 EK04 PH 02H 1 2 G1 G2 1005 RK24 220 1 2 GND1 APY04 1 CK32 1005 100p C 1 2 CK31 1005 100p C 1 2 CK44 1005 100p C 1 2 CK43 1005 100p C 1 2 CK41 1005 100p C 1 2 CK42 1005 100p C 1 2 C...

Страница 73: ... A19 I1R7 I0GO6 DRE4 DGE4 KEYO1 DVS A5 LAMP_ON A9 ROMWE I0GO1 3 3V IN1CLP DGE2 1 8VCPU D14 VOL_SEL DRE1 I1B7 DBE0 D13 I1G7 IN0PEN I1B4 MSLEEP IRIS_RST I0GO3 I1B1 DRE3 DBE3 LED TEMP A15 RESETP DVIPWDN WRN DHS I0RO6 IN0VS FG_SEL1 A14 A18 IN1HS DGE3 DBE7 DGE8 I0GO0 POWER6 I1G3 DGE1 A4 IN1CST D12 DBE5 I0GO2 I1B2 D2 I0RO1 PW_MUTE I0RO3 I1G0 DRE6 DBE2 RGB1 2 LED P G A10 F_SD HD UART_SEL I2CDAT DBE6 A17 ...

Страница 74: ...47 1 2 C262 1005 0 1 10 1 2 1005 R2E6 47 1 2 C256 1005 0 1 10 1 2 C274 1005 0 1 10 1 2 R278 2010 22 1 2 3 4 5 6 7 8 C254 1005 0 1 10 1 2 R260 2010 22 7 8 5 6 3 4 1 2 C273 1005 0 1 10 1 2 R281 2010 22 1 2 3 4 5 6 7 8 1005 R288 47 1 2 R295 2010 22 7 8 5 6 3 4 1 2 R294 2010 22 1 2 3 4 5 6 7 8 R297 2010 22 1 2 3 4 7 8 5 6 GND1 R273 2010 22 1 2 3 4 5 6 7 8 1005 R290 0 1 2 C255 1005 0 1 10 1 2 R261 2010...

Страница 75: ... H1 2 1608 L329 600 H1 2 1608 L323 600 H1 2 1608 L322 600 H1 2 1608 L324 600 H1 2 1608 L325 600 H1 2 1608 L328 600 H1 2 1005 R315 33 1 2 1005 R302 1 0K 1 2 E302 ZH 02H 1 2 G1 G2 1005 R324 0 1 2 2125 R004 47 1 2 RC_UPPER MOUSE R003 100 1 2 C005 4 7 6 3 1 2 C325 1005 0 01 16 1 2 GND1 APRC6 1 C006 47 6 3 MVK SKV 1 2 5V 38_RC I312 SN74LV32APW 1A 1B 1Y 2A 2B 2Y GND 3Y 3A 3B 4Y 4A 4B VCC C321 100p C 1 2...

Страница 76: ...R814 2 2K 1 1 2 R8E5 100 1005 1 2 1005 R803 2 2K 1 2 R8E7 100 1005 1 2 1005 R8E0 100 1 2 1005 R8H4 2 2K 1 1 2 1005 R897 0 1 2 R848 2010 10K 5 6 7 8 1 2 3 4 LAMP_ON POWER3 POWER1 FAN CNT4 1 2V FAN CNT2 FAN CNT3 4 0V POWER2 17V 14 5V POWER6 5V FG_SEL2 POWER0 FG_SEL0 LAMP S 1 8VCPU 3 3V FG_SEL1 FANGND FAN15V POWER7 FAN CNT1 POWER4 15 5V WHISPER FAN_FG 6 6V POWER5 3 3VP COVER S FAN CNT5 I851 SI 3010KM...

Страница 77: ...4 F17 GND F17 F16 GND F16 F15 GND F15 F14 GND F14 F6 GND F6 F5 GND F5 F4 GND F4 E17 GND E17 E16 GND E16 E15 GND E15 E14 GND E14 E6 GND E6 E5 GND E5 E4 GND E4 D17 GND D17 D16 GND D16 D15 GND D15 D14 GND D14 D6 GND D6 D5 GND D5 D4 GND D4 C18 GND C18 C3 GND C3 B19 DIRY C20 NRG D20 SHENB C2 CLP2 C1 CLP1 B1 HPLL A4 VRESET0 A3 HRESET0 A6 SELECT M12 GND M12 I401 L3E07110K0A C11 RIN0 A10 RIN1 B10 RIN2 C10...

Страница 78: ...2 H 1 2 2518 L504 10 H 1 2 APR31 1 APR24 1 APR21 1 APR7 1 APR13 1 APR9 1 APR4 1 APR23 1 APR12 1 APR33 1 APR29 1 APR3 1 APR10 1 APR2 1 APR28 1 APR18 1 APR14 1 APR22 1 APR36 1 CHMDR 1 APR34 1 APR8 1 APR30 1 APR20 1 APR15 1 APR11 1 APR35 1 APR19 1 APR25 1 APR6 1 APR32 1 APR17 1 APR5 1 I501 L3E01060P0A SCS SCLK SDATA DIVS DXIN CLXIN ENBX5I ENBX1IN GND 9 CLK GND 11 PVDD HVDD 13 DIRY DY CLY CLY ENBY1 EN...

Страница 79: ...2 H 1 2 2518 L602 22 H 1 2 APG30 1 APG6 1 APG10 1 APG14 1 APG28 1 APG34 1 APG22 1 APG24 1 APG15 1 APG19 1 APG11 1 APG2 1 APG21 1 APG32 1 APG31 1 APG17 1 APG33 1 APG35 1 APG29 1 APG3 1 APG12 1 APG5 1 APG20 1 APG18 1 CHMDG 1 APG23 1 APG8 1 APG25 1 APG4 1 APG36 1 APG13 1 APG7 1 APG9 1 I601 L3E01060P0A SCS SCLK SDATA DIVS DXIN CLXIN ENBX5I ENBX1IN GND 9 CLK GND 11 PVDD HVDD 13 DIRY DY CLY CLY ENBY1 EN...

Страница 80: ...0 H 1 2 2518 L701 22 H 1 2 APB36 1 APB19 1 APB11 1 APB18 1 APB24 1 APB31 1 APB14 1 APB5 1 APB10 1 APB34 1 APB32 1 APB8 1 APB3 1 APB25 1 APB9 1 APB33 1 APB20 1 APB7 1 APB35 1 APB12 1 APB23 1 APB17 1 APB4 1 APB13 1 APB29 1 APB22 1 CHMDB 1 APB15 1 APB6 1 APB21 1 APB30 1 APB28 1 APB2 1 I701 L3E01060P0A SCS SCLK SDATA DIVS DXIN CLXIN ENBX5I ENBX1IN GND 9 CLK GND 11 PVDD HVDD 13 DIRY DY CLY CLY ENBY1 EN...

Страница 81: ...GND 54 R_9 R_8 R_7 R_6 R_5 IOGND 60 R_4 R_3 R_2 R_1 R_0 IOVDD 66 IOGND 67 GND 68 DVDD 69 PWDN RESETB TMS I2CA SCL SDA CLAMP COAST VSYNC_A VSYNC_B EXT_CLK HSYNC_A HSYNC_B PLL_A18GND 83 PLL_A18VDD 84 PLL_A18VDD 85 PLL_A18GND 86 FILT1 FILT2 PLL_F PLL_A18GND 90 NSUB 91 A33GND 92 A33VDD 93 A33VDD 94 A33GND 95 GIN_4 SOGIN_3 GIN_3 SOGIN_2 GIN_2 1005 R190 10 1 2 1005 R121 100 1 2 1005 R180 0 1 2 1005 R142...

Страница 82: ...2125 LV11 SC200JT 1 2 3 2125 LV14 SC200JT 1 2 3 2125 LV12 SC200JT 1 2 3 2125 LV13 SC200JT 1 2 3 GND1 GND1 GND1 GND1 GND1 GND1 GND1 GND1 GND1 GND1 GND1 GND1 GND1 GND1 GND1 GND1 GND1 GND1 GND1 GND1 GND1 GND1 GND1 GND1 GND1 GND1 GND1 GND1 GND1 GND1 GND1 GND1 GND1 2518 LV08 47 H 1 2 2518 LV07 4 7 H 1 2 2518 LV02 47 H 1 2 2518 LV06 47 H 1 2 2518 LV01 47 H 1 2 2518 LV05 47 H 1 2 2518 LV03 47 H 1 2 2518 ...

Страница 83: ...S R 1 0 6 5 1 2 1005 RS37 0 1 2 1005 RS52 75 1 1 2 1005 RS55 8 2K 1 2 RS24 0 1 2 1005 RS34 8 2K 1 2 1005 RS30 33K 1 2 1005 RS54 8 2K 1 2 RS25 220 1 2 1005 RS53 8 2K 1 2 1005 RS59 0 1 2 1005 RS60 0 1 2 1005 RS31 33K 1 2 RS96 0 1 2 1005 RS44 560 1 1 2 1005 RS58 33K 1 2 1005 RS35 8 2K 1 2 1005 RS63 560 1 1 2 1005 RS57 33K 1 2 RS47 75 1 1 2 1005 RS64 560 1 1 2 RS07 100 1 2 1005 RS51 10 1 2 1005 RS65 5...

Страница 84: ... 2 1005 RG15 10K 1 2 1005 RG76 10K 1 2 1005 RG41 47K 1 2 1005 RG75 56 1 2 1005 RG74 56 1 2 1005 RG01 10K 10K 1 2 1005 RG30 56 1 2 1005 RG14 0 1 2 1005 RG39 56 1 2 1005 RG34 56 1 2 1005 RG10 10K 1 2 1005 RG77 56 1 2 1005 RG33 56 1 2 1005 RG72 10K 1 2 RG80 75 1 1 2 1005 RG93 56 1 2 1005 RG43 5 6K 1 2 RG36 2010 0 1 2 7 8 5 6 3 4 RGA6 2010 47 1 2 3 4 5 6 7 8 RGA9 2010 47 1 2 3 4 5 6 7 8 RGB2 2010 47 1...

Страница 85: ...1005 RW05 100 1 2 1005 RW16 3 3K 1 2 1005 RW70 220 1 2 1005 RW67 10K 1 2 1005 RW80 2 7K 1 1 2 1005 RW53 0 1 2 1005 RW17 100 1 2 1005 RW35 10K 1 2 1005 RW84 0 1 2 1005 RW54 0 1 2 1005 RW44 0 1 2 1005 RW36 1 0K 1 2 1005 RW45 0 1 2 1005 RW93 33 1 2 1005 RW46 0 1 2 1005 RW20 2 2K 1 2 1005 RW74 56K 1 2 RW41 2010 0 1 2 3 4 5 6 7 8 RW91 2010 33 5 6 3 4 1 2 7 8 RW29 2010 3 9K 1 2 3 4 5 6 7 8 RW38 2010 100...

Страница 86: ...G10 G11 G12 G13 G14 G15 G16 G17 G18 G19 G20 G21 G22 G23 G24 G25 1005 RAB9 100 1 2 1005 RA40 120K 1 2 1005 RAC6 10K 1 2 1005 RA01 180K 1 2 1005 RA48 4 7K 1 2 1005 RAC1 150K 1 2 1005 RA11 0 1 2 1005 RA26 5 6K 1 2 1005 RAB6 120K 1 2 1005 RA46 120K 1 2 1005 RA36 100 1 2 1005 RA04 180K 1 2 1005 RAB1 100 1 2 1005 RA50 22K 1 2 1005 RA97 2 2K 1 2 1005 RAC0 120K 1 2 1005 RA44 100K 1 1 2 1005 RA15 0 1 2 100...

Страница 87: ...3 0 1 2 1005 REC5 100 1 2 1005 REA1 100 1 2 1005 RE96 3 3K 1 2 1005 REF2 15K 1 2 1005 RE98 0 1 2 1005 RE72 10K 1 2 1005 RE16 3 3K 1 2 1005 RE93 0 1 2 1005 RE19 33 1 2 1005 REF8 0 1 2 1005 RE36 0 1 2 1005 RE12 33 1 2 1005 RE94 3 3K 1 2 1005 RE77 100 1 2 1005 RE07 10K 1 2 1005 RE63 3 3K 1 2 1005 RE66 100 1 2 1005 RE37 0 1 2 1005 REA2 100 1 2 1005 RE33 10K 1 2 1005 REF6 0 1 2 1005 RE22 1 5K 1 2 1005 ...

Страница 88: ...CP X600 EDX40K3 MEMO ...

Страница 89: ...T 2 PWB assembly INPUT PWB assembly KEYPAD PWB assembly MAIN 1 PWB assembly MAIN 2 PWB assembly MAIN 3 PWB assembly MAIN 4 PWB assembly MAIN 5 PWB assembly MAIN 6 PWB assembly MAIN 7 PWB assembly MAIN 8 PWB assembly MAIN 9 PWB assembly MAIN 10 PWB assembly MAIN 11 PWB assembly MAIN 12 PWB assembly MAIN 13 PWB assembly MAIN 14 PWB assembly MAIN 15 Basic circuit diagram list ...

Страница 90: ...QR72691 Printed in Japan JE CP X600 YK No 0586E ...

Отзывы: