


44
CP-X600(EDX40K3)
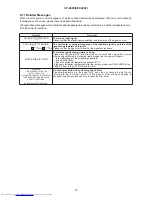
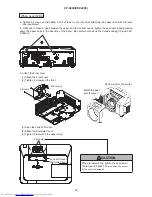
Notice
1. Detach and attach the upper case.
Follow the procedure below to detach and attach the upper case.
When disassembling
CAUTION
The lamp door must be removed before the upper case when disassembling the machine. If the upper
case is detached with the lamp door installed, the MAIN board might be damaged.
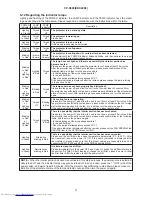
a. Remove the Lamp door.
Loosen this screw
Lamp door
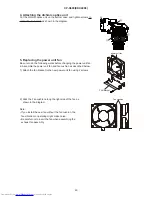
b. Remove 2 screws on the front and 2 screws on the upper case.
(1) Before remove 2 screws on the upper case, open the Lens shift cover.
2 screws
Lens shift cover
Dial Hole Cover
Содержание CP-X600 series
Страница 33: ...33 CP X600 EDX40K3 7 Wiring diagram Wiring diagram 1 ...
Страница 34: ...34 CP X600 EDX40K3 Wiring diagram 2 ...
Страница 35: ...35 CP X600 EDX40K3 Wiring diagram 3 ...
Страница 36: ...36 CP X600 EDX40K3 Wiring diagram 4 ...
Страница 37: ...37 CP X600 EDX40K3 Wiring diagram 5 ...
Страница 38: ...38 CP X600 EDX40K3 Wiring diagram 6 ...
Страница 39: ...39 CP X600 EDX40K3 Wiring diagram 7 ...
Страница 40: ...40 CP X600 EDX40K3 Wiring diagram 8 ...
Страница 41: ...41 CP X600 EDX40K3 Wiring diagram 9 ...
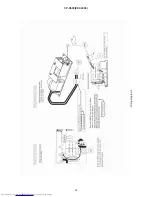
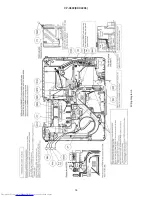
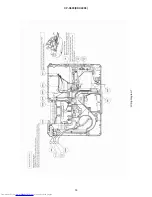
Страница 42: ...42 CP X600 EDX40K3 8 Disassembly diagram ...
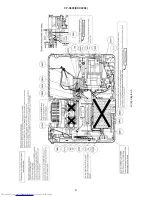
Страница 43: ...43 CP X600 EDX40K3 ...
Страница 67: ...CP X600 EDX40K3 1 2 3 4 5 6 6 1 2 3 4 5 D G F E C B A POWER UNIT BALLAST 1 CONFIDENTIAL ...
Страница 68: ...CP X600 EDX40K3 1 2 3 4 5 6 6 1 2 3 4 5 D G F E C B A POWER UNIT BALLAST 2 CONFIDENTIAL ...
Страница 88: ...CP X600 EDX40K3 MEMO ...
Страница 90: ...QR72691 Printed in Japan JE CP X600 YK No 0586E ...


