background image

3

Projector features / Preparations

Projector features

This projector is used to project various computer signals as well as NTSC/PAL/

SECAM video signals onto a screen. It requires just a little space for installation 

and gets a large image from short distance.

 High Brightness

Newly developed 230W UHB (Ultra High Brightness) lamp gives you a higher 

brightness image on a screen. The image can be still kept as bright and clean 

enough for use in bright rooms.

 Low Noise

WHISPER mode is equipped for reducing acoustic noise to realize quieter 

operation. It is perfect for use in low luminance rooms where low noise is more 

important than brightness.

 Rich Connectivity

This projector has a variety of I/O ports. It can be easily connected to many 

signal sources like PC, DVD and so on. The rich connectivity provides you 

more options to make your presentation impressive.

 Compact Body

Even with its many features, this projector is extremely compact and slim, 

which gives you more fl exibility and usability to use it where you want.

Preparations

About contents of package

Please see the "Contents of package" of the "User's Manual - Quick Guide". Your 

projector should come with the items shown there. Contact immediately your 

dealer if anything is missing.

NOTE

  • Keep the original packing materials for future reshipment. For 

moving the projector, be sure to use the original packing material. Use special 

caution for the lens part.

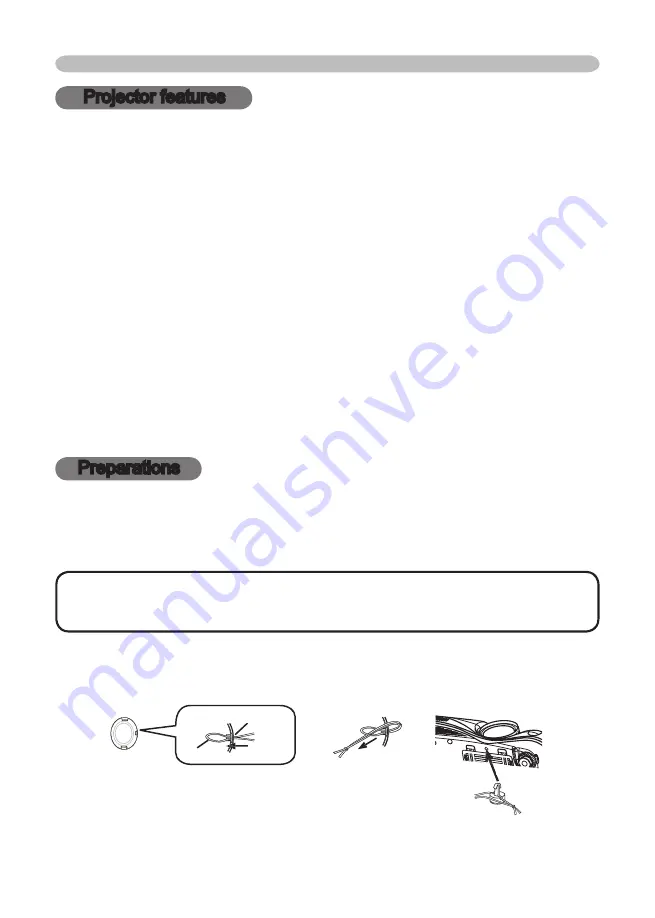
Fastening the lens cap

To avoid losing, please fasten the lens cap to the projector using the strap.

1. 

Fix the strap to the strap ring of lens cap.

2.

Put the strap into the groove on rivet.

3.

Push the rivet into the strap hole.

Strap ring

Strap ring

Strap

Strap hole            

Strap hole            

Strap hole            

Strap hole            

Strap hole            

Strap hole            

Strap hole            

Strap hole            

Strap hole            

Strap hole            

Strap hole            Bottom side

Содержание CP-X443 series

Страница 1: ...ing Please refer to the pages written following this symbol NOTE The information in this manual is subject to change without notice The manufacturer assumes no responsibility for any errors that may appear in this manual The reproduction transmission or use of this document or contents is not permitted without express written authority Trademark acknowledgment VGA and XGA are registered trademarks...

Страница 2: ...n 21 Temporarily blanking the screen 21 Operating the computer screen 22 Multifunctional settings 23 Using the menu function 23 Contents Contents EASY Menu 24 Aspect Mode Bright Contrast Color Tint Sharpness Whisper Mirror Reset Filter time Language Go to advanced menu PICTURE Menu 26 Bright Contrast Gamma Color temp Color Tint Sharpness My memory IMAGE Menu 29 Aspect Over scan V position H phase ...

Страница 3: ...ty provides you more options to make your presentation impressive Compact Body Even with its many features this projector is extremely compact and slim which gives you more flexibility and usability to use it where you want Preparations About contents of package Please see the Contents of package of the User s Manual Quick Guide Your projector should come with the items shown there Contact immediat...

Страница 4: ...ht side Rear Left side Control buttons 5 See the following page Ports See below Vent 6 AUDIO OUT port 11 Ports AUDIO IN port 11 AUDIO IN L R port 12 USB port 11 RGB IN1 port 11 RGB IN2 port 11 DVI D port 11 NOTE About Restart switch This Projector is controlled by an internal microprocessor Under certain exceptional circumstances the projector may not operate correctly and the microprocessor will ...

Страница 5: ... button 18 Control buttons STANDBY ON button 16 VIDEO button 17 BLANK button 21 ASPECT button 18 Lever switch 23 ESC button 22 POSITION button 19 MAGNIFY buttons 20 FREEZE button 21 KEYSTONE button 20 REMOTE CONTROL port 15 STANDBY ON button 16 INPUT button 17 KEYSTONE button 20 RESET button 23 LAMP incicator 50 TEMP indicator 50 POWER indicator 16 Remote control Cursor buttons 23 Battery cover 14...

Страница 6: ...cts such as walls Don t place the projector on a metallic thing or anything weak in heat Don t place the projector on a carpet cushion or bedding Don t place the projector in direct sunlight or near a hot object such as heater Put nothing about lens and vents of the projector Put nothing on the projector Put nothing that is sucked or sticks to the bottom of projector This projector has some intake...

Страница 7: ...7 145 4 8 190 12 5 110 43 90 2 3 4 2 164 5 4 214 14 5 123 49 100 2 5 4 6 182 6 1 238 15 6 137 54 120 3 0 5 6 219 7 3 286 18 7 165 65 150 3 8 7 0 274 9 1 359 23 9 206 81 200 5 1 9 3 366 12 2 479 30 12 274 108 250 6 4 11 6 458 15 2 599 38 15 343 135 300 7 6 14 0 551 18 3 719 46 18 411 162 a Screen size inch m inch m inch m b Projection distance m inch b Projection distance m inch b Projection distan...

Страница 8: ...djustment place the projector horizontally You can use the elevator feet to make adjustments if the surface on which you need to set the projector is uneven or if you otherwise need to adjust the angle of projection The adjustment range of the elevator feet is 0 to 9 degrees 1 After making sure that the projector is cool adequately press and hold in the elevator buttons while holding the projector...

Страница 9: ...r cover for bottom up use It is higher than usual filter cover to keep the space for intake ventilation Please change in the following procedure 1 After making sure that the projector is cool adequately slowly turn the projector so that the lens side is facing up Please be careful for a projector not to fall While the projector is placed lens side up hold the projector 2 Unhooking the filter cover s...

Страница 10: ...des the optional Mac adapter is necessary When the image resolution is changed on a computer depending on an input automatic adjust function may take some time and may not be completed In this case you may not be able to see a check box to select Yes No for the new resolution on Windows Then the resolution will go back to the original It might be recommended to use other CRT or LCD monitors to cha...

Страница 11: ...AN COMPONENT VIDEO CB PB CR PR R AUDIO IN L AUDIO OUT Y VIDEO RGB IN1 RGB IN2 DVI D RGB OUT CONTROL AUDIO IN REMOTE CONTROL USB DC OUT S VIDEO LAN COMPONENT VIDEO CB PB CR PR R AUDIO IN L AUDIO OUT RGB IN2 RGB OUT Setting up Examples of connection with a computer Audio out USB A RS 232C DVI out DVI cable Stereo mini audio cable AUDIO IN is linked to RGB IN1 2 and DVI D RGB out Audio out Stereo min...

Страница 12: ...T VIDEO CB PB CR PR R AUDIO IN L AUDIO OUT Y VIDEO RGB IN1 RGB IN2 DVI D RGB OUT CONTROL AUDIO IN REMOTE CONTROL USB DC OUT S VIDEO LAN COMPONENT VIDEO CB PB CR PR R AUDIO IN L AUDIO OUT Setting up Examples of connection with a VCR DVD player Audio L out Video out Audio cable Audio Video cable Audio Video cable Audio L out Audio L out S Video out S Video cable RGB out Audio L out Component video o...

Страница 13: ...ctor If it is damaged contact your dealer to newly get correct one Only plug the power cord into an outlet rated for use with the power cord s specified voltage range Never modify the power cord Never attempt to defeat the ground connection of the three pronged plug 1 Connect the connector of the power cord to the AC inlet of the projector 2 Firmly plug the power cord s plug into the outlet AC inle...

Страница 14: ...d remove the battery cover in the direction of the arrow 2 Insert the batteries Align and insert the two AA batteries according to their plus and minus terminals as indicated in the remote control 3 Close the battery cover Replace the battery cover in the direction of the arrow and snap it back into place Remote control Laser pointer This remote control has a laser pointer in place of a finger or r...

Страница 15: ...ction Adjust the direction of the projector to keep light from directly hitting the projector s remote sensor The remote control works with the projector s remote sensor The range of the remote sensor is 3 meters with a 60 degree range 30 degrees to the left and right of the remote sensor Also a remote signal reflected in the screen etc may be available If it is difficult to send a remote signal to ...

Страница 16: ...everal seconds 3 Press the STANDBY ON button on the projector or remote control The projector lamp will light up and the POWER indicator will begin blinking green When the power is completely on the indicator will stop blinking light green To display the picture select an input signal according to the section Selecting an input signal 17 Turning off the power 1 Press the STANDBY ON button on the p...

Страница 17: ...ected to the item AUTO SEARCH of OPTION menu 38 the projector checks the current selected port at first If no input is detected at the port projector will check other ports in above order 1 Press the VIDEO button on the remote control to select an input for video signal Each time you press the button the projector switches its video input port as below COMPONENT VIDEO S VIDEO VIDEO When the TURN ON...

Страница 18: ...ic keystone distortion correction Projector automatically corrects vertical keystone distortion due to the forward backward setup angle by itself This is only performed if ONE TOUCH of the OPTION menu is set to TURN ON 38 Selecting an aspect ratio 1 Press the ASPECT button on the remote control Each time you press the button the projector switches the mode for aspect ratio in turn At a RGB DVI sig...

Страница 19: ...s approximately 10 seconds Also please note that it may not function correctly with some input Adjusting the position 1 Press the POSITION button on the remote control The POSITION indication will appear on the screen 2 Use the cursor buttons to adjust the picture position When you want to reset the operation press the RESET button on the remote control during the operation To complete this operat...

Страница 20: ...ASER INDICATOR LASER RGB ENTER ON OFF ESC POSITION MAGNIFY MUTE KEYSTONE FREEZE ONE TOUCH AUTO PAGE MENU RESET VOLUME ON OF Operating Correcting the keystone distortions 1 Press the KEYSTONE button on the projector or the remote control A dialog will appear on the screen to aid you in correcting the distortion 2 Use the cursor buttons to select AUTO or MANUAL operation and press the button to perf...

Страница 21: ...oo long Temporarily blanking the screen 1 Press the BLANK button on the remote control The blank screen will be displayed instead of the screen of input signal Please refer to the item BLANK of section SCREEN menu 35 To remove the blank screen and return to the input signal screen press the BLANK button again The projector automatically returns to the input signal screen when the input signal chan...

Страница 22: ... The USB control can be used only for the functions listed below You cannot do things like press two buttons at once for instance pressing two buttons at the same time to move the mouse pointer diagonally This function is not available while the lamp is warming up the POWER indicator flashes green and while adjusting the volume and display correcting for trapezoidal distortion zooming in on the scr...

Страница 23: ...trol to progress The operation menu of the selected item will appear 4 Use the cursor buttons to operate the item When you want to reset the operation press the RESET button on the remote control during the operation Note that items whose functions are performed simultaneously with operation ex LANGUAGE H PHASE etc aren t reset At the advanced menu when you want to return to the previous display p...

Страница 24: ... a line may appear BRIGHT Using the buttons adjusts the brightness See the item BRIGHT of section PICTURE menu 26 CONTRAST Using the buttons adjusts the contrast See the item CONTRAST of section PICTURE menu 26 COLOR Using the buttons adjusts the strength of whole color See the item COLOR of section PICTURE menu 27 TINT Using the buttons adjusts the tint See the item TINT of section PICTURE menu 2...

Страница 25: ...button performs reset FILTER TIME Performing this item resets the filter timer which counts use time of air filter A dialog is displayed to make sure Selecting RESET using the button performs reset See the item FILTER TIME of section OPTION menu 39 LANGUAGE Select the LANGUAGE to toggle the menu language Refer to description of LANGUAGE in the SCREEN menu 35 Go To Advanced Menu Select the Go To Adva...

Страница 26: ...ges as below No pattern Gray scale of 9 steps Ramp Gray scale of 15 steps Eight of equalizing bars corresponds to eight of tone level of test pattern except the darkest in the left end If you want to adjust the 2nd tone from left end on the test pattern use the equalizing adjustment bar 1 The darkest tone at the left end of the test pattern cannot be controlled with any of equalizing adjustment ba...

Страница 27: ...ns and adjust the level using the buttons You can display a test pattern for checking the effect of your adjustment by pressing the ENTER button Each time you press the ENTER button the pattern changes as below No pattern Gray scale of 9 steps Ramp Gray scale of 15 steps When this function is performed a certain extra such as a line may appear COLOR Using the buttons adjusts the strength of whole ...

Страница 28: ... or LOAD4 loads the data on the memory whose number corresponds with the command s number and adjusts the picture automatically depending on the data Performing the SAVE1 SAVE2 SAVE3 or SAVE4 puts the current adjustment data on the memory whose number corresponds with the command s number Current adjustment data of the items in the PICTURE menu is stored Although adjustment data under the CUSTOM i...

Страница 29: ...al position Up Down This item is not selected when DVI D input port is selected H POSITION Using the buttons adjusts the horizontal position Left Right This item is not selected when DVI D input port is selected H PHASE Using the buttons adjusts the horizontal phase to eliminate flicker Right Left This item can be selected only at a RGB signal or a component video signal Note that this does not wor...

Страница 30: ...ase and horizontal size will be automatically adjusted Make sure that the application window is set to its maximum size prior to attempting to use this feature A dark picture may still be incorrectly adjusted Use a bright picture when adjusting At a video signal The video format best suited for the respective input signal will be selected automatically This function is available only when the AUTO...

Страница 31: ...oving object In such a case please select the TURN OFF even though the screen image may lose the crisp 3D YCS Using the buttons switches the 3D YCS mode STILL IMAGE NORMAL TURN OFF This function performs only at a VIDEO input of NTSC 3 58 NORMAL is the mode for images with a lot of motions like movies and STILL IMAGE is the mode for images with few motions or completely still ones like slides When...

Страница 32: ...gnal from the VIDEO port or the S VIDEO port For a component video signal the signal type is identified automatically independently of this function The AUTO mode automatically selects the optimum mode The AUTO operation may not work well at some signals If the picture becomes unstable ex an irregular picture a color lack please select the mode depending on the input signal DVI Select a signal sour...

Страница 33: ...INPUT INFORMA INPUT INFORMA INPUT TION INFORMATION INFORMA COMPONENT 576i 50 SCART RGB The FRAME LOCK message on the dialog means the frame lock function is working This function automatically works when a RGB signal with vertical frequency of 50 to 60 Hz is input and it displays a moving picture more smoothly The SCART RGB message means the COMPONENT VIDEO port is working as a SCART RGB input por...

Страница 34: ...IR REMOTE Select a remote sensor using the button 1 then switch it using the or the ENTER button 2 1 1 FRONT 2 TOP 2 Off On A sensor cannot be turned off when the other is off With the SETUP menu items shown in the table below can be performed Select an item using the cursor buttons on the projector or remote control and press the cursor button on the projector or remote control or the ENTER butto...

Страница 35: ... MyScreen ORIGINAL BLUE WHITE BLACK MyScreen is the screen you can register a desired screen ORIGINAL screen is the existing standard screen BLUE WHITE and BLACK are non patterned plain screens in each color To avoid remaining as an afterimage the MyScreen and the ORIGINAL screens will change to the BLACK screen after several minutes For the MyScreen please refer to the item MyScreen 36 With the S...

Страница 36: ...led MyScreen It will ask you if you start capturing the picture from the current screen Please wait for the target picture to be displayed and press the ENTER button on the remote control when the picture is display The picture will freeze and the frame for capturing appears To stop performing press the RESET or ESC button on the remote control 2 Using the buttons adjust the frame position Please ...

Страница 37: ... is selected the following message function works AUTO IN PROGRESS while automatically adjusting NO INPUT IS DETECTED SYNC IS OUT OF RANGE Searching while searching for the input Detecting while an input signal is detected The indication of the input signal by changing The indication of the aspect ration by changing SCREEN Menu continued ...

Страница 38: ... search is started from the current port Then when an input is found the projector will stop searching and display the image RGB IN1 RGB IN2 DVI D COMPONENT VIDEO S VIDEO VIDEO AUTO OFF Using the buttons adjusts the time to count down to automatically turn the projector off Long max 99 minutes Short min 0 minute DISABLE AUTO OFF ENABLE 1 AUTO OFF DISABLE 0 When the time is set to 0 the projector i...

Страница 39: ...aring the air filter see the section Air filter 46 SERVICE Selecting this item displays the SERVICE menu Select an item using the buttons and press the button or the ENTER button on the remote control to progress FAN SPEED AUTO ADJUST GHOST FACTORY RESET FAN SPEED Using the buttons switches the rotation speed of the cooling fans The HIGH is the mode for use at highlands etc Note that the projector i...

Страница 40: ...ork This menu is available only when the item of the DHCP is set to TURN OFF INFORMATION Selecting this item shows the information about the current network setting of the projector With the NETWORK menu items shown in the table below can be performed Select an item using the cursor buttons on the projector or remote control and press the cursor button on the projector or remote control or the ENT...

Страница 41: ...er Netscape 6 2 or higher on a computer connected to the network When using a Web browser to configure the projector s network settings password access is required However since a password is not configured when the product is shipped from the factory if a password has not been configured then you can simply click on Login without entering a password to access the Projector Network Configuration dial...

Страница 42: ...urn to Screen 2 The password is case sensitive and can be up to 16 single byte alphanumeric characters in length Screen 6 DHCP Setting 1 Check the DHCP box to enable DHCP or uncheck the DHCP box to disable DHCP 2 Click on Write 3 Click on return to top page to return to Screen 2 Screen 5 IP Configuration Allows you to configure the IP address subnet mask and default gateway if DHCP is disable 1 Ent...

Страница 43: ...o make changes using a computer that logged on earlier you will need to login again to regain authority Except for the login screen all of the screens will timeout after 10 minutes of no operation Should this occur you will need to login again to modify the settings The 10 minute timeout remains in effect even if you close the Web browser and end the configuration session Therefore if you try to re...

Страница 44: ...well and make sure not to breathe the gas that comes out of the projector vents or get it in your eyes or mouth Before replacing the lamp turn the projector off and unplug the power cord then wait at least 45 minutes for the lamp to cool sufficiently Handling the lamp while hot can cause burns as well as damaging the lamp Never unscrew except the appointed marked by an arrow screws Do not open the...

Страница 45: ...er 5 Loosen the 2 screws marked by arrow of the lamp and slowly pick up the lamp by the handles 6 Insert the new lamp and retighten firmly two screws that are loosened in the previous process to lock it in place 7 Interlocking the 2 tabs of the lamp cover to the projector position the lamp cover on the projector Then push the center point of two claws to fix the lamp cover 8 Slowly turn the projecto...

Страница 46: ... your dealer and tell the air filter type number NJ20642 An air filter of specified type will come even with the replacement lamp for this projector 7 Position the cleaned air filter or a new air filter into place and push the points of PUSH word with claws to fix the air filter 8 Replace the filter cover and snap it back into place 9 Slowly turn the projector so that the top is facing up 10 Turn the proj...

Страница 47: ...hard objects Inside of the projector In order to ensure the safe use of your projector please have it cleaned and inspected by your dealer about once every year Caring for the lens If the lens is flawed soiled or fogged it could cause deterioration of display quality Please take care of the lens being cautious of the handling 1 Turn the projector off and unplug the power cord Allow the projector to...

Страница 48: ...L TURN OFF AFTER hr The time the lamp timer has counted is approaching 2000 hours so a lamp change within hours is recommended When lamp usage reaches 2000 hours the power will automatically be turned off Please change the lamp by referring to the section Lamp After you have changed the lamp please be sure to reset the lamp timer 39 CHANGE THE LAMP AFTER REPLACING LAMP RESET THE LAMP TIMER THE POW...

Страница 49: ... THE FILTER TIMER A note of precaution when cleaning the air filter Please immediately turn the power OFF and clean or change the air filter by referring to the Air Filter section of this manual After you have cleaned or changed the air filter please be sure to reset the filter timer 39 NOTE A lamp has a finite product life Lamps are characterized by the fact that after long hours of usage a lamp will ...

Страница 50: ...ntil the POWER indicator finishes blink and then perform the proper response measure using the item descriptions below as reference Blinking In Red or Lighting In Red Lighting In Red Turned off The lamp does not light and there is a possibility that interior portion has become heated Please turn the power off and allow the unit to cool down at least 20 minutes After the projector has sufficiently co...

Страница 51: ...air filter dirty Does the peripheral temperature exceed 35 C If the same indication is displayed after the treatment please set the HIGH at the FAN SPEED of the item SERVICE of the OPTION menu Lighting In Green Alternative blinking in Red There is a possibility that the interior portion has become overcooled Please use the unit within the usage temperature parameters 5 C to 35 C After the treatment...

Страница 52: ... FACTORY RESET function of SERVICE menu in the OPTION menu 39 to reset all settings to factory default Then if the problem is not removed after maintenance please contact your dealer or service company Phenomenon Cases not involving a machine defect Reference page Power does not come on The electrical power cord is not plugged in Correctly connect the power cord 13 The power switch is not set to t...

Страница 53: ...nd or COLOR SPACE settings using the menu functions 24 27 32 COLOR SPACE setting is not suitable Change the COLOR SPACE setting to AUTO RGB SMPTE240 REC709 or REC601 32 Pictures appear dark The brightness and or contrast are adjusted to an extremely low level Adjust the BRIGHT and or CONTRAST settings to a higher level using the menu function 24 26 The WHISPER function is working Select the NORMAL...

Страница 54: ... vertical Lens Zoom lens F 1 7 2 1 f 24 4 29 3 mm Lamp 230W UHB Speaker 3W x 4 Power Supply AC100 120V 4 0A AC220 240V 2 0A Power Consumption 370W Temperature range 5 35 C Operating Size 336 W x 95 H x 265 D mm Not including protruding parts Please refer to the following figure Weight mass 3 8 kg Ports Optional parts Lamp DT00691 Air filter NJ20642 Others Please consult your dealer DIGITAL RGB input...

Страница 55: ...55 Specifications Specifications continued 336mm 95mm 265mm 109mm ...

Отзывы: