background image

English

4

GENERAL OPERATIONAL PRECAUTIONS

WARNING!

 When using electric tools, basic safety

precautions should always be followed to reduce the risk
of fire, electric shock and personal injury, including the
following.
Read all these instructions before operating this product
and save these instructions.
For safe operations:

1.

Keep work area clean. Cluttered areas and benches
invite injuries.

2.

Consider work area environment. Do not expose
power tools to rain. Do not use power tools in
damp or wet locations. Keep work area well lit.
Do not use power tools where there is risk to
cause fire or explosion.

3.

Guard against electric shock. Avoid body contact
with earthed or grounded surfaces. (e.g. pipes,
radiators, ranges, refrigerators).

4.

Keep children away. Do not let visitors touch the
tool or extension cord. All visitors should be kept
away from work area.

5.

Store idle tools. When not in use, tools should
be stored in a dry, high or locked up place, out
of reach of children.

6.

Do not force the tool. It will do the job better and
safer at the rate for which it was intended.

7.

Use the right tool. Do not force small tools or
attachments to do the job of a heavy duty tool.
Do not use tools for purposes not intended; for
example, do not use circular saw to cut tree
limbs or logs.

8.

Dress properly. Do not wear loose clothing or
jewellery, they can be caught in moving parts.
Rubber gloves and non-skid footwear are
recommended when working outdoors. Wear
protecting hair covering to contain long hair.

9.

Use eye protection. Also use face or dust mask
if the cutting operation is dusty.

10.

Connect dust extraction equipment.
If devices are provided for the connection of dust
extraction and collection facilities ensure these are
connected and properly used.

11.

Do not abuse the cord. Never carry the tool by
the cord or yank it to disconnect it from the
receptacle. Keep the cord away from heat, oil and
sharp edges.

12.

Secure work. Use clamps or a vise to hold the
work. It is safer than using your hand and it frees
both hands to operate tool.

13.

Do not overreach. Keep proper footing and balance
at all times.

14.

Maintain tools with care. Keep cutting tools sharp
and clean for better and safer performance. Follow
instructions for lubrication and changing
accessories. Inspect tool cords periodically and if
damaged, have it repaired by authorized service
center. Inspect extension cords periodically and
replace, if damaged. Keep handles dry, clean, and
free from oil and grease.

15.

Disconnect tools. When not in use, before servicing,
and when changing accessories such as blades,
bits and cutters.

16.

Remove adjusting keys and wrenches. Form the
habit of checking to see that keys and adjusting
wrenches are removed from the tool before turning
it on.

17.

Avoid unintentional starting. Do not carry a
plugged-in tool with a finger on the switch. Ensure
switch is off when plugging in.

18.

Use outdoor extension leads. When tool is used
outdoors, use only extension cords intended for
outdoor use.

19.

Stay alert. Watch what you are doing. Use common
sense. Do not operate tool when you are tired.

20.

Check damaged parts. Before further use of the
tool, a guard or other part that is damaged should
be carefully checked to determine that it will
operate properly and perform its intended function.
Check for alignment of moving parts, free running
of moving parts, breakage of parts, mounting and
any other conditions that may affect its operation.
A guard or other part that is damaged should be
properly repaired or replaced by an authorized
service center unless otherwise indicated in this
handling instructions. Have defective switches
replaced by an authorized service center. Do not
use the tool if the switch does not turn it on and
off.

21.

Warning
The use of any accessory or attachment, other
than those recommended in this handling
instructions, may present a risk of personal injury.

22.

Have your tool repaired by a qualified person.
This electric tool is in accordance with the relevant
safety requirements. Repairs should only be carried
out by qualified persons using original spare parts.
Otherwise this may result in considerable danger
to the user.

PRECAUTIONS ON USING JIG SAW

This machine employs a high-power motor. If the machine
is used continuously at low speed, an extra load is applied
to the motor which can result in motor seizure. Always
operate the power tool so that the blade is not caught by
the material during operation. Always adjust the blade
speed to enable smooth cutting.

Содержание CJ 110VA

Страница 1: ...rima dell uso leggere attentamente e comprendere queste istruzioni Deze gebruiksaanwijzing s v p voor gebruik zorgvuldig doorlezen Leer cuidadosamente y comprender estas instrucciones antes del uso JIG SAW STICHSÄGE SCIE SAUTEUSE SEGHETTO ALTERNATIVO DECOUPEERZAAGMACHINE SIERRA CALADORA CJ 110VA Handling instructions Bedienungsanleitung Mode d emploi Istruzioni per l uso Gebruiksaanwijzing Instruc...

Страница 2: ...Block A 4 Switch 5 Wiring Block B Ass y 6 Internal Wire 7 Connector 50096 8 Cord Clip 9 Tapping Screw W Flange D4 16 10 Cord Armor 11 Tail Cover 12 Tapping Screw W Flange D4 12 13 Tapping SCrew W Flange D4 16 14 HITACHI Label 15 Cord 16 Tapping Screw D4 30 17 Gear Cover 18 Hex Socket Hd Bolt W Flange M4 6 19 Ball Bearing 608DDW 20 Armature 21 Fan Guide Ass y 22 Rubber Bushing 23 Stator 24 Ball Bea...

Страница 3: ...1 3 1 4 5 6 7 8 1 2 3 4 8 9 7 A C D L K J I 2 B E F E G H E ...

Страница 4: ...2 9 10 11 12 13 14 15 L M N O J P T S F E U 7mm 14mm 46 R Q D 6 6 5 16 D ...

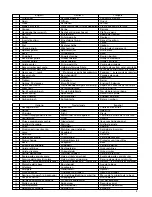
Страница 5: ...lborstel No del escobilla S Molla a spirale Spiraalveer Resorte espiral T Porfa spazzola Borstelhouder Sujetador de carbón U Spazzola di carbone Koolborstel Escobilla English Deutsch Français 1 Chip cover Schnipseldeckel Couvercle d éclats 2 Open Öffnen Ouvrir 3 Close Schließen Fermer 4 Blade set screw Klemmschraube für das Sägeblatt Vis de fixation de la lame 5 Groove Kerbe Rainure 6 Hexagonal ba...

Страница 6: ...ting tools sharp and clean for better and safer performance Follow instructions for lubrication and changing accessories Inspect tool cords periodically and if damaged have it repaired by authorized service center Inspect extension cords periodically and replace if damaged Keep handles dry clean and free from oil and grease 15 Disconnect tools When not in use before servicing and when changing acc...

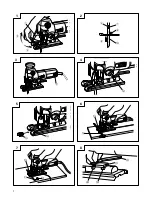
Страница 7: ...sure that the mounting portion of the set ring is clean and claer of sawdust to ensure proper blade mounting and set screw clamping 5 Adjusting the blade operating speed The CJ110VA is equipped with the electric control circuit which enables stepless speed control To adjust the speed turn the dial shown in Fig 3 When the dial is set to 1 the jig saw operates at the minimum speed 700 min When the d...

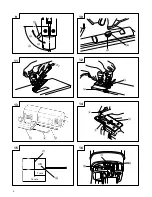
Страница 8: ...tighten Figs 8 9 10 12 CONCERNING CUTTING OF STAINLESS STEEL PLATES CAUTION While sawing the base must be firmly in contact with the workpiece surface and the blade must be held at a right angle If the base becomes separated from the material it could cause the blade to break When cutting stainless steel plates adjust the unit as described below 1 Adjust the speed NOTE Dial scale reading is for re...

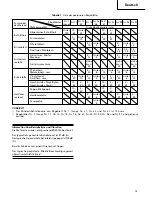
Страница 9: ...ce of the motor The motor unit winding is the very heart of the power tool Exercise due care to ensure the winding does not become damaged and or wet with oil or water NOTE 䡬 The minimum cutting radius of No 1 Long No 21 No 22 and No 41 blades is 100 mm 䡬 No 1 Long No 11 No 12 No 15 No 16 No 21 No 22 No 95 No 96 and No 97 blades are sold separately Table 1 List of appropriate blades Material Blade...

Страница 10: ...he terminal marked with the letter N or coloured black The wire coloured brown must be connected to the terminal marked with the letter L or coloured red Neither core must be connected to the earth terminal NOTE This requirement is provided according to BRITISH STANDARD 2769 1984 Therefore the letter code and colour code may not be applicable to other markets except The United Kingdom Information ...

Страница 11: ...Arbeitsplatz gut absichern Zwingen oder einen Schraubstock zur Befestigung des Werkstücks verwenden Das ist sicherer als die Benutzung der Hände und macht beide Hände zur Bedienung des Werkzeugs frei 13 Sich niemals weit überbeugen Immer einen festen Stand und ein sicheres Gleichgewicht bewahren 14 Die Werkzeuge sollten sorgfältig behandelt werden Für einen einwandfreien und sicheren Betrieb sollt...

Страница 12: ...emmschrauben des Sägeblattes am Einstellring gelockert wie in Abb 2 dargestellt 3 Das Anbaustück des Blattes vollkommen in den Einstellring mit der Hinterseite des Blates in Schlitz eingreifend einsetzen und die Klemmschraube anziehen Abb 2 4 Den Schnipseldeckel schließen Abb 1 HINWEISE Lose Klemmschrauben können zur Beschädigung des Sägeblattes führen Es ist immer derauf zu achten daß der Anbaute...

Страница 13: ...ie Mittenführung Sonderzubehör äußerst nützlich Abb 7 Den Basishandgriff der sich direkt unterhalb des Gehäuses befindet durch Drehung um etwa 90 Grad lösen Dann die Basis völlig nach vorn bewegen den Basishandgriff um etwa 90 Grad gegen den Uhrzeigersinn drehen die Basis direkt unter das Gehäuse zurückbringen und anziehen Abb 8 9 Die Kreisschnittführung durch das Befestigungsloch stecken und die ...

Страница 14: ... Verbrauchsteile sind Wenn sie abgenützt sind kann es zu Motorschäden führen Wenn der Motor mit einer Auto Stop Kohlebürste ausgestattet ist wird er automatisch anhalten Beide Kohlebürsten sollen dann durch neue ersetzt werden die dieselbe Bürstennummer tragen wie auf der Abbildung Darüber hinaus müssen die Kohlebürsten immer sauber gehalten werden und müssen sich in der Bürstenhalterung frei bewe...

Страница 15: ...Nr 16 Nr 21 Nr 22 Nr 95 Nr 96 Nr 97 des Material Lang 42 46 41 Materialqualität Dicke des Materials mm Schnittholz Allgemeines Schnittholz Unter 10 Unter 10 5 100 60 20 60 40 Furnierplaten 5 Unter 5 3 30 10 30 20 Einsenblech Flßstahlblech 3 Unter 3 Unter 2 10 3 6 3 5 Rostfreies Stahlblech 1 5 0 5 1 5 2 5 1 5 2 5 Nichteisen Aluminium Kupfer 3 Unter 3 Unter Unter metalle Messing 12 3 12 3 5 Hohe Hoh...

Страница 16: ...er Utiliser des agrafes ou un étau pour la maintenir C est plus sûr que d utiliser ses mains et cela les libêre pour faire fonctionner l outil 13 Ne pas présumer de ses forces Essayer de garder son équilibre en toute circonstance 14 Entretenir les outils avec soin Les conserver bien aiguisés et les nettoyer afin d en obtenir les meilleures performances et de pouvoir les utiliser sans danger Suivre...

Страница 17: ...ance est en position ARRET Si la fiche est branchée alors que l interrupteur est sur MARCHE l outil démarre immédiatement et peut provoquer un grave accident 3 Fil de rallonge Lorsque la zone de travail est éloignée de la source de puissance utiliser un fil de rallonge d une épaisseur suffisante et d une capacité nominale suffisante Le fil de rallonge doit être aussi court que possible 4 Montage d...

Страница 18: ...endu séparément sont très utiles Fig 7 Desserrer la poignée du socle qui se trouve directement sous le boîtier en la tournant d environ 90 degrés Puis déplacer le socle à fond vers l arrière tourner la poignée du socle d environ 90 degrés vers la gauche ramener le socle directement en dessous du boîtier et serrer Fig 8 9 Faire passer le guide de cercle par l orifice de fixation sur la base et serr...

Страница 19: ...n mauvais fonctionnement du moteur Quand le moteur est équipé d un balai en carbone à arrêt automatique il s arrêtera automatiquement Remplacez alors les balais en carbone par des nouveaux et ayant les mêmes numéros que ceux montré sur la fugure En outre toujours tenir les balais propres et veiller à ce qu ils coulissent librement dans les supports 4 Remplacement d un balai en carbone Fig 16 Démon...

Страница 20: ...r Long 42 46 41 Qualité du matériau Epaisseur du matériau mm Bois de Bois de charpente géneral Moins 10 Moins 10 5 charpente 100 60 20 60 40 Contreplaqué 5 Moins 5 3 30 10 30 20 Plaque Plaque en acier douz 3 Moins 3 Moins 2 en fer 10 3 6 3 5 Plaque en acier inoxydable 1 5 0 5 1 5 2 5 1 5 2 5 Métal Auminium cuivre lation 3 Moins 3 Moins Moins nonferreux 12 3 12 3 5 Chassis en aluminium Hauteur Haut...

Страница 21: ...getti taglienti 12 Lavorare su oggetti fermi Fissare saldamente l oggetto in una morsa Èpiù sicuro che non tenendolo fermo con le mani che restano libere per maneggiare l elettroutensile 13 Non squilibrare il corpo durante l esecuzione di un lavoro Stare sempre su due piedi in equilibrio stabile 14 Trattare gli utensili elettrici con cura Tenerli sempre puliti ed affilati per un funzionamento migl...

Страница 22: ...e specificate nella piastrina dell apparecchio 2 Interruttore di corrente Mettere l interruttore in posizione SPENTO Se la spina è infilata in una presa mentre l interruttore è acceso l utensile elettrico si mette immediatamente in moto facilitando il verficarsi di incidenti gravi 3 Prolunga del cavo Quando l ambiente di lavoro è lontano da una presa di corrente usare una prolunga del cavo di suff...

Страница 23: ... la rottura della lama 3 Taglio a cerchio o ad arco di cerchio In questo caso è utile usare la guida circolare ausiliaria e la guida di centraggio venduta separatamente Fig 7 Allentare la maniglia della base situata direttamente sotto l alloggiamento facendola ruotare di circa 90 gradi Quindi spostare la base completamente in avanti girare la maniglia della basse di circa 90 gradi in senso antiora...

Страница 24: ...è consumata o vicina al limite d usura il motore potrebbe subire dei danni Usando spazzole di carbone con arresto automatico il motore si ferma automaticamente quando queste sono consumate In tal caso bisogna sostituirle con delle nuove dello stesso numero come indicato nella figura Tenere inoltre sempre pulite le spazzole e fare in modo che queste scorrino liberamente all interno del portaspazzol...

Страница 25: ...da tagliare Lungo 42 46 41 Qualitá del materiale Spessore del materiale mm Legno Legno comune Meno 10 Meno 10 5 di 100 60 di 20 60 40 Compensato 5 Meno 5 3 30 di 10 30 20 Lamiera Lamiera di acciaio tenero 3 Meno 3 Meno 2 di ferro 10 di 3 6 di 3 5 Lastra di acciaio inossidabile 1 5 0 5 1 5 2 5 1 5 2 5 Metalli non Aluminio rame otton 3 Meno 3 Meno Meno ferrosi 12 di 3 12 di 3 di 5 Altezza Altezza Al...

Страница 26: ...heid in acht Gebruik klemmen of een bankschroef om het werkstuk vast te zetten Hierdoor heeft u uw handen vrij om het gereedschap te bedienen 13 Buig u nooit te ver naar voren Kies een goede plaats en behoud altijd uw evenwicht 14 Behandel het gereedschap voorzichtig Zorg ervoor dat het gereedschap scherp en schoon is zodat een goed en veilig prestatievermogen wordt verkregen Volg de gebruiksaanwi...

Страница 27: ...reedschap onmiddellijk te draaien hetwelk ernstig gevaar betekent 3 Verlengsnoer Wanneer het werkterrein niet in de buurt van een stopcontact ligt dan moet men gebruik maken van een verlengsnoer dat voldoende dwarsprofiel en voldoende nominaal vermogen heeft Het verlengsnoer moet zo kort mogelijk gehouden worden 4 Het aanbrengen van het zaagblad 1 Open de zaagselafdekking Afb 1 2 Gebruik de inbuss...

Страница 28: ...aagblad kunnen leiden 3 Het zagen van cirkels of een cirkelboog Voor het zagen van een cirkel of cirkelsegment kunt u het best de bijbehorende cirkelgeleider en centreergeleider los verkrijgbaar begruiken Afb 7 Los de basishendel die direct onder de behuizing zit door ongeveer 90 graden te draaien Druk de basis vervolgens geheel naar voren draai de basishendel ongeveer 90 graden naar links en druk...

Страница 29: ...at tot aanzienlijke gevaren leiden 3 Inspectie van de koolborstels Afb 15 Bij de motor zijn koolborstels gebruikt die onderhevig zijn aan slijtage De motor kan beschadigd worden wanneer de koolborstels versleten zijn De motor stop automatisch wanneer deze voorzien is van auto stop koolborstels In dit geval dienen beide koolborstels vervangen te worden door nieuwe borstels van hetzelfde nummer zoal...

Страница 30: ... nr 21 nr 22 nr 95 nr 96 nr 97 materiaal Lang 42 46 41 Materiaalkaliteit Dikte van het materiaal mm Bestekhout Algemeen bestekhout Onder 10 Onder 10 5 100 60 20 60 40 Fineerplaten 5 Onder 5 3 30 10 30 20 Stalen Vloeistalen platen 3 Onder 3 Onder 2 platen 10 3 6 3 5 Roestvrije staalplaat 1 5 0 5 1 5 2 5 1 5 2 5 Metalen Aliminium koper messing 3 Onder 3 Onder Onder Non ferro 12 3 12 3 5 Aluminium ra...

Страница 31: ...a operar la herramienta 13 No extenderse excesivamente para efectuar un trabajo Mantener en todo momento un buen balance y base de apoyo 14 Mantener cuidadosamente las herramientas Tener las siempre limpias y afiladas para obtener un mejor rendimiento y un funcionamiento más seguro Seguir siempre las instrucciones para la lubricación y el cambio de accesorios Inspeccionar periódicamente los cables...

Страница 32: ...hufe mientras el conmutador de alimentación esté pocisión ON conectado las herramientas eléctricas empezarán a trabajar inmediatamente provocando un serio accidente 3 Cable de prolongación Cuando está alejada el área de trabajo de la red de alimentación usar un cable de prolongación de un grosor de potencia nominal y suficiente El cable de prolongación debe ser mantenido lo más corto posible 4 Mon...

Страница 33: ...atamente puede ocasionarse la rotura de la cuchilla 3 Cortar en circulo o un arco circular En este caso será muy útil emplear una guía circular auxiliar y una guía de centrado vendidas aparte Fig 7 Afloje el asa de la base situada directamente debajo de la caja girándola aproximadamente 90 grados y después mueva la ranura de la parte semicircular hasta la posición indicada por la marca de la cubie...

Страница 34: ...la escobilla de carbón de parada automática el motor se detendrá automáticamente en ese momento hay que proceder a cambiar ambas escobillas de carbón por la nuevas que tienen los mismos números de escobillas de carbón como se muestra en la figura Además siempre hay hay que mantener las escobillas de carbón limpias y asegurarse de que se muevan libremente en sus porta escobillas 4 Reemplazar el car...

Страница 35: ...lorulo de vinilo 5 Menos 5 Menos 5 3 5 Menos 5 resina acrílica etc 30 10 20 5 30 20 20 5 15 Polietileno espumoso 10 3 5 3 10 3 5 3 5 estirol espumoso 65 30 40 30 65 40 40 30 30 Pasta de Cartón cartón ondulado 10 3 10 3 papel 65 30 65 40 Fibra prensada dura 3 Menos 3 Menos 3 30 6 30 6 30 Fibra prensada Menos 6 NOTA 䡬 El radio mínimo de corte de las cuchillas No 1 Largo No 21 No 22 y No 41 es de 100...

Страница 36: ...34 ...

Страница 37: ...35 ...

Страница 38: ... aplica a los productos con marcas de la CE English EC DECLARATION OF CONFORMITY We declare under our sole responsibility that this product is in conformity with standards or standardized documents EN50144 HD400 EN55014 EN60555 and or EN50082 1 in accordance with Council Directives 73 23 EEC 89 392 EEC and or 89 336 EEC This declaration is applicable to the product affixed CE marking Deutsch ERKLÄ...

Отзывы: