background image


3-1 


English 

StarBoard FX-E90W 

Appendix

3.


Appendix 

3.1 Troubleshooting 

Before assuming the product is broken, be sure to check adjustments, proper handling 
procedures, the possibility of faulty cable connections, etc. 


Recognition-Related Problems 

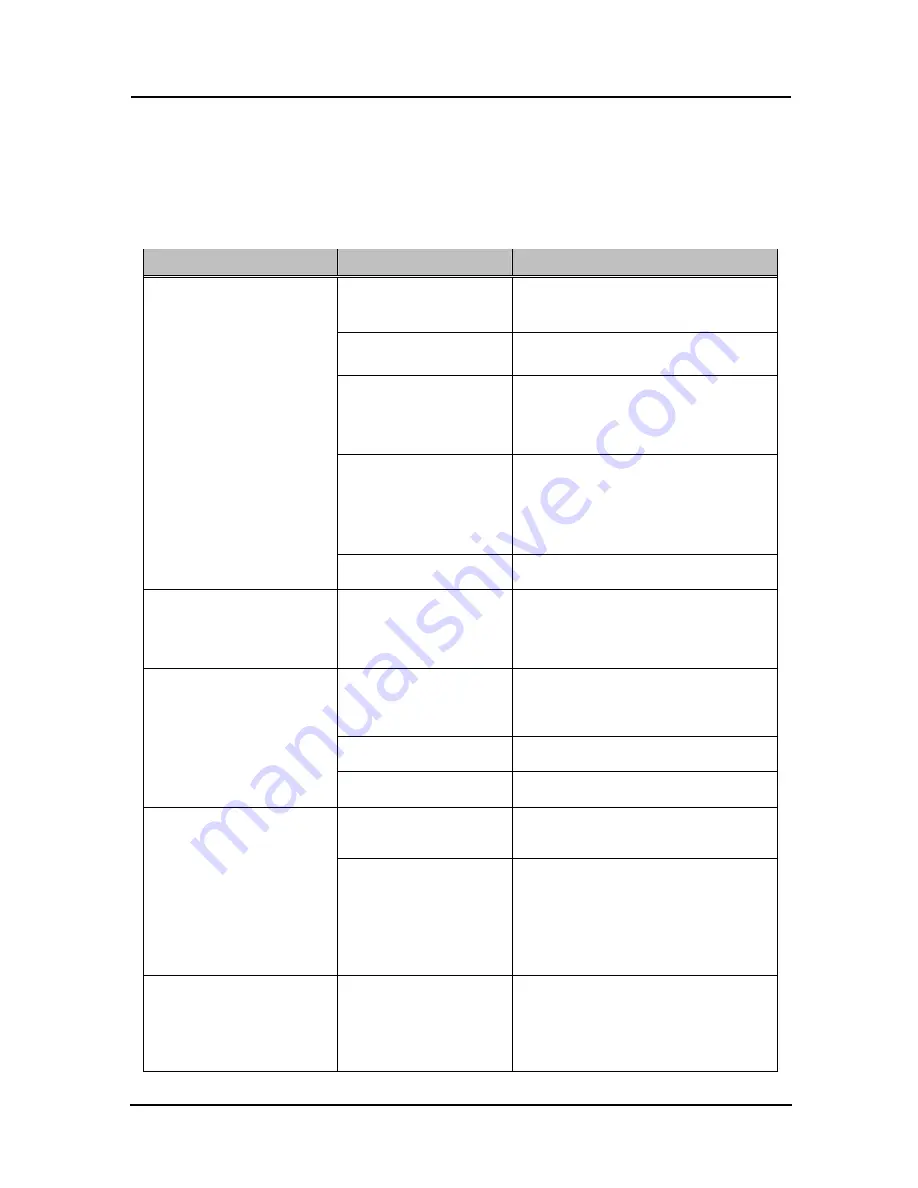
Problem 

What to check 

What to do 

Is the USB cable 

connected to the PC? 

Connect the USB cable to the PC. 

Is the status LED 
(page1-4) lit green? 

Check the USB cable connection. 

Did you start the system 
in the correct sequence? 

Start the system in the correct 
sequence. (For details on starting the 
system, see page 2-7 of this User's 
Guide.) 

StarBoard Software files 
may be broken or 
installation may not be 
complete correctly. 

Uninstall the StarBoard Software and 
then re-install it.   

For details on installing StarBoard 

Software, see the StarBoard Software 
x.x Installation Guide.) 

The StarBoard does not 

recognise input. 

Other than the above 

Contact a support center. 

The StarBoard does not 
recognise input. 

In case the driver could not 

be found.) 

“Optical Touch Sensor” 
exists on USB controller 
of the Device Manager. 

Update the driver software. 

Is something blocking 

light from reaching the 

board surface or reflective 

tape? 

Remove the blockage. 

Are the silver surfaces of 

the reflective frame dirty?

Use a soft brush to clean the silver surfaces 

of the reflective frame. 

Touch Sensor Error 
(Something is blocking light 
from reaching the board 
surface or reflective tape. Or 
sensor adjustment is not 
properly. StarBoard can not 
detect the input.) 

Other than the above 

Adjust the sensor. 

(See page 3-4 of this User's Guide.) 

The controller must be 

reset and the system 

restarted. 

Disconnect the USB cable and 

reconnect it. If this does not solve the 

problem, restart the PC. 

Touch Sensor Error 
(USB error) 


In case that USB cable 

extended as bellow, it 

may result in unstable of 

product working. 

USB extension cable 

Bus-powered USB hub

USB extender 

Quit the USB cable extend, plug USB 

cable to PC directly. If you need to 

extend USB cable, use self-powered 

USB hub. 

Touch Sensor Error 
(Insufficient  
USB bandwidth) 


Is a high-speed USB 

device connected to the 

USB host controller used 

to connect the StarBoard?

Be sure to connect the StarBoard and 

any high-speed USB devices to 

separate USB host controllers. 

Be sure to use a USB hub in the case of 

PCs with only one USB host controller. 

Содержание StarBoard FX-E90W

Страница 1: ...Guide FXEW ML110901 Read this User s Guide and carefully retain it for future reference Before using this product carefully read and fully understand the safety instructions Store this User s Guide nearby for ease of reference ...

Страница 2: ...ct as industrial waste according to all applicable laws and regulations Disclaimers Hitachi Solutions Ltd assumes no liability and makes no warranty either express or implicit regarding the contents of this User s Guide Also the company makes no warranty as to the product s suitability merchantability or fitness for a particular intended use All products of Hitachi Solutions Ltd described in this ...

Страница 3: ...EW ML110901 is for the following products AH00303 StarBoard FX E90W AH00180 Electronic Pen Windows is a trademark of Microsoft Corporation U S and in other countries Mac and Mac OS are trademarks of Apple Inc registered in the U S and other countries Other trademarks and product names are trademarks and or registered trademarks of their respective holders Manual Creation Dates September 2011 first...

Страница 4: ...nceforth referred to as StarBoard This User s Guide has been created for people who already have a working knowledge of personal computers henceforth referred to as PC Please make sure that you understand the contents of this User s Guide and use the software correctly We hope that you make the most of this product ...

Страница 5: ...is symbol will appear to raise the attention of the user to existing risks that may cause harm to people To avoid any chances of injuries or possibly death DO NOT IGNORE the safety instructions that follow this symbol WARNINGS This warning will appear where there exists a risk of death or fatal injuries CAUTIONS This warning will appear where there exists a risk of moderate or light injuries NOTIC...

Страница 6: ...derto prevent damage by static electricity toucha nearby metal object with yourhand to discharge any static electricity before touching this product Static electricity from your body may cause damage to this product NOTICE Make sure that the silversurfaces of the reflective frame does not become dirty orscratched Scratches or dirt on the silver surfaces of the Reflective Frame may prevent them fro...

Страница 7: ...without repair may result in emission of a strange odor or smoke 3 Precautions Regarding Handling WARNINGS Do not hang from or climb on this product Failure to comply may result in personal injury if the product falls collapses or breaks into pieces Be particularly careful in the case of small children Do not touch this product if you hear thunder Failure to comply may result in electric shock CAU...

Страница 8: ...e core electrical short or severing of the cable 4 Precautions Regarding Moving the Product CAUTIONS Always use two or more people to move this product This product is a very large and heavy precision instrument Always use two or more people and take great care when moving this product Result in the personal injury or breakdown if the product falls over NOTICE Always disconnect the USB cable from ...

Страница 9: ...alfunction Do not place in a location with flammable or corrosive gas Placing this product in a location where there is flammable or corrosive gas may result in fire or damage to this product There is a particular danger of explosion in the case of flammable gas Do not place in a location with flammable or corrosive gas CAUTIONS Do not touch internally mounted parts Directly toughing internally mo...

Страница 10: ...t in a location subject to vibration or shock of impact Do not set up this product near a high voltage line or power source If this product is set up near high voltage lines or power sources it might receive interference Do not set up in a location subject to direct sunlight or near a heater Failure to comply may result in deformation of or damage to this product 6 Precautions Regarding Disposal N...

Страница 11: ...using a wall mounting bracket capable of supporting a weight of at least 30 kg P 1 7 Cautions Contents Page s Be sure to use two or more people for this work Failure to comply may cause the board to fall resulting in personal injury or may cause damage to this product due to shock of impact P 1 8 Do not strike the board forcefully with the stylus pen bend it or apply an excessive load to it Failur...

Страница 12: ...mm When inputting to this product use a tool that is at least 7 mm If a pen or similar tool with a thickness of less than 7 mm is used the input will be unstable Also do not use tools with a sharp tip such as a ballpoint pen If such a tool is used incorrectly it could damage the surface of the board P 2 1 Using infrared and compact cameras this product captures the image shadow of a pen or finger ...

Страница 13: ...TRONIC PEN 2 4 2 2 1 Inserting the Battery 2 4 2 2 2 Using the Electronic Pen 2 5 2 2 3 Basic Operations of the Electronic Pen 2 6 2 2 4 Customizing the Electronic Pen 2 6 2 3 START METHOD 2 7 2 3 1 Start Method Windows version 2 7 2 3 2 Start Method Mac version 2 8 3 APPENDIX 3 1 3 1 TROUBLESHOOTING 3 1 3 2 ADJUSTING THE SENSOR 3 4 3 2 1 Items to Check Before Making Sensor Adjustments 3 4 3 2 2 S...

Страница 14: ... onto the board with a projector Two pen types are available the stylus pen that is included with the product and an electronic pen that is option When the term pen is used in this User s Guide it means electronic pen You can write directly onto the PC screen After installing the provided StarBoard Software onto a PC you can use your finger or the pen to write characters or images directly onto th...

Страница 15: ...re that all the following parts are present 1 2 1 StarBoard 1 Parts No Name Qty 1 StarBoard 1 2 Wall mounting bracket 1 3 Brush 1 4 Stylus pen 1 5 StarBoard Software DVD ROM 1 6 StarBoard Software Startup Guide 1 7 StarBoard FX E90W Startup guide 1 8 Warranty Sheet 1 2 1 3 4 5 6 7 8 ...

Страница 16: ...1 3 StarBoard FX E90W Introduction English 1 2 2 Electronic Pen option 1 Parts No Name Qty 1 Electronic pen 1 2 AAA alkaline battery 1 3 Spare pen tip 2 1 2 3 ...

Страница 17: ... sure that the image projected from the projector is kept within this area 5 USB Cable Used to connect the StarBoard with the PC 6 Reflective Frame Reflects light Used to capture pen or finger operations 7 Wall Fitting Attachment Used to fix the lower board on the wall Use 4 6mm diameter screws 8 Wall Fixing Hole Board has four holes to fix the four corners on the wall Use 3mm diameter screws 9 Pr...

Страница 18: ...mode or pen mode 1 Select Solid Pen black Select one time right click 1 2 Select Solid Pen red Hides displays the StarBoard Software Toolbar Select Solid Pen blue Adds a new blank page Select Solid Pen green Show previous page Select Fluorescent Marker Pen Show next page Select Eraser Hides displays the Topic List Customisable button 1 Calibration is set as the default Switch to PC Operation Custo...

Страница 19: ...wing in mind WARNINGS Install this product on a vertical and flat surface Do not install this product on a slanting surface ceiling or uneven wall Otherwise the equipment might fall possibly resulting in injury or the impact might cause product failure NOTICE Do not set it up near equipment that might generate electromagnetic waves or radio frequencies such as radio transmitters televisions copyin...

Страница 20: ... not suite the wall material may result in the board falling off the wall causing injuries or damage to the board Furthermore wall installation may not be possible depending on the wall For details consult with your dealer Keep the wall strength in mind when installing Only use this product after confirming that it is securely attached and will not fall Furthermore be sure to install using a wall ...

Страница 21: ...ting bracket should be located the center of the board CAUTION Be sure to use two or more people for this work Failure to comply may cause the board to fall resulting in personal injury or may cause damage to this product due to shock of impact Back side of Board Wall mounting bracket Wall mounting bracket Hook part Hook part Around the center 1158mm 1158mm ...

Страница 22: ...r corners of board and fitting metal of center of lower board on a wall with screws Important Be sure to hung the board as digitiser storage area should be located left side It may result in malfunction Use 3mm diameter screws Use 4 6mm diameter screws Digitiser Storage Area ...

Страница 23: ... port on the PC 4 Connect the power supply cables of the PC and projector to the power supply Depending on your PC an incorrect operation might be caused by PC noise via the USB cable If this happens verify that the earth of your PC s power supply cable is connected If the earth is not connected it might cause an incorrect operation About PC Earth Install the StarBoard Software on your PC before s...

Страница 24: ...w touches the board or you are within 1 cm of the board it might cause an incorrect operation NOTICE Do not scrape or strike the board surface by stylus pen Failure to comply may result in damage on the board surface Use an input tool with a thickness of least 7 mm When inputting to this product use a tool that is at least 7 mm If a pen or similar tool with a thickness of less than 7 mm is used th...

Страница 25: ...stylus pen if you touch the board with anything other than your finger or you are too close to the board it might cause an incorrect operation 2 1 2 PC Operations When performing PC operations by pointing or giving presentations without inputting characters it is convenient to extend the stylus pen and use it as a pointer ...

Страница 26: ...orcefully with the stylus pen bend it or apply an excessive load to it Failure to comply may result in damage to the stylus pen or personal injury Important Do not place the stylus pen onto the Reflective Frame Doing so may cause a sensor error or mistaken detection to occur ...

Страница 27: ...oing so may damage it CAUTION Be sure to install batteries correctly Do not install batteries with positive and negative terminals reversed or use batteries other than the type specified It will cause pen malfunctions and excess heat or burns to the hand Be sure to provide insulation during disposal Be sure to insulate the positive and negative terminals of the battery using cellophane tape or sim...

Страница 28: ...into the electronic pen 2 A miniature transmitter is embedded in the tip of the electronic pen If you hold the transmitter area of the electronic pen while drawing characters or images the drawing data from the electronic pen might not be transmitted correctly If the characters or images drawn on the whiteboard are not imported correctly into the PC change your grip on the electronic pen and then ...

Страница 29: ... the board two times in the same spot Drag Drag Push the pen tip onto the board with sufficient force and without releasing it away from the board move it from one point to another 2 2 4 Customizing the Electronic Pen The electronic pen has one pen tip button and three side buttons Mouse actions can be assigned to these four buttons The default button settings are shown in the following table Func...

Страница 30: ...he desktop If the No connection icon in below appears on the Tasktray it means that the StarBoard is not connected Make sure that the StarBoard and the PC are properly connected Connected No Connection If the StarBoard is properly connected the icon changes to Connected as above If the icon does not change despite correcting the connection there may be some other problem For details refer to 3 App...

Страница 31: ...Board Software 6 Select MENU on the StarBoard Software toolbar Settings StarBoard Check Connection and then check the connection If the StarBoard is not connected message appears StarBoard Software has not detected the StarBoard Check whether the StarBoard and PC are connected properly Connected No Connection If they are connected properly the StarBoard is connected message appears If the indicati...

Страница 32: ...ursor are out of alignment select MENU on the StarBoard Software toolbar Settings StarBoard Calibrate and then perform position alignment Important Conduct sensor adjustments upon first time operations and whenever the board has been moved Not doing so may cause operation errors ...

Страница 33: ... Update the driver software Is something blocking light from reaching the board surface or reflective tape Remove the blockage Are the silver surfaces of the reflective frame dirty Use a soft brush to clean the silver surfaces of the reflective frame Touch Sensor Error Something is blocking light from reaching the board surface or reflective tape Or sensor adjustment is not properly StarBoard can ...

Страница 34: ...n cannot be aligned properly Other than the above Contact a support center This may be due to faulty contact of electronic pen batteries Remove the batteries from the electronic pen and re install them Are batteries used up Replace the batteries For details on battery replacement see page 2 4 of this User s Guide StarBoard Software files may be broken or installation may not be complete correctly ...

Страница 35: ...ser s Guide StarBoard Software files may be broken or installation may not be complete correctly Uninstall the StarBoard Software and then re install it For details on installing StarBoard Software see the StarBoard Software x x Installation Guide Restart Windows Mac OS or StarBoard Software Electronic pen operation is unstable or stops Other than the above Check if the same problem arises when us...

Страница 36: ...Adjust Camera button on the LSaDrv Touch Sensor Error dialog box displayed on the PC screen This folder path may be changed since it depends on your Windows installation NOTICE Using infrared and compact cameras this product captures the image shadow of a pen or finger and detects the corresponding coordinate position Do not operate near lighting that will obstruct the capture of the image Locatio...

Страница 37: ...sh StarBoard FX E90W Appendix 2 Camera Adjustment Wizard Start window appears Press All Adjust 3 Press Finish This completes sensor adjustment After making adjustments check that input can be performed normally ...

Страница 38: ...edure Mac version 1 Press the OK button on the LSaDrv Touch Sensor Error dialog box displayed on the Mac screen 2 Start the sensor adjustment wizard Start Go Applications StarBoard Lsadrv folder LsCamWiz 3 The sensor adjustment wizard starts Click the All adjust button ...

Страница 39: ...orm adjustment again while referring to Section 3 2 1 If adjustment is still not successful the StarBoard unit may be defective 5 If adjustment was successful click the Exit button Note that just clicking the button does not complete the adjustment process 6 To save the adjustment result click the Yes button This completes sensor adjustment After making adjustments check that input can be performe...

Страница 40: ... Settings StarBoard StarBoard Settings and press 1 Sensor adjustment in the StarBoard toolbar Change of auto execute interval of the sensor adjustment For the auto execute interval of the sensor adjustment select from 0 to 30 by 2 button If you select 0 auto execute is disable NOTICE Using infrared and compact cameras this product captures the image shadow of a pen or finger and detects the corres...

Страница 41: ...ollowing window will be displayed when sensor auto adjustment finished Press OK This is all of auto sensor adjustment Confirm the normal input after adjustment In case of adjustment error following window will be displayed Press Retry to auto sensor adjustment program execute again If this message displayed again StarBoard may have some problem Please Contact our support ...

Страница 42: ...ife Approx 80 hours of continuous use 3 alkaline battery Size 149 mm φ17 mm Weight Approx 20 g not including batteries Standards etc VCCI Class A FCC Class B CE 1 Using infrared and compact cameras this product captures the image shadow of a pen or finger and detects the corresponding coordinate position Do not operate near lighting that will obstruct the capture of the image This includes Locatio...

Страница 43: ...brush to clean the silver surfaces of the reflective frame Do not use water or liquids Note that rubbing or striking the silver surfaces of the reflective frame with nails or hard objects may result in scratching The product may not work correctly if scratched 3 Cleaning the electronic pen To clean the electronic pen use a diluted neutral cleansing agent that does not contain a polishing compound ...

Страница 44: ...ear or physical damage Not covered by warranty 3 Please refer to the warranty sheet for this product s warranty service period 4 Even during the warranty period there will be a repair charge in the following cases 1 If the registration card accompanying the warranty is not returned to our company 2 If the warranty is not presented 3 If specified fields on the registration card accompanying the war...

Страница 45: ...ion number it might not be covered by warranty 6 As a rule the customer is responsible for shipping charges required to send all or part of the product for repair etc Our company will assume responsibility for the return shipping to the customer 7 This warranty does not cover labour fees for repair associated equipment assembly or disassembly 8 Incidental damage caused by the failure of this produ...

Отзывы: